Obeo AI for Capella - Desktop Client Quick Start
This guide configures Obeo AI for Capella with an MCP-compatible desktop LLM client on the same computer, using a local STDIO connection.
1. Prerequisites
You need:
-
Capella 7.1.0 (target version); installation also supports 7.0.1 and 6.1.0;
-
the Obeo AI for Capella package provided by Obeo;
-
a desktop client supporting local MCP servers over STDIO, such as ChatGPT desktop.
Standard Capella 7.1.0 includes Java 21, which the MCP launcher uses automatically. If you use another version or distribution, such as Capella 7.0.1, Capella 6.1.0 or SMW without Java 21, follow Java setup.
2. Install Obeo AI for Capella in Capella
Extract the package so that capella, tools, and updateSite are in the same parent folder:
<installation-folder-absolute-path>/
  capella/
  tools/
  updateSite/
If your macOS installation is a Capella.app application, right-click it in Finder and select Show Package Contents. Place tools and updateSite inside Capella.app/Contents, alongside MacOS. In the paths below, use the full path to Capella.app/Contents as <installation-folder-absolute-path>. See the installation guide for the complete layout.
Windows
-
Open the Start menu, type
cmd, and open Command Prompt (Invite de commandes on French Windows). -
Drag
install_automation_server_in_capella.batfrom your installation’stoolsfolder into the command window. -
Press Enter to run the installer. The window stays open so you can check its messages and any errors.
Linux or macOS
On macOS, open Terminal; on Linux, open a terminal. Type bash followed by a space, drag the installer .sh file from your installation’s tools folder into the terminal, and press Enter. If your terminal does not support dragging files, run:
bash "<installation-folder-absolute-path>/tools/install_automation_server_in_capella.sh"Replace <installation-folder-absolute-path> with the absolute path to your installation.
3. Request and install your license
Complete the installation first, then start Capella. Your personalized license must cover the installed Obeo AI for Capella version. If you already have a license for this version, skip the request and install it below; otherwise request a license and include your product version in the registration email.
To request a license, select Help > Register Obeo AI for Capella. Send the registration information to registration@obeo.fr to obtain your personalized license archive.
To install the license supplied by Obeo:
-
In Capella, select Help > Install New Software.
-
Select Add > Archive and choose the personalized license archive.
-
Select the license feature, complete installation, and restart when prompted.
Setup on the Capella side is now complete. Next, configure your LLM desktop client.
4. Configure your LLM desktop client
Each desktop LLM client has its own menus. The following example uses ChatGPT desktop; menu labels may vary with the application version.
-
Open ChatGPT desktop and use the account menu to open Settings (marker 1 in the screenshot).
-
Select Plugins (2), then the MCPs tab (3).
-
Select Add (4), then Add MCP server (5).
-
In the configuration form (6), enter Capella MCP Server as the name (7) and select STDIO as the type (8).
-
Set Command to launch (9) to the absolute launcher path shown below. Leave Arguments empty.
-
Select Save (10), then ensure the server is enabled in the server list.
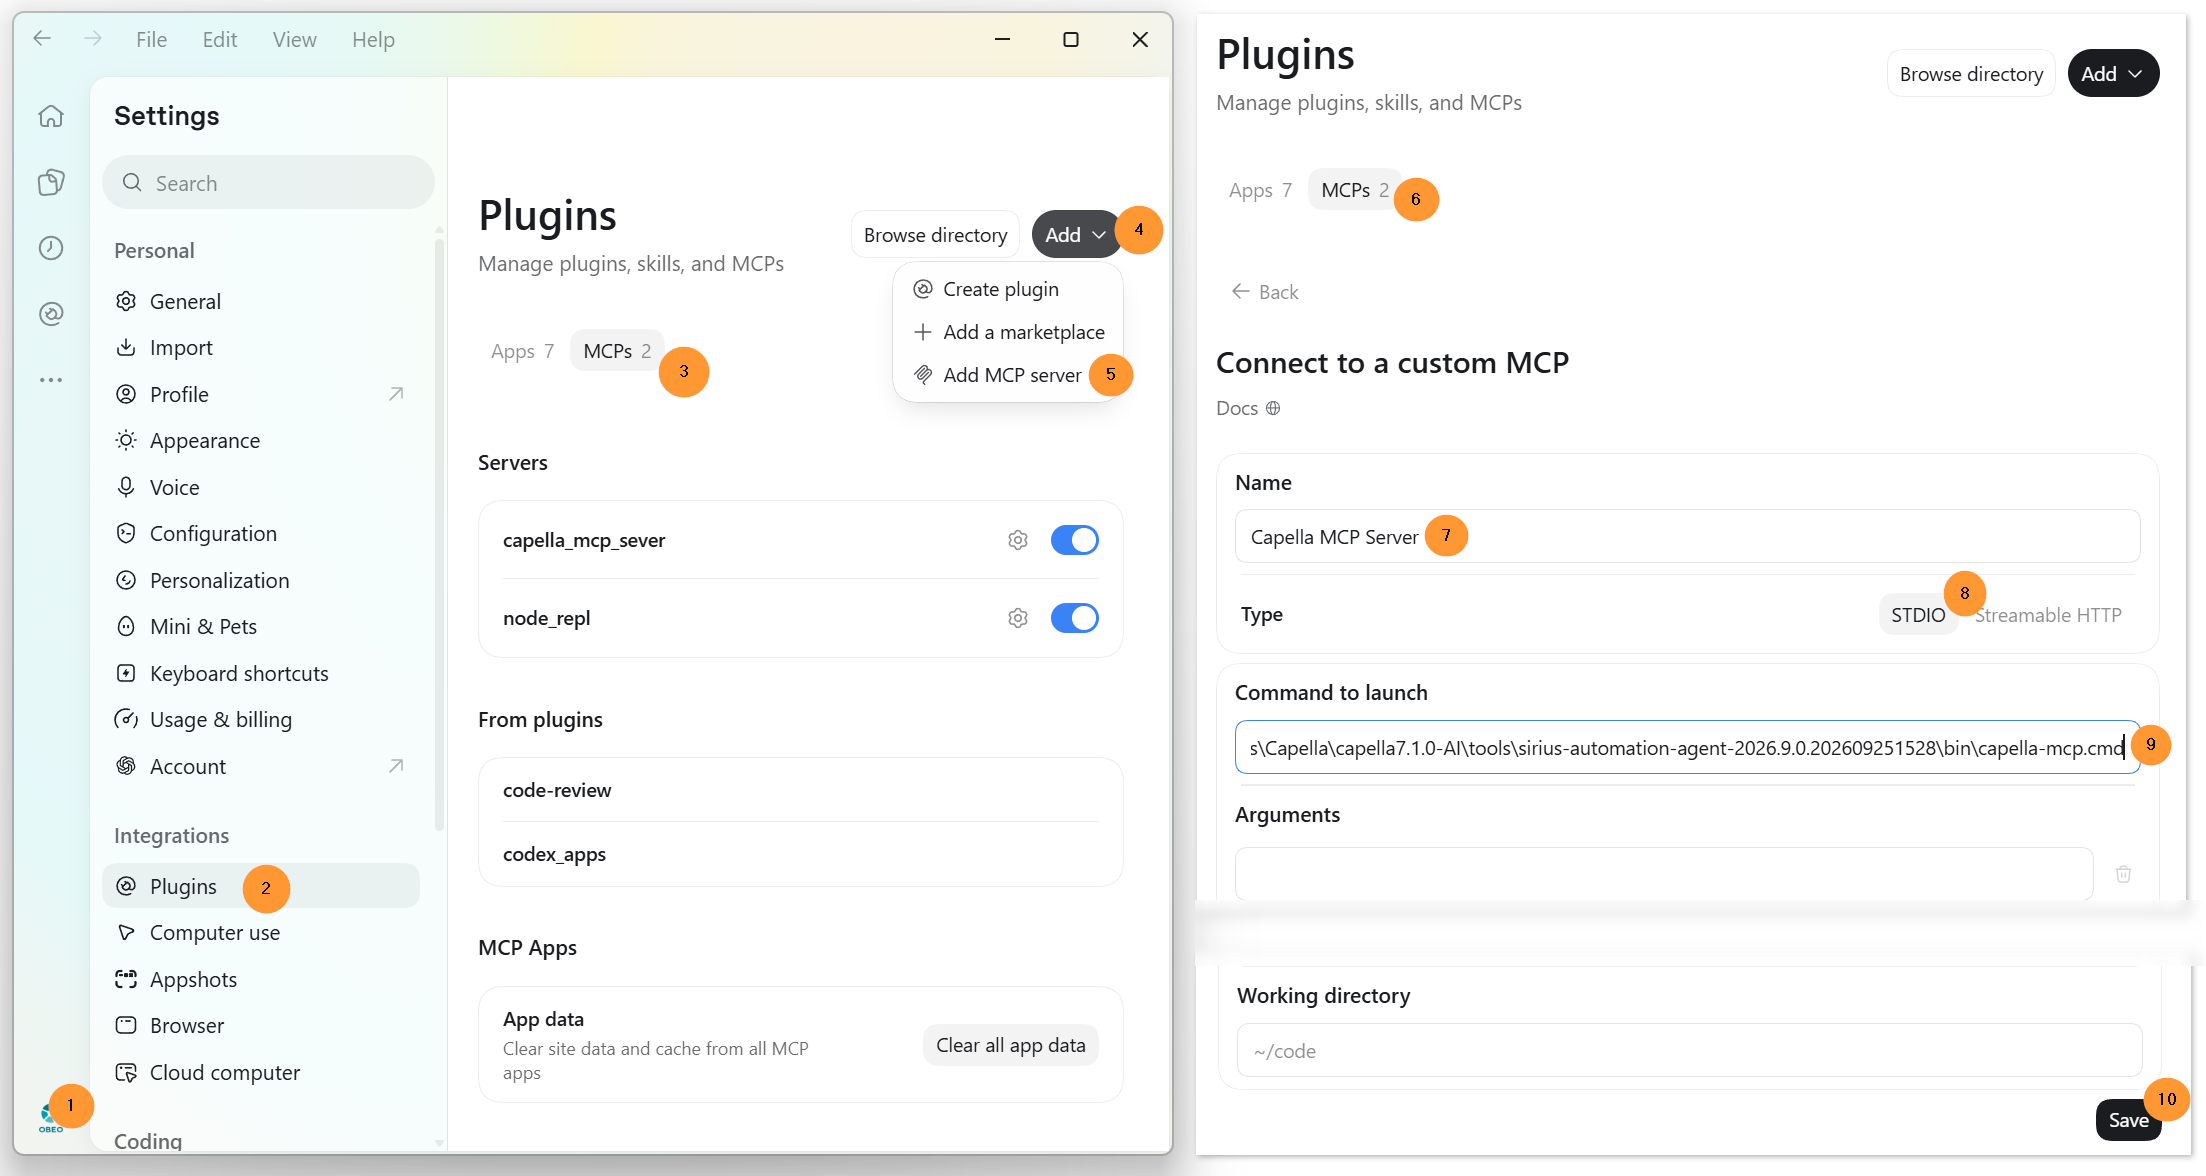
Use these settings:
| Setting | Value |
|---|---|
Name |
|
Transport / Type |
|
Command |
The absolute path to the |
Arguments |
Leave empty |
<installation-folder-absolute-path>\tools\sirius-automation-agent-<version>\bin\capella-mcp.cmd<installation-folder-absolute-path>/tools/sirius-automation-agent-<version>/bin/capella-mcpReplace the example installation path with your own absolute path and <version> with the version of the extracted agent folder. If Capella is installed as Capella.app on macOS, use the full path to Capella.app/Contents as the installation path.
Fully close ChatGPT desktop, including any background instance, then restart it to load the saved configuration.
For other clients and connection methods, see the LLM client configuration guide in the installation guide.
5. Verify the installation
Start Capella, then open a chat in your LLM desktop client.
|
Watch for confirmation requests in both Capella and your LLM client. Approve the local automation connection in Capella when prompted; its dialog may be hidden behind another window. Answer any confirmation requests from the LLM client to continue. |
Check 1: prepare the Capella resources and find the MCP server. Send:
We will work on Capella models. Load the Capella MCP resources needed to interact with Capella, and list the available MCP servers.
Check that your configured Capella MCP Server appears in the returned list. The client may display its name as capella_mcp_server.
Check 2: connect to Capella. Send:
Connect to the running Capella instance and list its projects.
Check that the assistant lists your workspace projects; an empty list is valid for an empty workspace. If the Capella guidance was not loaded, follow If Guidance Was Not Loaded, then retry.
You are now ready to use Obeo AI for Capella. Continue with Working with Capella to request model changes and review the results.
If either check fails, see Troubleshooting below.
6. Troubleshooting
If the connection fails, check that:
-
the configured launcher path is absolute and points to the correct
capella-mcpexecutable; use backslashes on Windows and forward slashes on Linux/macOS, and omit surrounding quotes in ChatGPT’s Command to launch field; -
the launcher uses Java 21; see Check Java 21 setup;
-
Capella is running;
-
your personalized license is installed, valid and covers the installed Obeo AI for Capella version;
-
you accepted the local automation connection prompt in Capella and answered any confirmation requests in your LLM client;
-
you fully closed and restarted the LLM desktop client after changing its MCP settings or launcher path.
To check installed features, open Help > About Capella > Installation Details > Installed Software and locate Obeo AI for Capella and your personalized license. The connection check above verifies that a license is available for the running product. If it reports an unavailable license, send the installed product version and the error message to registration@obeo.fr.
For Windows installation errors, run the .bat from Command Prompt (cmd) as shown in the installation steps to keep the messages visible.
For further help, see the installation guide’s troubleshooting section.