Administrator Manual
In this document, you will discover how to manage a Server supporting Collaborative Modeling features.
Once the server is started and correctly configured, please refer to the Collaborative Modeling – User Manual to discover how to collaborate in real-time through Shared Modeling Projects.
1. Starting a Collaborative Server
The starting point of Collaboration is the setting-up of a Collaborative server.
1.1. Using the Obeo Designer Team Server
The Obeo Designer Team Server is a ready-to-use Collaborative server, optimized for Sirius Collaborative features and customizable, according to your specific needs.
We strongly advise you to read the Obeo Designer Team Server User Guide to get started, although the other methods described below are valid alternatives.
1.2. Using default Server configurations
Obeo Designer Team Edition provides four default launch configurations allowing to set-up four default servers. To load these default configurations, import the Collaborative Server examples by selecting File > New > Example… > Obeo Designer > Collaborative Server examples
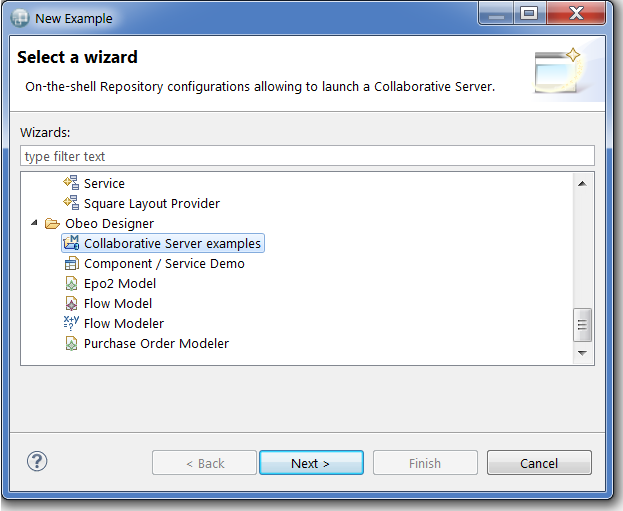
After having imported the example project, you should be able to launch three different servers (from Run > Run Configurations… > Eclipse Application). The following table presents the differences between each default Server configuration:
| Server configuration name | Collaborative server – Default | Collaborative server – Authenticated | Collaborative server – User profile | Collaborative server – Memory |
|---|---|---|---|---|
Basic Server description |
Informations are stored in an H2 database. |
Forbids access to non-authenticated users. Informations are stored in an H2 database. |
Forbids access to non-authenticated users, and support user-specific permissions. Informations are stored in an H2 database. |
Informations are stored in memory (no data persistence). |
Persists all informations inside a database |
✓ |
✓ |
✓ |
✗ |
When stopped and relaunched, retrieve the previous elements state |
✓ |
✓ |
✓ |
✗ |
Allows anonymous log-in |
✓ |
✗ |
✗ |
✓ |
Supports authentication |
✗ |
✓ |
✓ |
✗ |
Supports user-specific permissions |
✗ |
✗ |
✓ |
✗ |
Supports branching |
✗ |
✗ |
✗ |
✓ |
Supports auditing |
✗ |
✗ |
✗ |
✓ |
Set-up instructions |
Launch the |
✓ Install the additional server features ✓ Launch the More about the configuration |
✓ Install the additional server features ✓ Launch the More about the configuration |
Launch the |
How can I check that my server is started? |
✓ For performance considerations, server logging is deactivated. Open the debug view ( ✓ Check that the |
|||
Tear-down instructions |
✓ Open the debug view ( ✓ Select the ✓ Right-click and select |
|||
1.2.1. Install additional server features
This step is only required when launching the server samples from Obeo Designer Team Edition. On Obeo Designer Team Server everything is already installed, and this step can be ignored.
To be able to launch a server with authentication or user profiles server, a couple of features that are not pre-installed in the Obeo Designer Team Edition are required. To install these additional features, follow the following steps:
-
Access menu Help/Install New Software.
-
In the drop-down menu, find the Obeo Designer Team Edition update site (by default, it should be the only one).
-
In the category "Obeo Designer Team Edition - Extensions" check the features:
-
Sirius Collaborative User Profiles Server
-
Sirius Collaborative User Profiles Administrator (only required for the server with user-profile in order to get the facilities for defining user-specific permissions.
-
-
Finally click on Next and Finish until the wizard finishes to install the additional feature and asks to restart Eclipse.
1.2.2. Authenticated server configuration
To activate the authenticated server you have to set the line below in the cdo-server.xml file before the <store > tag.
<userManager type="collab_file" description="usermanager.properties"/>
usermanager.properties is a path to the authenticated server configuration file. The path can be absolute or relative to the cdo-server.xml file.
users.file.path=users.properties
# ldap configuration
auth.type=ldap
auth.ldap.url=ldap://127.0.0.1:10389
auth.ldap.dn.pattern=cn={user},ou=people,o=sevenSeas
auth.ldap.filter=
auth.ldap.tls.enabled=false
auth.ldap.truststore.path=
auth.ldap.truststore.passphrase=
users.file.path is the name of the file containing the users. This file has to be copied into the root server installation folder. You can add new users by modifying the users.properties file.
auth.xxx corresponds to the authentication configuration. The properties are prefixed by auth.
The file users.properties contains entries which keys are the logins and values are the passwords. Note that space must be escaped with \ else it will be considered as a key-value separator.
admin=admin
John\ Doe=secret
1.2.3. User profile configuration
To activate the user profile server, you have to set the line below in the cdo-server.xml file before the <store > tag.
<securityManager type="collab" realmPath="userprofile-config.properties" />
userprofile-config.properties is a path to the user profile configuration file. The path can be absolute or relative to the cdo-server.xml file.
realm.users.path=users.userprofile
administrators.file.path=administrator.properties
# ldap configuration
auth.type=ldap
auth.ldap.url=ldap://127.0.0.1:10389
auth.ldap.dn.pattern=cn={user},ou=people,o=sevenSeas
auth.ldap.filter=
auth.ldap.tls.enabled=false
auth.ldap.truststore.path=
auth.ldap.truststore.passphrase=
realm.users.path is the name of the resource that contains the user profile model.
administrators.file.path is a path to the administrators file. The path can be absolute or relative to the cdo-server.xml file. This file is used to initialize administrators in the user profile model. It is mandatory for a production server because the definition of the user profile (users and their permissions) can only be done by an administrator. For testing purpose, if there is no administrators file or if it is empty, a default administrator will be created with Administrator / 0000 as credentials.
auth.xxx corresponds to the authentication configuration. The properties are prefixed by auth.
Default user profile configuration
When the server is configured with the User Profiles functionality, the following roles are automatically created:
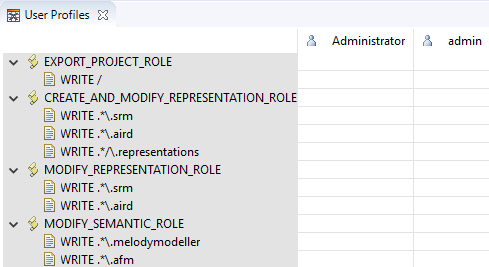
These defaults roles are required :
-
EXPORT_PROJECT_ROLE : is needed in order to be authorized to export projects. The pattern is only "/" because each project will be exported in the server in a new folder with the name of the project. For exporting projects, the permission to create elements at the root of the repository is therefore needed.
-
CREATE_AND_MODIFY_REPRESENTATION_ROLE : is needed in order to be authorized to create and modify representations, but only graphically. This will not allow semantic modifications. This role contains three resource permissions with the following pattern:
-
".*\.srm", with the lazy loading each representation are placed in a .srm file. This allows to load only the displayed representations in order to improve performances.
-
".*\.aird", this remains the main file aggregating all representations and viewpoints information. Even if the representations are placed in separate files, modifying a representation still updates some information in the .aird file, such as timestamps.
-
".*/\.representations", with the lazy loading mode, each representation are placed in a folder ".representations" (hidden by default). A permission is therefore needed in order to create or delete representations in this folder.
-
-
MODIFY_REPRESENTATION_ROLE : is needed in order to be authorized to modify representations but only graphically. This will not allow semantic modifications.
-
The permission are the same as the previous role, but without the permission on the ".representations" folder in order to avoid allowing creating and deleting representations.
-
-
MODIFY_SEMANTIC_ROLE: is needed in order to be allowed to modify semantic model elements.
-
the extension files of the semantic resources that are listed as resource permission are provided by the User Profile properties file (by default userprofile-config.properties) referenced by the CDO server configuration file (cdo-server.xml). In this properties file, these file extensions are associated to the "permissions.role.semantic.file.extensions" key and separated by ",".
-
Note that as user created as administrators (in the administrator properties file as presented in the previous part) have full access and do not need to be assigned to any role. Trying to assign roles to administrators will be prevented and a dialog will appear explaining that the administrators already have full access.
1.3. From command line
java -Dnet4j.config="$PATH_TO_SERVER_CONFIG_FOLDER" -jar $PATH_TO_EQUINOX_LAUNCHER -application org.eclipse.emf.cdo.server.app
-
PATH_TO_SERVER_CONFIG_FOLDER : the path to a folder containing the CDO Server configuration file named cdo-server.xml
-
PATH_TO_EQUINOX_LAUNCHER : the path to an eclipse installation containing CDO Server, for example
plugins/org.eclipse.equinox.launcher_1.1.1.R36x_v20101122_1400.jar
1.4. Configure LDAP authentication on the Server
1.4.1. Activate LDAP authenticator
You can activate LDAP authentication in three different ways:
-
As authenticator, the user must only be declared in the LDAP directory.
-
In combination with authenticated server. In that case, the authentication requires that the user is declared in the user file and is authenticated against the LDAP directory.
-
In combination with user profile server. In that case, the authentication requires that the user is defined in the user profile model and is authenticated against the LDAP directory.
|
These ways are excluding themselves. To activate LDAP authentication, as exclusive authenticator, the following authenticator tag must be added to the repository configuration in cdo-server.xml. The description attribute is a path to a properties file containing the LDAP authenticator configuration. This path may be relative to the CDO server configuration file or absolute. |
1.4.2. Configure LDAP authenticator
The LDAP authenticator’s configuration file is a properties file which should contain the following keys :
-
ldap.url : URL of the LDAP server, typically in the form
<ldap or ldaps>://<IP_address or domain_name>:<port> -
ldap.dn.pattern : Pattern to define the LDAP query used to bind a user. It must contain a
{user}part which will be replaced with the login provided by the user. For exemple, =cn={user},ou=people,o=sevenSeas -
ldap.filter is the LDAP query used to filter users by checking some attributes (optional). Different patterns are available to define this filter. For instance with the Apache DS sample (To download it, you can save the target of this link), to grant access to users having an email, the ldap filter pattern would be: mail=*.
-
ldap.tls.enabled : Should be true to enable TLS, false otherwise (non-SSL mode or use of deprecated LDAPS protocol). Default value is true.
-
ldap.truststore.path : Absolute path to a certificate truststore (useful for self-signed certificates). On Windows, don’t forget to escape backslash or, else, use slash instead of backslash.
-
ldap.truststore.passphrase : Truststore’s passphrase (useful for self-signed certificates)
When the LDAP authenticator is used in User Profile or Authenticated configurations, those properties property keys must be prefixed by the auth. and the auth.type=ldap is needed to activate the LDAP authentification.
|
If the LDAP certificate has been signed by an official Certificate Authority it is not required to set the trust store path as the JVM already trusts the CA. If you need to generate a self-signed certificate or need to create a trust store from an existing certificate please refer to the following section. |
Use a self-signed or non CA-authentified certificate
In case the certificate is self-signed or the CA used in your certificate is not managed by the jvm, you will need to generate a truststore and reference this truststore from the configuration file.
Follow the Export and TrustStore creation steps to create the trust store.
Example of LDAP using multiple patterns
# ldap configuration
ldap.url=ldap://ldap.myCompany.com:389
ldap.dn.pattern=uid={user},ou=group1,o=orga1,dc=mycompany,dc=fr
ldap.dn.pattern.1=uid={user},ou=group2,o=orga1,dc=mycompany,dc=fr
ldap.dn.pattern.2=uid={user},ou=groupN,o=orgaM,dc=mycompany,dc=fr

ldap.tls.enabled=false
1.4.3. Configure LDAP with a manager
Some LDAP does not support anonymous binding (if your LDAP server doesn’t even allow a query without authentication), then Sirius would have to first authenticate itself against the LDAP server, and Sirius does that by sending "manager" DN and password. Using this specific connection, the user credentials can be looked for in the LDAP tree.
This manager credentials needs to be provided in the properties file as it will not be asked to the user. These credentials are provided with the following properties:
-
ldap.manager.dn : The login of the manager.
-
ldap.manager.password : The password of the manager.
The search for the user himself in the LDAP is provided with the following properties:
-
ldap.user.search.base : search pattern working like the ldap.dn.pattern field.
-
ldap.user.search.filter : search filter working like the ldap.filter filed.
Example of LDAP configuration with a manager
# ldap configuration
ldap.url=ldap://ldap.myCompany.com:389
ldap.user.search.base=dc=myCompany,dc=com
ldap.user.search.filter=(&(objectClass=account)(cn={user}))

# The manager credentials are useful for LDAP requiring authentication to run search filters
ldap.manager.dn=uid=manager,ou=People,dc=myCompany,dc=com
ldap.manager.password=DerfOcDoocs6

ldap.tls.enabled=false
1.4.4. Configure LDAP with Active Directory
An LDAP using Active Directory provides a field sAMAccountName that is usually used as a key (like the "cn" field). Users can be identified using this field associated with a domain name after an "@" as separator. This leads to this pattern: sAMAccountName@DomainName. As the user identifies himself by providing only his identifier, not the domain name, the corresponding pattern is: {user}@DomainName.
Example of LDAP configuration with Active Directory
For instance, if the domain name is "MyCompanyDomain" then the LDAP pattern will be: ldap.dn.pattern={user}@MyCompanyDomain
# ldap configuration
ldap.url=ldap://ldap.myCompany.com:389
ldap.dn.pattern={user}@MyCompanyDomain

ldap.tls.enabled=false
Example of LDAP configuration with a manager and Active Directory
# ldap configuration
ldap.url=ldap://ldap.myCompany.com:389
ldap.user.search.base=dc=myCompany,dc=com
ldap.user.search.filter=(&(objectClass=organizationalPerson)(sAMAccountName={user}))

# The manager credentials are useful for LDAP requiring authentication to run search filters
ldap.manager.dn=manager@myCompany.com
ldap.manager.password=managerPassword

ldap.tls.enabled=false
Additional information
Sometimes, the structure of an Active Directory is not trivial and the exact path of a user in the Active Directory tree is not obvious. Here are some usefull command to get information about the Active Directory structure to reach the user "testUser" (testUser@myCompany.com)
dsquery * -filter "samaccountname=testUser" -attr *dsquery group -name "groupname"dsquery * -filter "samaccountname=testGroup" -attr *
dsquery * -filter "cn=testGroup" -attr *How to complete the filter with the group
(& (objectClass=organizationalPerson)(sAMAccountName={user}) (memberOf=CN=grp1,CN=Users,DC=MyCompany,DC=com))Usefull links:
1.5. Activate OpenID Connect authentication
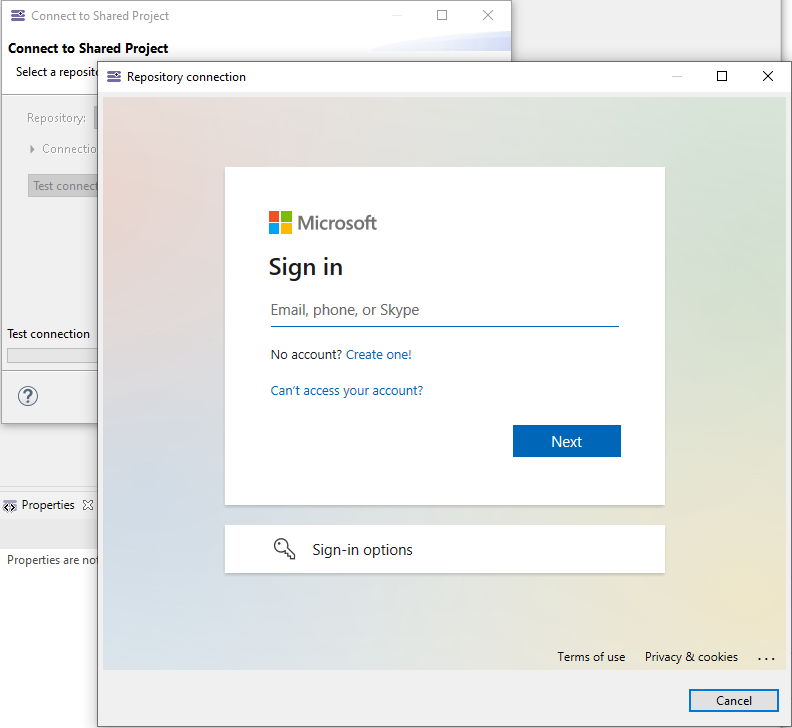
With a server set with an OpenID Connect Connect authentication, the user will be able to authenticate using the UI provided by the OpenID Connect Platform. Instead of having the default dialog where the user enters his login/password, here the embedded web server will display a popup web browser interacting with the OpenID Connect platform.
For instance, for a server set with Microsoft Entra ID, here is the user experience when the user clicks on the "Test Connection" button of the Connection wizard. A web browser is displayed and present a Sign-in interface provided by Microsoft Entra ID.
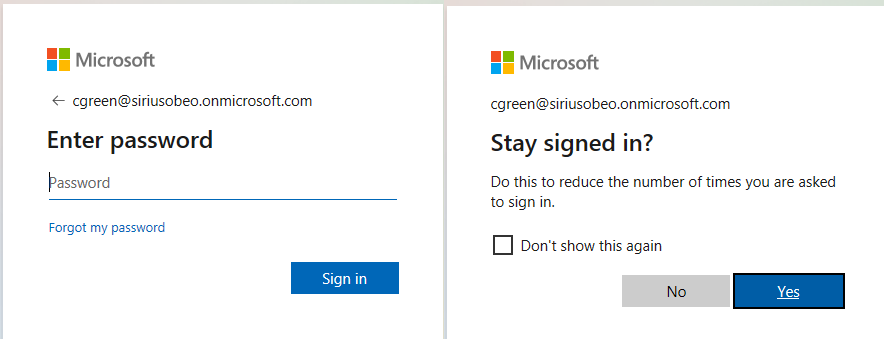
Then, the user follows the authentication process through the different web pages provided by the OpenID Connect platform depending on how it is configured.
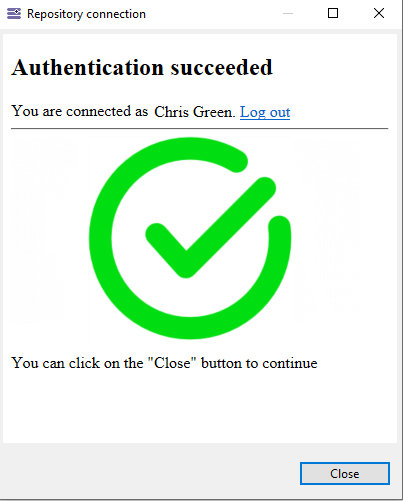
Finally, the user will be presented a web page displaying if the authentication was successful or not. The user can close the browser and continue as usual. In this page, a "Logout" hyperlink allows to logout the current user. The end-user is redirected to the sign-in page and may sign-in with another login.
|
Technical views such as CDO views or Administration views still authenticate with basic login/password credentials. See Configure OpenID Connect authenticator to know how to configure these credentials. |
1.5.1. Configure the CDO server
Activate OpenID Connect authenticator
You can activate the OpenID Connect authentication:
-
As an authenticator, the user must only be declared on the OpenID Connect platform.
-
In combination with user profile server. In that case, the authentication requires that the user is defined in the user profile model and is authenticated with the OpenID Connect server.
-
In combination with authenticated server. In that case, the authentication requires that the user is declared in the user file and is authenticated with the OpenID Connect server.
| For the combination with both "user profile server" and "authenticated server", the user name to configure must correspond to the attribute "Name" of the user in the OpenID Connect authentication platform. |
The server must be restarted to take into account the modifications done in the cdo-server.xml file.
To activate the OpenID Connect authentication, as exclusive authenticator, the following authenticator tag must be added to the repository configuration in cdo-server.xml. Make sure the other tags are commented.
<authenticator type="openidconnect" description="openid-config.properties" />openid-config.properties is a path to a properties file containing the OpenID Connect authenticator configuration. This path may be relative to the CDO server configuration file or absolute.
As access control modes are exclusive, other modes must be commented in the cdo-server.xml file:
<!-- <userManager type="auth" .../> -->
<!-- <securityManager type="collab" .../> -->
Finally, the OpenID Connect authentication requires a web server in order to securely communicate with the OpenID Connect platform. If the CDO server is configured with the OpenID Connect authentication mode, then it will require to activate the embedded web server for this secure communication.
Configure OpenID Connect authenticator
<installation folder>/server/configuration/openid-config.properties is the OpenID Connect authenticator’s configuration file. It is a properties file whose content could look like the following one:
openIDConnect.discoveryURL=https://login.microsoftonline.com/{tenant}/v2.0/.well-known/openid-configuration
openIDConnect.tenant=organizations
openIDConnect.clientID=79bce8de-7542-4b90-bf18-XXXXXXXXXXXX
openIDConnect.technicalUsers.file.path=technicalUsers.properties
where :
-
openIDConnect.discoveryURL is the URL of the OpenID Connect metadata document (RFC) that contains the information required for the authentication.
-
openIDConnect.tenant controls the type of user profile that will be able to authenticate.
-
openIDConnect.clientID is the application ID that the OpenID Connect platform assigned to your application.
-
openIDConnect.technicalUsers.file.path is a relative path to a properties file that contains credentials(login, password) used for technical views such as CDO views or Administration views.
Configure embedded web server for OpenID Connect authentication
As presented before, the OpenID Connect Authentication requires a web server in order to authenticate securely. To activate it, your CDO server application should be started with the argument -Dadmin.server.configuration.path="PATH_TO_FOLDER_admin.server.config". This targets a folder with a file admin-server.properties that contains the properties for the web server. This is the same web server as the one providing the web services (REST API) for repository management.
Note that if you do not have the CDO server and all the clients installed on the same machine, you will need to configure the web server in https mode. Indeed, this is a security required from the OpenID Connect platform. So,
-
If the CDO server is local to the client you may use
httpprotocol withlocalhost. This is the default configuration. -
If the CDO server is installed on a different machine than the client, you must configure the admin server with
https.
To configure the admin server with https, do the following changes in <installation folder>/server/configuration/fr.obeo.dsl.viewpoint.collab.server.admin/admin-server.properties
# Jetty configuration
admin.server.jetty.https.enabled=true

# The next three line will be needed if the '${admin.server.jetty.https.enabled} option is set to true.'
admin.server.jetty.ssl.host=0.0.0.0
admin.server.jetty.ssl.port=8443
admin.server.jetty.ssl.keystore.path=${currentDir}/<keystoreFile>
admin.server.jetty.ssl.keystore.passphrase=<password>
-
admin.server.jetty.ssl.host: let it as it is
-
admin.server.jetty.ssl.port is the port to use for the redirect url in the configuration of the OpenID Connect authentication platform
-
admin.server.jetty.ssl.keystore.path must lead to a keystore file. See Managing certificate to know how to do it.
-
admin.server.jetty.ssl.keystore.passphrase is the password used for the keystore.
1.5.2. Configure the application on the OpenID Connect platform
On the OpenID Connect platform, there is one property that requires to be properly set: the redirect URI. Indeed, the embedded web server expects that the redirect URI is the page /auth/redirect.
This means that the redirect URI must be set to
-
either
http://localhost:8080/auth/redirectif the CDO server is local to the client -
or
https://<IP admin server>:8443/auth/redirectif the CDO server is installed on a different machine than the client.
1.5.3. Configure the client for OpenIdConnect
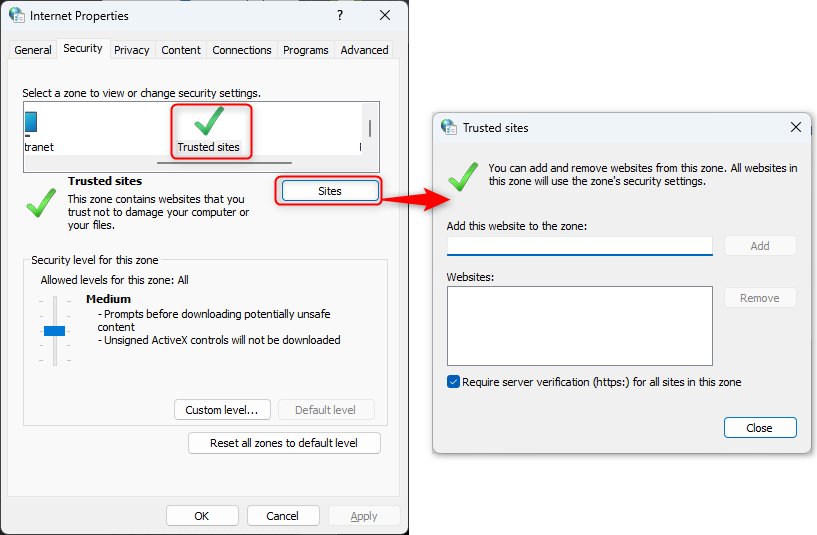
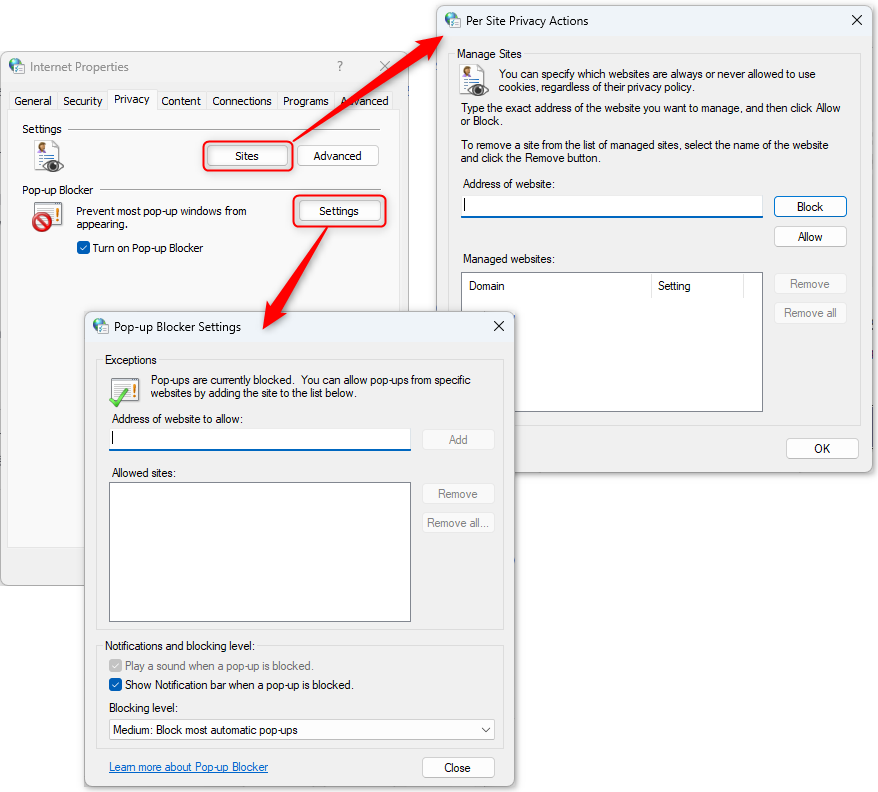
Once the authentication with OpenIDConnect has succeded the client browser will call admin server on redirect URI passing some information inside cookies. So The client browser needs to trust the URL and authorize cookies.
On windows, the configuration is done in Internet properties.
-
Open
Internet properties -
Select Security tab
-
Select Trusted sites then Sites button
-
Add the admin server URL for example
https://yourDNS
-
Select Privacy tab
-
Click Sites button
-
Allow the admin server URL for example
https://yourDNS -
Click Settings button
-
Allow the admin server URL for example
https://yourDNS
Configure OpenID Connect authenticator with Microsoft Entra ID
If your OpenID Connect platform is Microsoft Entra ID, here is a quick way to find how to configure the OpenID Connect authenticator for your CDO server.
First, the openIDConnect.discoveryURL is provided by the OpenID Connect platform itself, not by your application. For Microsoft Entra ID, this protocol is presented in the online documentation. On the same page, there is a list of the different values the openIDConnect.tenant.
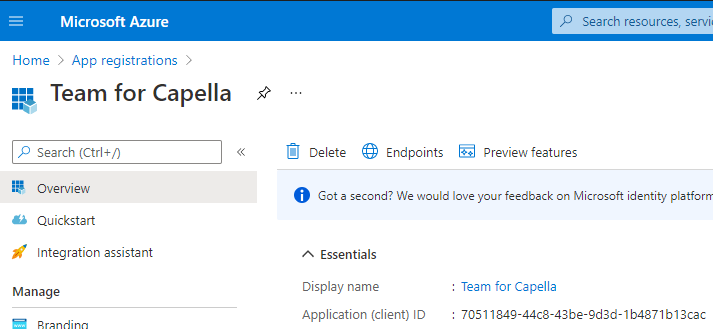
For the openIDConnect.clientID, you will need to look for it in the application you created in Microsoft Entra ID in order to use it for authentication. From the Microsoft Entra ID home page, you can select App registration. Select your application for Sirius collaborative mode. From the overview, you can see the Application ID.
Note that from this menu, you must set the redirect URI from the menu Authentication. In Platform configuration add a Web platform and set the redirect URI.
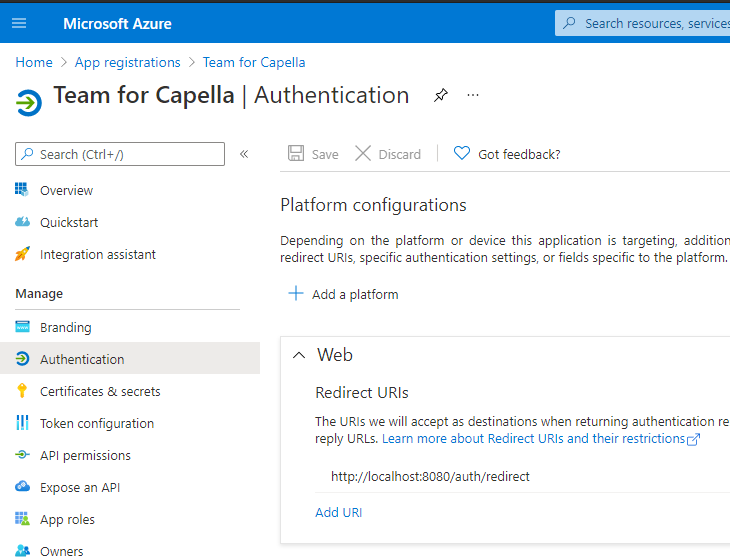
The last property, openIDConnect.domainURL, depends on the location/address of the web server and is not linked with the OpenID Connect configuration.
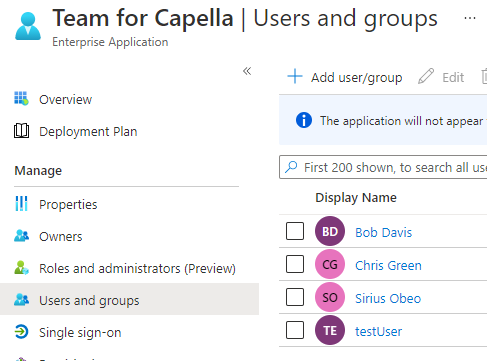
On your application, do not forget to add the users that will be able to authenticate to the application:
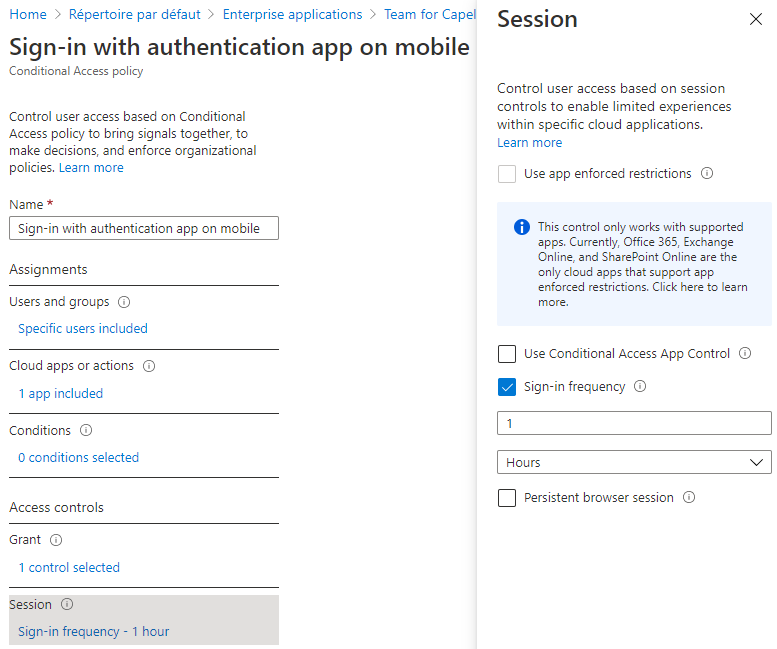
It is also recommended to create a conditional access policy (Security/Conditional Access), so you can set a timeout to the session once users are authenticated. You can also define how users are grant access (for instance with multi-factor authentication).
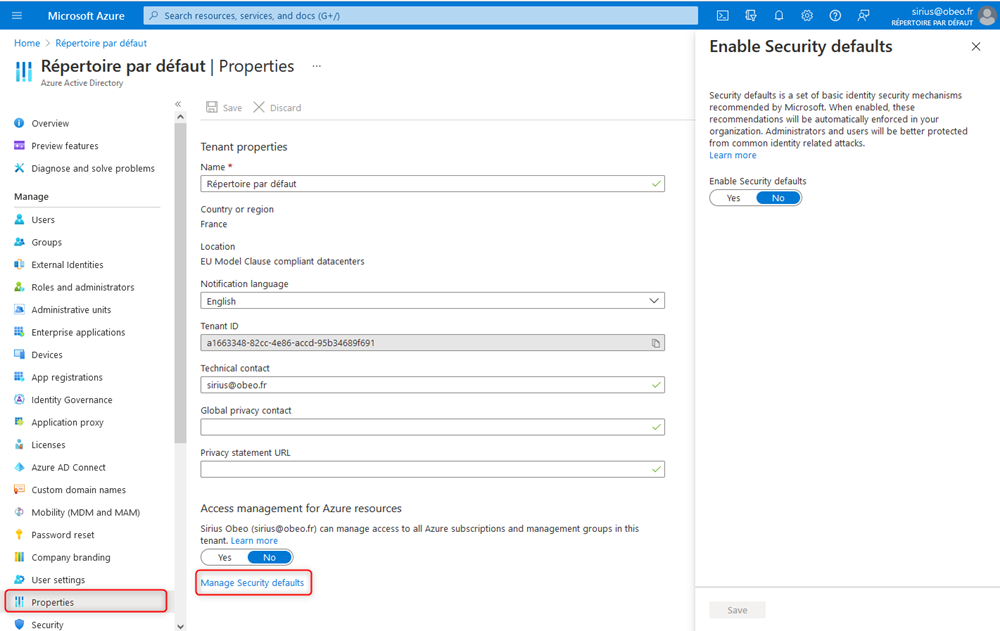
Note that to be able to add conditional access policies, you need to disable the security defaults.
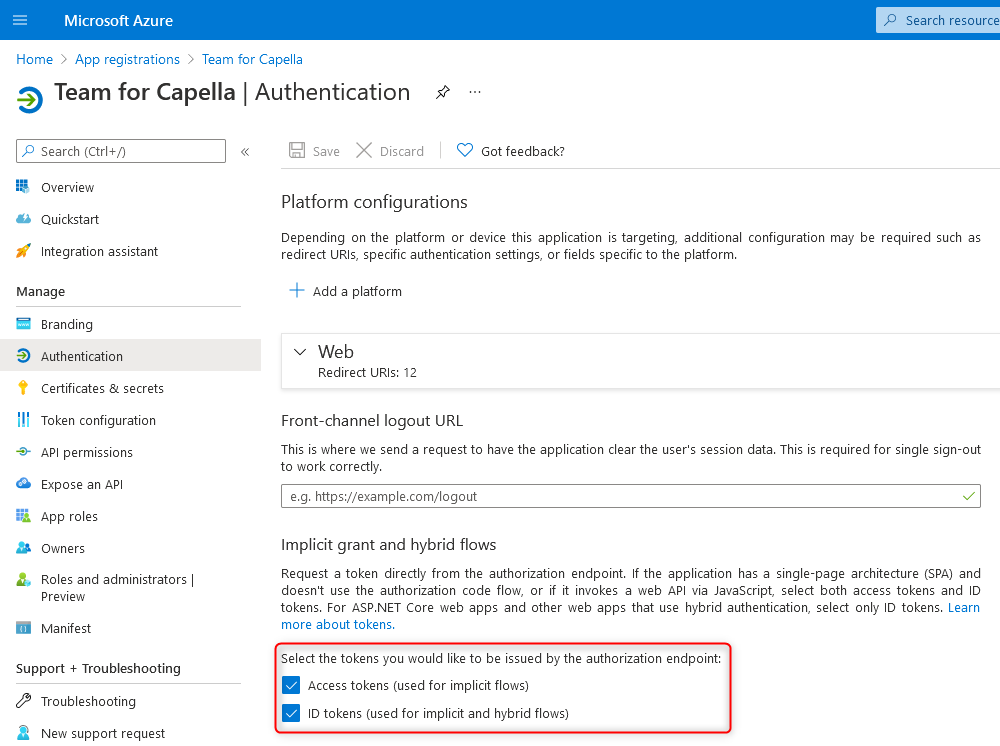
Note that the following options must be activated because the authentication uses the implicit grant
-
Access tokens (used for implicit flows)
-
ID tokens (used for implicit and hybrid flows)
1.6. Activate WebSocket connection
It is possible to activate a WebSocket connection between the client and the CDO server. Both client and server have to be configured accordingly.
1.6.1. Client configuration
On client side, users will have to use WS or WSS connection types regarding the configuration of the server.
The client side configuration will depend on the global deployment of the current server and the use of the WS and WSS connection types.
Then a user will have to use the following parameters to connect to the repository:
-
Repository Host: localhost or ip/url of the server,
-
Port Number: 8080 (value of
admin.server.jetty.portoradmin.server.jetty.ssl.portif HTTPS is enabled, or specific proxy port if the server is deployed behind a proxy) -
Repository Name: designer-server
-
Connection type: WS (WSS if Jetty has been deployed in HTTPS or is behind an HTTPS proxy)
When the REST Admin server runs in HTTPS mode, it will be configured with a certificate.
1.6.2. Client JRE configuration
You need to add the public certificate into the JRE of the client.
The JRE is located in <client>/jre
Assuming that the private certificate has been provided by the customer. The public certificate can be generated directly from the private.
You can use keytool to generate the public certificate or use Keystore explorer that can be download from https://keystore-explorer.org/
With Keystore explorer
-
Open the
certificate.jksused by the server -
Select the certificate and export it. You get a
certificate.cerfile -
Open
Keystore explorerand importcapella/jre/lib/security/cacert -
Click on
import a trusted certificateand selectcertificate.cer -
If the certificate is structured in tree with a root certificate import all certificates
-
Do not forget to save
What if a Web Application Server(WAF) or a proxy stands between the client and the server
Context: the installation architecture is
-
a client on client VM
-
a WAF proxy that accept 443 connection
-
a server on server VM that accepts 8443
Issue when clicking test connection from the client : unable to find valid certification path to requested target
Analysis
The certificate is configured on the server. Is it the same certificate that is installed on the client JRE?
To check that
-
From the client, open a Navigator and enter the address
https://ServerDNS:443 -
Open or export the certificate from the navigator url toolbar or from the navigator settings
-
Check the certificate serial number
-
From the server, open
Keystore explorer. You can download it fromhttps://keystore-explorer.org/ -
Open the
certificate.jksused by the server -
Check the certificate serial number
-
Expected : if serial numbers are not the same it is logical to have the issue
Pay attention to compare the proper serial number because sometimes the certificate used by the server contains a root certificate and other dedicated certificate
Solution
To solve the issue, we need to add the certificate used by the WAF in the client JRE cacert
-
In the client VM, from the navigator, download the root certificate returned by the WAF using your navigator (directly from the url toolbar or using settings)
-
Open
Keystore explorerand importcapella/jre/lib/security/cacert -
Click on
import a trusted certificateand select the download certificates -
If the certificate is structured in tree with a root certificate import all certificates
-
Do not forget to save
Restart capella and recheck the connectionSSL connection
Autosigned or untrusted certicate
If this certificate is self-signed or untrusted, the following system properties can be added in the client capella.ini file in order to configure the security checks:
-
Trust any certificate (self-signed for example):
-Dfr.obeo.dsl.viewpoint.collab.https.jetty.ssl.context.trustall=true -
Endpoint Identification Algorithm:
-Dfr.obeo.dsl.viewpoint.collab.https.jetty.ssl.context.endpointIdentificationAlgorithm -
TrusStore passphrase:
-Dfr.obeo.dsl.viewpoint.collab.https.jetty.ssl.context.passphrase -
TrusStore URI:
-Dfr.obeo.dsl.viewpoint.collab.https.jetty.ssl.context.trust -
TrustStore type:
-Dfr.obeo.dsl.viewpoint.collab.https.jetty.ssl.context.trust.type -
Trust Manager Factory Algorithm:
-Dfr.obeo.dsl.viewpoint.collab.https.jetty.ssl.context.trust.manager.factory.algorithm
Those properties are used to configure the Jetty’s (org.eclipse.jetty.util.ssl.SslContextFactory).
Additional properties might be needed, see server configuration section.
1.6.3. Server configuration
The REST Admin Server and the CDO Server need to be configured to enable the Net4J WebSocket-based transport:
-
the property
admin.server.jetty.net4j.enabled=truein configuration/fr.obeo.dsl.viewpoint.collab.server.admin/admin-server.properties allows to deploy the Net4J Websocket servlet. -
a specific acceptor must be added in the cdo-server.xml with type
wsorwss.-
<acceptor type="ws"/>is the simplest and default WebSocket-based acceptor. Additional configurations are explained below. -
It can be used to replace the default acceptor (
<acceptor type="tcp" listenAddr="0.0.0.0" port="2036"/>) or as an additional one.
-
The move from a Websocket-based transport to a SecuredWebsocket-based transport can be done through Jetty configuration by enabling HTTPS, or with the use of an HTTPS reverse proxy server (Nginx or Apache for example).
1.6.4. Optional configuration
Here is a list of optional settings which will impact both server and clients configurations:
-
change the acceptor name to be specific to your product: from
ws://1.2.3.4:8080/net4j/@defaulttows://1.2.3.4:8080/net4j/@YourAcceptorName-
server: change the acceptor tag in the cdo-server.xml to be
<acceptor type="ws" name="YourAcceptorName" /> -
client:
-Dfr.obeo.dsl.viewpoint.collab.net4j.ws.acceptor=YourAcceptorName(same value than name attribute of the acceptor tag used on the server side).
-
-
change the HTTP REST endpoint from the default value (
/net4j) to the path of your choice: fromws://1.2.3.4:8080/net4j/tows://1.2.3.4:8080/your/path/-
server: set
admin.server.jetty.net4j.path=your/path -
client:
-Dfr.obeo.dsl.viewpoint.collab.net4j.ws.path=your/path
-
-
have basic authentication on the Net4J servlet (same credentials than the one used for the other servlets, see
openapi/):-
for tests purpose only: login passwords might be available from the installation details of the eclipse platform and in the executable companion .ini file.
-
server:
admin.server.jetty.net4j.remove.public.constraint=true -
client:
-
declare the login:
-Dorg.eclipse.net4j.internal.ws.WSClientConnector.clientBasicAuth.login=sampleuser -
declare the password:
-Dorg.eclipse.net4j.internal.ws.WSClientConnector.clientBasicAuth.password=samplepassword
-
-
1.7. Activate SSL connection
It is possible to activate an SSL connection between the client and the CDO server. Both client and server have to be configured accordingly. On server side a keystore has to be set up and, on client side, a trust store containing the key store public key has to be set up. See chapter Managing certificate to generate keystore and truststore.
1.7.1. Client configuration:
Add the following lines in the client ini file:
-Dorg.eclipse.net4j.tcp.ssl.passphrase=secret
-Dorg.eclipse.net4j.tcp.ssl.trust=file:///<trusted.ks absolute path>
1.7.2. Server configuration:
In the cdo-server.xml configuration file the acceptor has to be configured to accept SSL connections
<acceptor type="ssl" listenAddr="0.0.0.0" port="2036">
Set the acceptor type to ssl.
Add the following lines in the server ini file:
-Dorg.eclipse.net4j.tcp.ssl.passphrase=secret
-Dorg.eclipse.net4j.tcp.ssl.key=file:///<server.ks absolute path>
1.8. Customize the server configuration
You can customize any feature of the default server configurations. This section will only give some examples of customization, please refer to CDO documentation to get a complete documentation of server configuration files.
Let’s take the following example : you want to modify the Collaborative server - Authenticated configuration to make it support branching.
Open the serverconfig_authenticated/cdo-server.xml file and change the <property name="supportingBranches"> value to value="true". By editing this configuration file, you can modify the server behavior like the storage of information inside the server (MappingStrategy). The changes in configuration files will be applied during the next server start up.
1.9. Implement your own CDO Server
CDO provides API to implement your own CDO Server. Pleaser refer to CDO documentation to get additional information about Server implementation.
2. Configure Permissions on the Server
It is possible to define permissions on the Server to specify who can perform changes on model elements and representations. A user without WRITE permission on an object will see a grey padlock on it and will not be able to modify this element.
To be able to manage the permissions, the administrators have to install the feature "Sirius Collaborative User Profiles Administrator" from the Obeo Designer Team Edition update site.
2.1. Activate Permissions on Server
To activate permissions support on the server, you can:
-
Use the appropriate example from the Obeo Designer Team Server
-
Use the appropriate server launch configuration
-
Add the following line to your
cdo-server.xmlfile (just before the<store>tag):<securityManager type="collab" realmPath="users.userprofile"/>
|
Notice that if you use a |
2.2. Create a Shared User Profiles Project
Once your server with permissions enabled has been launched, you can create a new Shared User Profiles Project (New > Other… > Sirius > Shared User Profiles Project), which provides facilities for defining user-specific permissions.
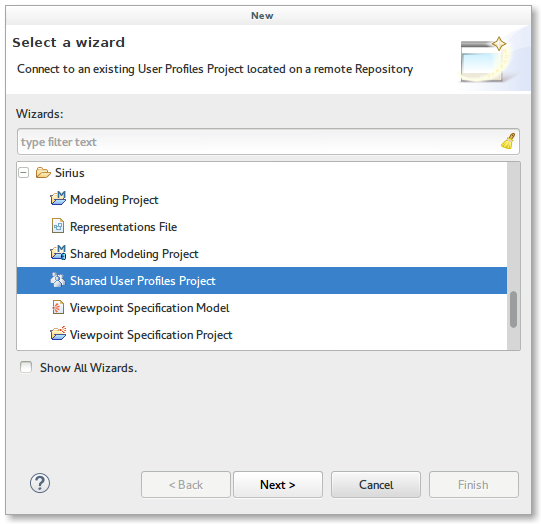
The first time a Server is launched with permissions activated, it creates a user profile model with the Administrators that are declared in the administrator file. See server configuration.
Administrators are user having WRITE access to the whole repository.
Once the project is created, a User Profiles table is created and opened.
2.3. Add Users

To add new users to the system, right-click on the table and select the Create User action. The following popup will appear.
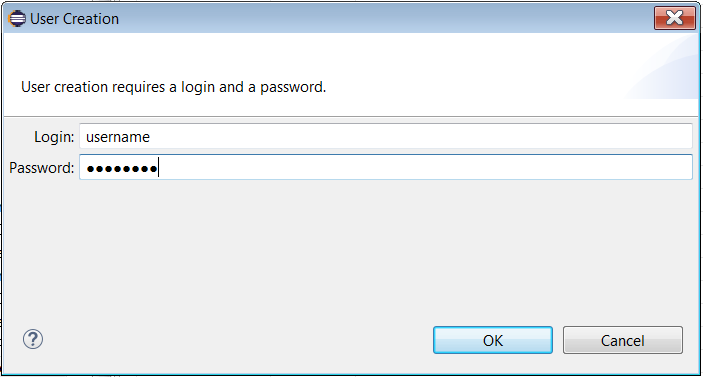
|
| If you want these modifications to be effective, restart your Server. |
2.4. Associate Users to Roles
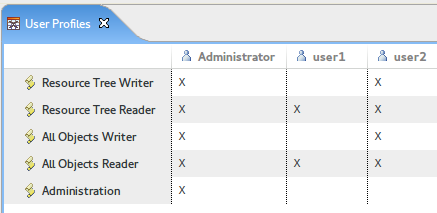
To assign a User to a role, type "X" in the corresponding table cell (in the example above we assign the Role All Objects Reader to User user1).
To directly assign several roles to a same user, you can also select the user in the Model Explorer and edit the Roles field in the Properties view:
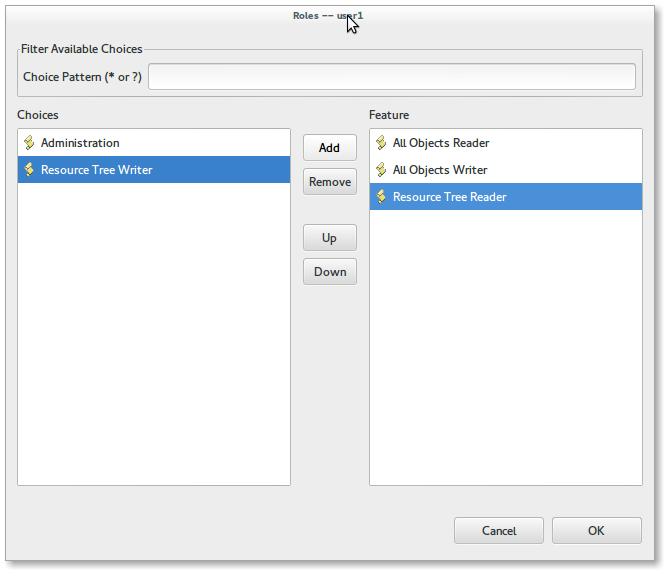
| If you want these modifications to be effective, restart your Server. |
2.5. Define new Roles & Permissions
A Role is a set of Permissions, composing a coherent list of rules. For example, we could define the Administrator role as a role which allows to modify user profile models elements (PackagePermission on the UserProfile package, with WRITE rights on the folder which is supposed to contain user profile models (ResourcePermission).
There are four kinds of permissions:
-
ResourcePermission: specify the access right for any resource or resource folder (including all contained objects) with a path matching the given pattern using the format ofjava.util.regex.Pattern. For example, you can give write access to a semantic model with the expression.*\mySemanticModel.basicfamily$ -
PackagePermission(experimental): specify the access right for all the EClasses included in a specific EPackage. -
ClassPermission(experimental): specify the access right for a specific EClass. -
ConcreteObjectPermission(experimental): specify access right on a specific element. This access can be recursive or not.
| With PackagePermission, EClassPermission and ConcreteObjectPermission,the corresponding metamodel elements (EPackage or EClass) must have their corresponding metamodel plugins deployed on the Server so the permission can work. See section Metamodel deployment. This administrators must have all the metamodel plugins which are deployed on the server they want to configure. |
Each permission is associated to an Access Type, which can be WRITE or READ.
When several permissions (or roles) can apply for an element, then the highest priority (e.g. WRITE versus READ) is considered.
|
Notice that Sirius requires all users to have at least If you want these modifications to be effective, restart your Server. |
|
For a role with concrete To do that, the only solution is to create the aird resource permission before any concrete one in a role. You cannot create the aird resource permission if a concrete one is already present. In such case, remove all concrete permission, create the resource one and recreate the concretes. |
2.6. User profile configuration examples
User profiles configuration will allow you to give WRITE right on semantic elements and/or on their representations in table or diagrams.
If you allow only semantic model modifications, user can perform that changes mainly from the properties view. Any tool or action that includes representation changes will not be allowed.
On the contrary, if you forbid only semantic changes, you may allow representation creation and modification, open editors and perform graphic changes such as resizing container.
| Functional need | Needed access type | Needed permission |
|---|---|---|
Allow any changes |
Write access to the whole repository (including the user profiles model) |
ResourcePermission .* or /.* |
Allow exporting a local project to the server |
It requires Write access to the root resource of the repository |
ResourcePermission / |
Allow any changes in a specific project |
It requires Write access to any resource in that specific project |
ResourcePermission /MyProject/.* |
Allow changes in semantic models |
It requires Write access to every resource of a given extension (here "myext") |
ResourcePermission .*\.myext |
Allow representation creation and Viewpoint activation |
You can provide a write access on .aird resource |
ResourcePermission .*\.aird |
Allow representation creation only |
It requires a write access on any DView class instance |
ClassPermission org.eclipse.sirius.viewpoint.DView |
Allow representation content modification |
It requires Write access to .srm resource |
ResourcePermission .*\.srm |
By default, the user profile model is initialized with permissions to:
-
Allow exporting a local project to the server
-
Allow representation creation and Viewpoint activation
-
Allow representation content modification
2.6.1. Special case for representation folder
In the Representations Lazy Loading mode, available if CDOSiriusPreferenceKeys.PREF_CREATE_SHARED_REP_IN_SEPARATE_RESOURCE is set to true, by default, the representations are stored in srm resources located in .representations folder in the project.
For that reason, we need a resource permission with .*/\.representations regular expression that will be required (but not sufficient) to create a new representation. As it is considered as a technical permission, it is automatically created at user profile model initialization and automatically associated to any added user in the user profile model. That permission will be automatically added when exporting a user profile model to the server.
2.7. Deploy metamodels used in permissions on Server
PackagePermission, ClassPermission and ConcreteObjectPermission are applied on elements of a specific EMF metamodel.
| If the metamodel plugin containing the elements used in permissions is not installed on the Server, then the permission won’t work. |
The Server is provided by default with only the Ecore metamodel deployed.
To deploy a metamodel used in your permissions, you have to use p2.director application available in some Eclipse package like Obeo Designer.
The steps to deploy your metamodel from such package to a target Collab server is the following :
On Windows:
-
Open the command line terminal and set the path to the root directory of your package containing your run executable like obeodesigner.exe
-
Run the command:
<executableName> -application org.eclipse.equinox.p2.director -console -consoleLog -repository <pathToUpdateSite> -installIU <metamodelPlugin> -tag <tagName> -destination <pathToServerRootDirectory> -profile DefaultProfilewhere you must customize only:
-
<executableName>is the executable name with an extension like obeodesigner.exe when run from an Obeo Designer package root directory or eclipse.exe from a standard Eclipse package. -
<pathToUpdateSite>is the absolute path to the update site containing the EMF metamodel plugin you want to deploy. It can be a folder or web path like file:///C:/myUpdateSiteFolder or http://download.eclipse.org/modeling/emf/updates/releases/. The parameter-repositoryalso accepts a comma separated list of update site paths, this can be useful if your update site does not contain all dependencies of your metamodel plugin: it can be used to reference additional repositories. -
<metamodelPlugin>is the plugin name containing the EMF metamodel (.ecore) to deploy like org.eclipse.sirius.sample.basicfamily -
<tagName>an installation tag that will be visible in the server installation details. It can be whatever you want. It is purely informative. -
<pathToServerRootDirectory>the absolute path to the server root directory of the server where to deploy your metamodel plugin. It contains the server executable like ObeoDesignerTeamServer.exe for Obeo Designer team server. For example, C:/ObeoDesignerTeamServer for an OD team server installed on the root of the C drive.You can find more information on the p2 director application here.
If the installation fails, a stack will be available in the .log file of the configuration folder of the package from which you launch the deployment. You can check if it was properly installed by opening the file "configuration/org.eclipse.equinox.simpleconfigurator/bundles.info" that lists every plug-in that was installed.
-
-
Restart the Server
On Linux distribution:
The same mechanism as Windows is used except that the command line must start by ./:
./<executableName> -application org.eclipse.equinox.p2.director -console -consoleLog -repository <pathToUpdateSite> -installIU <metamodelPlugin> -tag <tagName> -destination <pathToServerRootDirectory> -profile DefaultProfile
2.8. Import/Export the User Profiles
It is possible to reuse a user profile model defined in another existing repository. To do so, you can use:
-
the Import > Sirius > Import the User Profiles wizard to download the user profile model from a repository into your local workspace
-
the Export > Sirius > Export User Profiles wizard to upload the local user profile model from your workspace into another repository
Note that if you export a user profile model containing ConcreteObjectPermission, you must check before that objects referenced by each ConcreteObjectPermission exist in the target repository.
|
2.9. User profile example
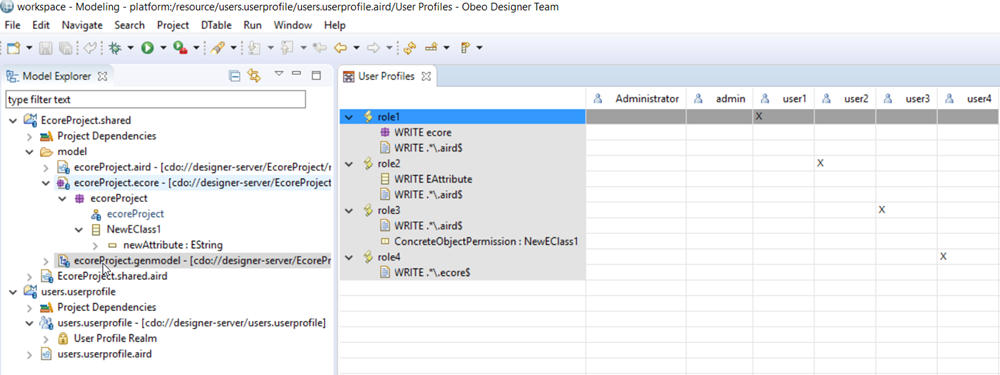
This section shows a user profile with different roles containing the four different kinds of permissions and with for each role the aird resource permission allowing to edit authorized elements from other permissions with Sirius tables and diagrams editors.
-
The first role has a package permissions allowing to edit all elements from Ecore models.
-
The second role contains an EClass permission on EAttribute allowing to edit any EAttribute.
-
The third role contains a concrete object permission on the EObject NewClass1 of ecoreProject.ecore metamodel allowing to edit it.
-
The last role has a resource permission on all elements of all Ecore metamodels present in the shared project.
3. Administrator commands
3.1. Resource rename
The Rename command allows, from the CDO Sessions view, to rename the full path of an EMF resource. The full path means the name of the resource and all the folder parts name representing the path of the resource. It is not enabled in a Read-Only View.
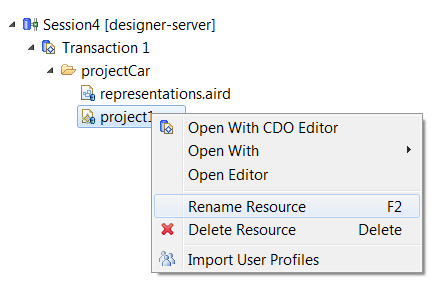
It is not possible to change the resource extension.
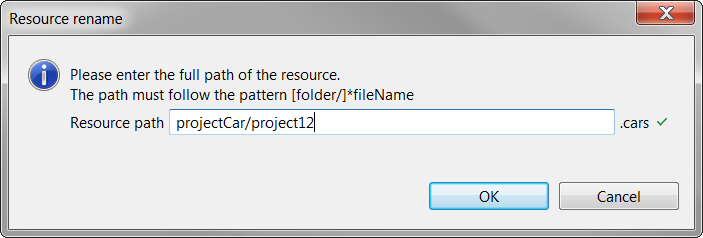
The resources (representation and other) impacted by the rename are coherently changed to keep integrity in the repository.
| After such changes, existing user sessions must be deleted and recreated. |
3.2. Resource deletion
The Deletion command allows, from the CDO Sessions view, to delete an EMF resource. It is not enabled in a Read-Only View.
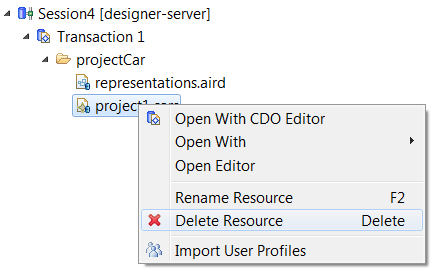
The resources (representation and other) impacted by the deletion are coherently changed to keep integrity in the repository.
| After such changes, existing user sessions must be deleted and recreated. |
4. Importer Application
The importer is an application used to extract the project from the cdo server database to a local folder.
It produces as many zip files as modeling projects.
It can also be used to import the user profiles model.
The importer also extracts information from the CDO Commit history in order to produce a representation of the activity made on the repository. This information is denominated '‹Activity metadata›'. See help chapter The commit history view and Commit description preferences for a complete explanation. By default, the importer will extract ‹Activity Metadata› for every commit on the repository. Be aware that the parameter ›‹-projectName› has no impact on this feature. It will also import commits that do not impact the selected project. Still, it is possible to specify a range of commits using the parameters ‹-to›‹ and ›‹-from›.
| The Importer application does not require a license. |
4.1. Importer strategies
Several import strategies are supported by the Importer application:
-
Connected import: the Importer application establishes a connection to the targeted repository and imports the models.
-
This is the default strategy of the Importer application.
-
Credentials might be required if the server has been configured to use identification, authentication or user profiles, see server configuration.
-
-
Offline import: This mode allows performing the import based on a snapshot of the targeted repository.
-
There is no connection to the server and no interaction with other users: no credentials are required for the importer application.
-
It also avoids overloading the server and can be done in a separate environment.
-
It can be enabled with the use of the
-importFilePathparameter. Refer to this parameter documentation in the parameters section for more details. -
A snapshot is an XML or binary extraction of the repository. It can be manually obtained by executing the
cdo exportcommand on the server osgi console.
-
4.2. Importer parameters
The importer needs credentials to connect to the CDO server if the server has been started with authentication or user profile.
Credentials can be provided using either -repositoryCredentials or -repositoryLogin and -repositoryPassword parameters. Credentials are required only for Connected import.
Here is a list of arguments that can be set to the Importer (in importer.bat or in a launch config):
| Arguments | Description |
|---|---|
-repositoryCredentials |
Login and password can be provided using a credentials file. It is the recommended way for confidentiality reason. If the credentials do not contain any password, the password will be searched in the eclipse secure storage. See how to set the password in the secure storage This parameter must not be used with To use this property file
Note: credentials are only required for the not required for Connected imports. |
-repositoryLogin |
The importer needs a login in order to connect to the CDO server if the server has been started with authentication or user profile.
Note: credentials are not required for Connected imports. |
-repositoryPassword |
This parameter is used to provide a password to the importer accordingly to the login. If
Warning: some special characters like double-quote might not be properly handled when passed in argument of the importer. The recommended way to provide credentials is through the repositoryCredentials file or the secure storage. Note: credentials are only required for Connected imports. |
-hostName |
Define the team server hostname (default: localhost). |
-port |
Define the team server port (default: 2036). |
-connectionType |
The connection kind can be set to tcp or ssl (keep it in low case) (default: tcp). |
-importType |
The backup is available in five different modes:
If the value is PROJECT_ONLY or SECURITY_ONLY, all options about the commit history will be ignored. (default: PROJECT_AND_COMMIT_HISTORY) |
-repoName |
Define the team server repository name (default: designer-server). |
-projectName |
By default, all projects are imported, i.e. with default value "*" (with the right -importType parameter). Argument "-projectName X" can be used to import only project X. Encoded and decoded names are both accepted (e.g. your can use either -projectName "Prj A", -projectName Prj%20A or -projectName "Prj%20A") (default: *). |
-runEvery |
Import every x minutes (default -1: disabled). |
-outputFolder |
Define the folder where to import projects (default : workspace). |
-logFolder |
Define the folder where to save logs (default : outputFolder). |
-archiveProject |
Define if the project should be zipped (default : true). Each project will be zipped in a separate archive suffixed with the date. Some additional archives can also be created:
|
-overrideExistingProject |
If the output folder already contains a project with the same name this argument allows to remove this existing project. |
-checkSize |
Check project zip file size in Ko under which the import of this project fails (default: -1(no check)). |
-checkSession |
Do some checks and log information about each imported project (default: true).
|
-errorOnInvalidCDOUri |
Raise an error on cdo uri consistency check (default: true). |
-addTimestampToResultFile |
Add a time stamp to result files name (.zip, logs, commit history) (default: true). |
-maxRefreshAttemptBeforeFailure |
The max number of refresh attempt before failing (default: 10). If the number of attempts is reached, the import of a project will fail but as this is due to the activity of remote users on the model. |
-timeout |
Session timeout used in ms (default: 60000). |
-importImages |
Define which images should be imported. Possible values are 'ALL', 'USED', 'NONE'. (default : ALL). |
-checkout |
The timestamp specifying the date corresponding to the state of the projects that will be imported (refer to the following note for details on the accepted formats). If empty, the framework will connect on the repository with a transaction on the repository head (current state). When this parameter is used, the framework will open a read-only view on the repository at the given time instead of a transaction on repository head. This option is meaningful only if -importType is one of ALL, PROJECT_ONLY, SECURITY_ONLY or PROJECT_AND_COMMIT_HISTORY. |
-from |
The timestamp specifying the date from when the metadata will be imported (refer to the following note for details on the accepted formats). If omitted, it imports from the first commit of the repository. The timestamp can also be computed from an '‹Activity Metadata›' model. In that case, this parameter could either be an URL or a path in the file system to the location of the model. If the date corresponds to a commit, this commit is included. Otherwise the framework selects the closest commit following this date. In the case of using a previous activity metadata, the last commit of the previous import is also included. |
-to |
The timestamp specifying the latest commit used to imported metadata (refer to the following note for details on the accepted formats). If omitted, it imports to the last commit of the repository. The framework selects the closest commit preceding this date. ''Be careful: this parameter only impacts the range of commit for importing activity metadata from the CDO server. Using this parameter will not import the version of the model defined by the given date. See -checkout argument for that purpose.'' |
-squashCommitHistory |
Squash consecutive commits done by the same user with the same description (default: true). |
-importCommitHistoryAsText |
Import commit history in a text file using a textual syntax (default: false). The file has the same path as the commit history model file, but with txt as extension. |
-importCommitHistoryAsJson |
Import commit history in a json file format (default: false). The file has the same path as the commit history model file, but with json as extension. |
-includeCommitHistoryChanges |
Import the commit history detailed changes for each commit done by a user with one of the save actions (default: false). The changes of commits done by wizards, actions and command line tools are not computed, those commits have a description which begins by specific tags like [Export], [Delete], [Maintenance], [User Profile], [Import], [Dump]. This option is applied for all kinds of import of the commit history (xmi, text or json files). Warning about the importer performance: if this parameter is set to true the importer might take more time particularly if the history of commits is long. |
-computeImpactedRepresentationsForCommitHistoryChanges |
Compute the impacted representations while importing changes (default: false). Warning about the importer performance: if this parameter is set to true the importer might take more time particularly if the history of commits is long. For each commit with changes to import, it will compute the impacted representations. |
-importFilePath |
This option allows to activate the Offline import. The expected argument is the file path of an an XML or binary extraction of the repository. It is recommended to provide an absolute path. A path ending with ".bin" will trigger the binary load, other extensions will trigger the XML load. some arguments will be ignored with -importFilePath argument since we do not establish any connection with the server. Only the arguments -outputfolder and -repoName are mandatory. |
-XMLImportFilePath |
(deprecated) see -importFilePath |
-eclipse.keyring file_path |
Specifies the location of the secure storage file used by Eclipse to store password and sensitive informations. The secure storage helps protect confidential data by encrypting it with a master key. By default, the secure storage file is located in the .eclipse folder of the user directory. You can change this location by using the For example, if you want to use the file |
-eclipse.password file_path |
Specifies the file path containing the master key password used by Eclipse to encrypt data in the secure storage. By default, the secure storage system uses a password provider mechanism to protect the master password used to encrypt data in the secure storage. If the For example, if you want to use the file This option can be used with |
-help |
Print help message. |
|
The timestamp arguments (checkout, from, to) must use the following formats:
For example, for the date 03/08/2017 10h14m28s453ms on a time zone +0100 use the argument "2017-08-03T10:14:28.453+0100". |
|
If the server has been started with user profile, the Importer needs to have write access to the whole repository (including the user profiles model). See Resource permission pattern examples section. If this recommendation is not followed, the Importer might not be able to correctly prepare the model (proxies and dangling references cleaning, …). This may lead to a failed import. |
4.3. Launching the importer
4.3.1. As a Launch Configuration
-
Open the Run Configurations menu.
-
Create a new Eclipse Application.
-
In the Program to Run area, select Run an application and fr.obeo.dsl.viewpoint.collab.importer.
-
On the Arguments tab, add the arguments from the previous table to configure the importer as you need. You can now run the Importer.
-
Here is an example of arguments settings:
-os ${target.os} -ws ${target.ws} -arch ${target.arch} -nl ${target.nl} -consoleLog
-outputFolder C:\Users\UserLogin\Desktop\Importer
-logFolder C:\Users\UserLogin\Desktop\Importer\Logs
-archiveProject false
-overrideExistingProject true
-importType ALL
-repositoryLogin admin
-repositoryPassword admin
-connectionType tcp
-port 2036
-repoName designer-server
-checkSize -1
-importCommitHistoryAsJson true
-importCommitHistoryAsText true
-
4.3.2. As a command file
-
Create a .bat file (importer.bat for instance) where your eclipse is installed
-
Add the following command:
eclipsec.exe ^
--launcher.suppressErrors ^
-nosplash -console -consoleLog ^
-data importer-workspace ^
-application fr.obeo.dsl.viewpoint.collab.importer ^
-repositoryCredentials repositoryLoginPassword.properties ^
-checksize -1 ^
%* ^
-vmargs -Xms1000m -Xmx3000m -Xss4m -Dorg.eclipse.net4j.util.om.trace.disable=true
-
You can add the same arguments from the previous example. Here the additional argument not to forget is -application fr.obeo.dsl.viewpoint.collab.importer.
4.3.3. Examples
importer.bat -nosplash -data importer-workspace
-outputFolder C:/Sirius/result
-connectionType ssl
-checkSize 10
importer.bat -nosplash -data importer-workspace
-outputFolder C:/Sirius/result
-connectionType ssl
-checkSize -1
-importType SECURITY_ONLY
4.4. How to set the Importer credentials in secure storage
The importer does not use the same credentials as the user. It is stored in a different entry in the Eclipse ‹Secure Storage›. Storing and clearing the credentials requires the application presented in the following parts.
4.4.1. How to set the Importer credentials in secure storage with an Eclipse application
-
Open the Run Configurations menu.
-
Create a new Eclipse Application.
-
In the Program to Run area, select Run an application and fr.obeo.dsl.viewpoint.collab.tools.credentials.
-
On the Arguments tab, add the arguments from the previous table to configure the importer as you need. You can now run the Importer.
-
The arguments ‹repositoryLogin› and ‹repositoryPassword› are mandatory. The default value of the arguments ‹hostname›, ‹port› and ‹repoName› are respectively: ‹localhost›, ‹2036› and ‹designer-server›.
-
Here is an example of arguments settings:
-os ${target.os} -ws ${target.ws} -arch ${target.arch} -nl ${target.nl} -consoleLog
-repositoryLogin admin
-repositoryPassword admin
-hostname localhost
-port 2036
-repoName designer-server
-
4.4.2. How to clear the Importer credentials in secure storage with an Eclipse application
-
Open the Run Configurations menu.
-
Create a new Eclipse Application.
-
In the Program to Run area, select Run an application and fr.obeo.dsl.viewpoint.collab.tools.credentials.
-
On the Arguments tab, add the arguments from the previous table to configure the importer as you need. You can now run the Importer.
-
The arguments ‹clearStoredCredentials› is mandatory as its default value is false. The default value of the arguments ‹hostname›, ‹port› and ‹repoName› are respectively: ‹localhost›, ‹2036› and ‹designer-server›.
-
Here is an example of arguments settings:
-os ${target.os} -ws ${target.ws} -arch ${target.arch} -nl ${target.nl} -consoleLog
-clearStoredCredentials true
-hostname localhost
-port 2036
-repoName designer-server
-
5. Exporter Application
The exporter is an application used to export all projects from a given local folder into a remote repository.
| The Exporter application does not require a license. |
5.1. Exporter strategies
The Exporter application supports one strategy :
-
Connected export: the Exporter application establishes a connection to the targeted repository and export projects (chosen by the user).
-
Credentials might be required if the server has been configured to use identification, authentication or user profiles, see Server Configuration
-
5.2. Exporter parameters
The exporter needs credentials to connect to the CDO server if the server has been started with authentication or user profile.
Credentials can be provided using either -repositoryCredentials or -repositoryLogin and -repositoryPassword parameters.
Here is a list of arguments that can be set to the Exporter (in exporter.bat or in a launch config):
| Arguments | Description |
|---|---|
-repositoryCredentials |
Login and password can be provided using a credential file. It is the recommended way for confidentiality reason. If the credentials do not contain any password, the password will be searched in the eclipse secure storage. See how to set the password in the secure storage This parameter must not be used with To use this property file
|
-repositoryLogin |
The exporter needs a login in order to connect to the CDO server if the server has been started with authentication or user profile.
|
-repositoryPassword |
This parameter is used to provide a password to the exporter accordingly to the login. If
Warning: some special characters like double-quote might not be properly handled when passed in argument of the exporter. The recommended way to provide credentials is through the repositoryCredentials file or the secure storage. Note: credentials are only required for Connected exports. |
-hostName |
Define the team server hostname (default: localhost). |
-port |
Define the team server port (default: 2036). |
-connectionType |
The connection kind can be set to tcp or ssl (keep it in low case) (default: tcp). |
-repoName |
Define the team server repository name (default: designer-server). |
-sourceToExport |
Define the path of folder containing projects to export. It can be :
|
-logFolder |
Define the folder where to save logs. |
-overrideExistingProject |
If the remote repository already contains a project to export with the same name this argument allows to remove this existing project. |
-overrideExistingImage |
If the remote repository already contains image with the same name, this argument allows to ignore and override it. |
-addTimestampToResultFile |
Add a time stamp to result files name (.zip, logs, commit history) (default: true). |
-timeout |
Session timeout used in ms (default: 60000). |
-help |
Print help message. |
|
If the server has been started with user profile, the Exporter needs to have write access to the whole repository (including the user profiles model). See Resource permission pattern examples section. If this recommendation is not followed, the Exporter might not be able to override existing projects on remote for example. This may lead to a failed export. |
5.3. Launching the exporter
5.3.1. As a Launch Configuration
-
Open the Run Configurations menu.
-
Create a new Eclipse Application.
-
In the Program to Run area, select Run an application and fr.obeo.dsl.viewpoint.collab.exporter.
-
On the Arguments tab, add the arguments from the previous table to configure the exporter as you need. You can now run the Exporter.
-
Here is an example of arguments settings:
-os ${target.os} -ws ${target.ws} -arch ${target.arch} -nl ${target.nl} -consoleLog
-sourceToExport C:\Users\UserLogin\Desktop\ExporterProjects
-overrideExistingProject true
-repositoryLogin admin
-repositoryPassword admin
-connectionType tcp
-port 2036
-repoName designer-server
-
5.3.2. As a command file
-
Create a .bat file (exporter.bat for instance) where your eclipse is installed
-
Add the following command:
eclipsec.exe ^
--launcher.suppressErrors ^
-nosplash -console -consoleLog ^
-data exporter-workspace ^
-application fr.obeo.dsl.viewpoint.collab.exporter ^
-repositoryCredentials repositoryLoginPassword.properties ^
%* ^
-vmargs -Xms1000m -Xmx3000m -Xss4m -Dorg.eclipse.net4j.util.om.trace.disable=true
-
You can add the same arguments from the previous example. Here the additional argument not to forget is -application fr.obeo.dsl.viewpoint.collab.exporter.
5.3.3. Examples
exporter.bat -nosplash -data exporter-workspace
-sourceToExport C:\Users\UserLogin\Desktop\ExporterProjects
-connectionType ssl
6. REST Admin Server
By default, a Jetty admin server is started with the CDO server on port 8080.
The admin server is used :
-
to manage repositories with the REST API
-
by applications (importer, maintenance application, console application) to execute code on server
You can find more information in the file <ODTS installation folder>/server/configuration/fr.obeo.dsl.viewpoint.collab.server.admin/admin-server.properties: it contains all the admin server configuration information.
6.1. Credentials Management
The first time the server is launched, a default "admin" user and its associated default token are created in the Eclipse secure-storage of the user that started the CDO server.
The "admin" credentials are stored in a dedicated node used by the server. The token is hashed and encrypted.
A secret.txt file, containing the token, is created in the same folder than admin-server.properties file. It can be used in third party application to authenticated with the admin server. Do not forget to remove this file as soon as you can.
Moreover, the admin credentials are also added in the secure storage for the application needs (importer, exporter, etc) in a dedicated node. The credentials are encrypted.
This way once the server has been started the first time, there is no additional step. The applications can automatically be used, being authenticated with the admin server with the "admin" user.
Nevertheless, it is possible to manage the user and the user token with the Credentials application
6.2. REST Admin API
The admin web server provides a whole set of services to manage the projects, the models and the users. The documentation is available at the URL http(s)://<admin server IP>:<admin server port>/doc.
Swagger documentation is available at the URL http(s)://<admin server IP>:<admin server port>/openapi. It can be enabled or disabled with the admin.server.jetty.servlets.admin.docandopenapi.enabled property
7. Annex: Managing certificate
Keytool can be used to create and manage certificates and stores. This tool is provided with the JDK, and its documentation is available here.
7.1. Generate a keystore
The keystore contains certificate information, private and public key. To generate it use the following command:
keytool -genkey -ext SAN=IP:<server IP> -keyalg "RSA" -dname o=sevenSeas -alias keystore_alias -keystore server.ks -storepass secret -validity 730 -keysize 4096
-
-ext: For example, <server IP> may be the LDAP server for SSL connection between CDO server and LDAP server or may be the CDO Server for SSL connection between client and CDO server. -
-dname: This is an optional parameter. It initializes the metadata of your organization.
When the key password is asked, press Enter, to keep the same password as the key file’s.
7.2. Sign your certificate from a certificate authority (optional)
This step is optional, and you may then proceed with Export certificate from a keystore. For that step, you have to give your certificate signature request(server.csr) to your certificate authority (CA) which, in return, will provide a signed certificate(server.crt).
keytool -certreq -alias keystore_alias -file server.csr -keystore "server.ks"
The two steps below allow importing root certificate and intermediary certificate.
keytool -import -alias Root_CA -keystore server.ks -file Root_CA.cer
keytool -import -alias Server_CA -keystore server.ks -file Server_CA.cer
Then, import the signed certicated into the server.ks keystore.
keytool -import -alias keystore-signed -keystore server.ks -file server.crt
7.3. Export certificate from a keystore
To export a certificate from an existing keystore, use the following command accordingly to the keystore generation example
keytool -export -keystore server.ks -alias keystore_alias -file server.cer
This command asks for the store’s passphrase (Enter secret accordingly to the example) and then create a server.cer file containing the certificate previously created.
7.4. Create a truststore from a certificate
It is advised to not export the whole keystore on clients. Creating a truststore containing only the certificate and public key is recommended. This truststore is intended to be deployed on clients which need to connect to the server.
keytool -import -file server.cer -alias keystore_alias -keystore trusted.ks -storepass secret
When asked for "Trust this certificate?" Enter yes. This command creates a new truststore in file trusted.ks. This truststore contains the server’s public key, it can be copied on client machines and referenced via the truststore.path configuration key.
The truststore is protected with secret as a passphrase.
8. Credentials application
The credentials application can be used for:
-
Store and clean credentials, using the secure storage, for tools(exporter, importer etc)
-
Manage users and tokens, using the secure storage, for the admin server
8.1. How to launch the Tools Credentials Application
8.1.1. As a Launch Configuration
-
Open the Run Configurations menu.
-
Create a new Eclipse Application.
-
In the Program to Run area, select Run an application and fr.obeo.dsl.viewpoint.collab.tools.credentials.
-
On the Arguments tab, add the arguments from the previous table to configure it as you need. You can now run the Application.
8.1.2. In command line
-
In a CLI type the following:
eclipsec.exe ^
--launcher.suppressErrors ^
-nosplash ^
-data tools-workspace ^
-application fr.obeo.dsl.viewpoint.collab.tools.credentials ^
// complete here with the application parameters
-vmargs -Xms1000m -Xmx3000m -Xss4m -Dorg.eclipse.net4j.util.om.trace.disable=true
8.2. Manage tools credentials
The tool applications need credentials to either connect the admin server or to the CDO repository and by default, they search the credentials in the secure storage. So the credentials tool can be used to store or clean credentials in the secure storage.
There are three types of tools credentials:
-
The credentials used by applications that need to connect the rest admin server
-
The credentials used by applications that need to connect a CDO repository
-
The credentials used by third party applications that need to connect to the cdo repository
The credentials are created at the granularity of given CDO repository identified with <CDO server IP><CDO server port><CDO repository name>
8.2.1. List of Arguments
| Arguments | Description |
|---|---|
-credentialType |
The type of credentials:
|
-clearStoredCredentials |
Required for cleaning credentials. boolean value. false by default |
-hostname |
The IP address of the CDO repository |
-port |
The port of the CDO repository |
-reponame |
The name of the repository |
-userId |
Required for storing credentials commands. The user id |
-userPassword |
Required for storing credentials commands. The user password |
8.2.2. Manage Admin Server credentials
The credentials application can also be used to manage the users and their tokens for the admin server The authentication method is still Basic-Auth.
The server uses the Eclipse secure-storage to managed authorized users credentials. The first time the server is launched, if no credentials exists in the secure storage, the server initializes a default user with "admin" login and generates a token that can be used as password. New users or tokens can be added or removed by using the Credentials Application.
REST Admin Server Credentials
Two kinds of privileges exist: administrator and not administrator (user). Administrator and user have the same access rights to the Rest API. An administrator can add and remove users by using the Credentials Application. A user can only revoke or generate tokens for itself. A User registered in the server can have several tokens. The first time a user is created, a default token is generated with the id "default". This token cannot be removed but it can be regenerated. Tokens are stored after having been hashed. It is not possible to retrieve the value of a generated token. To retrieve a new generated token (the first time the user is created or after having generate a new one), you have to specify a path where the tool will generate the clear value of the token. You have to delete this file once the token value is retrieved.
List of Arguments
| Arguments | Description |
|---|---|
-restAdmin |
The command to execute:
|
-login |
Required for all commands. An administrator login for command requiring administrator privileges. |
-pwd |
Required for all commands. One of the existing tokens of the given user. |
-tokenId |
Required for generateToken and revokeToken commands. The token ID to generate or revoke. |
-tokenSecretPath |
Required for generateToken and addUser commands. The path where the new generated token (user creation or token (re)generation) should be written. If the file does not exist, a new one is created. For security reasons, the file should be removed once the token is retrieved |
-userId |
Required for addUser an removeUser commands. The user id of the new/removed user. |
-isAdmin |
Required for addUser command. If the new user should have admin privileges. true or false. |