Configure the OAuth2 support
1. Description
This document describes how to configure the product with an external OAuth2 provider for the authentication of the users. The OAuth2 support will be described with Keycloak but could be done with any other OAuth2 provider. It will contain the configuration for a user connection with a login form and, a resource server with bearer authentication. Finally, it will present some available configuration for how the OAuth2 login will be displayed in the application.
2. How to setup the OAuth2 support
First, we need to register the OAuth2 provider in the product to delegate the authentication of users. Once the OAuth2 provider is registered in the application, users will be able to authenticate thanks to this provider from the login page.
All the settings presented below are used to setup various configuration properties.
The configuration properties described in this document will all use KEYCLOAK as an example, you should replace the KEYCLOAK part with the name of your OAuth2 provider.
As an example below, you can see how to use one of the environment variable described in this document to use Keycloak or Github as the OAuth2 provider.
SPRING_SECURITY_OAUTH2_CLIENT_REGISTRATION_KEYCLOAK_CLIENT_ID=XXXX  // To use to register Keycloak as the OAuth2 provider
SPRING_SECURITY_OAUTH2_CLIENT_REGISTRATION_GITHUB_CLIENT_ID=XXX     // To use to register Github as the OAuth2 provider
The same change can be done to all the environment variables using KEYCLOAK.
Changing this part of the configuration property will not impact the behavior of the application but it will be easier to debug potential issues with the proper name.
Once configured, changing the identity of the OAuth2 provider (for example by changing KEYCLOAK to GITHUB in the environment variable) will change the identity of the account authenticated.
This may result in authentication issues for existing users (new accounts may be created instead of connecting them to their existing accounts for example).
These configuration properties can be configured using environment variables (the recommended approach) with variables such as SPRING_SECURITY_OAUTH2_CLIENT_PROVIDER_KEYCLOAK_ISSUER_URI or using system properties for example using -Dspring.security.oauth2.client.provider.keycloak.issuer.uri.
There are several ways to setup some external configuration properties for a spring boot application.
You can find more details on the list of all the Spring Security OAuth2 configuration properties in the official documentation.
2.1. Register Keycloak as a OAuth 2.0 provider
To register Keycloak as a OAuth 2.0 provider, you will need to set the following environment variables:
SPRING_SECURITY_OAUTH2_CLIENT_PROVIDER_KEYCLOAK_ISSUER_URI=http://localhost:8081/realms/YOUR_REALM_NAME
SPRING_SECURITY_OAUTH2_CLIENT_PROVIDER_KEYCLOAK_USER_NAME_ATTRIBUTE=preferred_username
Replace http://localhost:8081 with the URL of your Keycloak instance and YOUR_REALM_NAME with the name of your Keycloak realm.
If you are getting started with a brand new Keycloak instance, you will need to create a new realm in which your users will be managed.
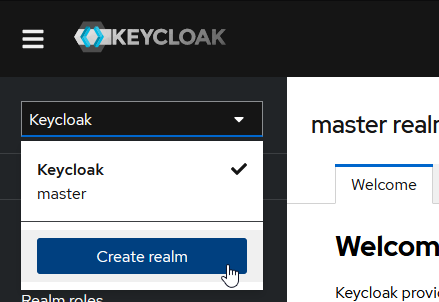
Once this is done, the server needs to be registered as a client of the OAuth2 provider to allow end users to authenticate with the OAuth2 provider. For that, the following environment variables are needed:
SPRING_SECURITY_OAUTH2_CLIENT_REGISTRATION_KEYCLOAK_AUTHORIZATION_GRANT_TYPE=authorization_code
SPRING_SECURITY_OAUTH2_CLIENT_REGISTRATION_KEYCLOAK_CLIENT_ID=YOUR_CLIENT_ID
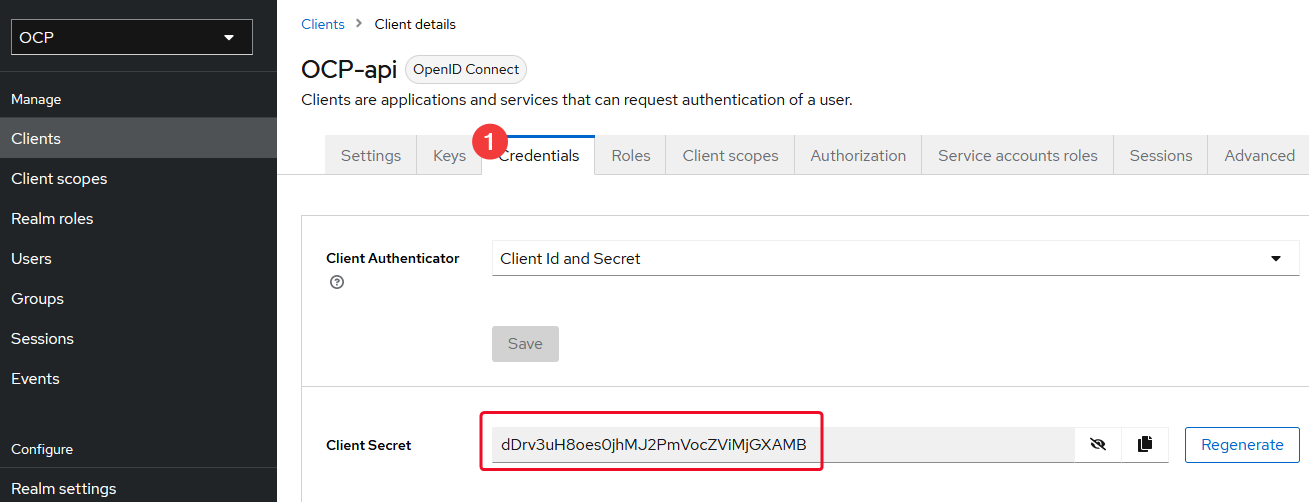
SPRING_SECURITY_OAUTH2_CLIENT_REGISTRATION_KEYCLOAK_CLIENT_SECRET=YOUR_CLIENT_SECRET
SPRING_SECURITY_OAUTH2_CLIENT_REGISTRATION_KEYCLOAK_REDIRECT_URI={baseUrl}/login/oauth2/code/{registrationId}
SPRING_SECURITY_OAUTH2_CLIENT_REGISTRATION_KEYCLOAK_SCOPE=openid
Replace the value of YOUR_CLIENT_ID and YOUR_CLIENT_SECRET with the real id and secrets that the application must use.
If you are getting started with a brand new Keycloak instance, you will need to create a new client for your realm and use its client id.
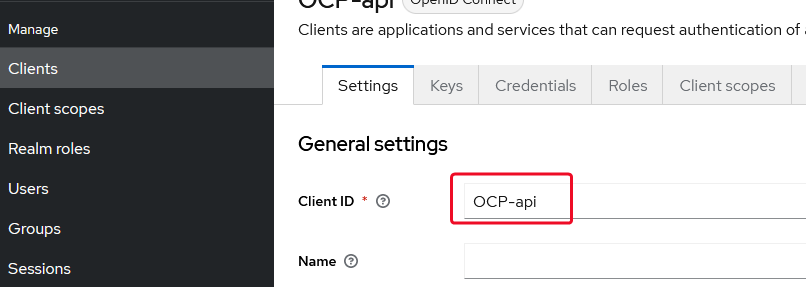
The client secret can be regenerated directly from the Keycloak user interface.
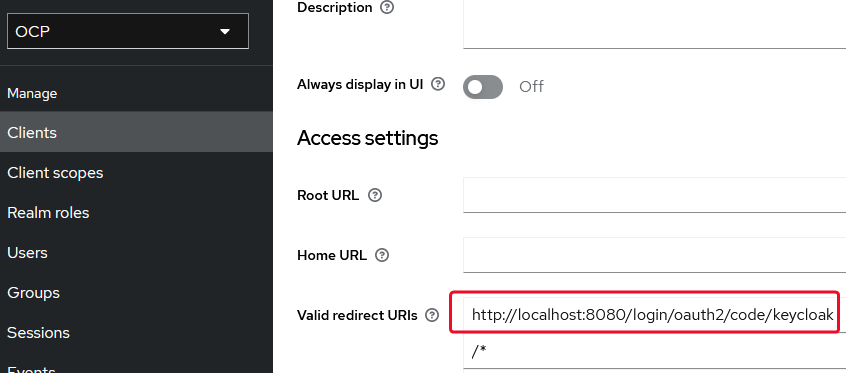
The value of the redirect URI should be the same as the one used by the application: {baseUrl}/login/oauth2/code/{registrationId}.
In your Keycloak instance, you should have a redirect URI matching the URL of the application such as: http://localhost:8080/login/oauth2/code/keycloak.
Replace http://localhost:8080 with the base URL of your application and keycloak with the identifier that you have used in the environment variables for the Keycloak instance.
When end users will try to log in the application, we will redirect them to the OAuth2 provider registered and compute a redirect URI to give to the OAuth2 provider from the environment variable.
By using {baseUrl}/login/oauth2/code/{registrationId}, if the server is running on http://localhost:8080 and the environment variables are using KEYCLOAK, we will ask the OAuth2 provider to redirect end users to http://localhost:8080/login/oauth2/code/keycloak.
This is the reason why the OAuth2 provider must accept this URI as a valid redirect URI.
Some OAuth2 providers may accept anything as a redirect URI while others may only accept specific URIs.
The value for the authorization grant type we recommend to use is the Keycloak Standard flow.
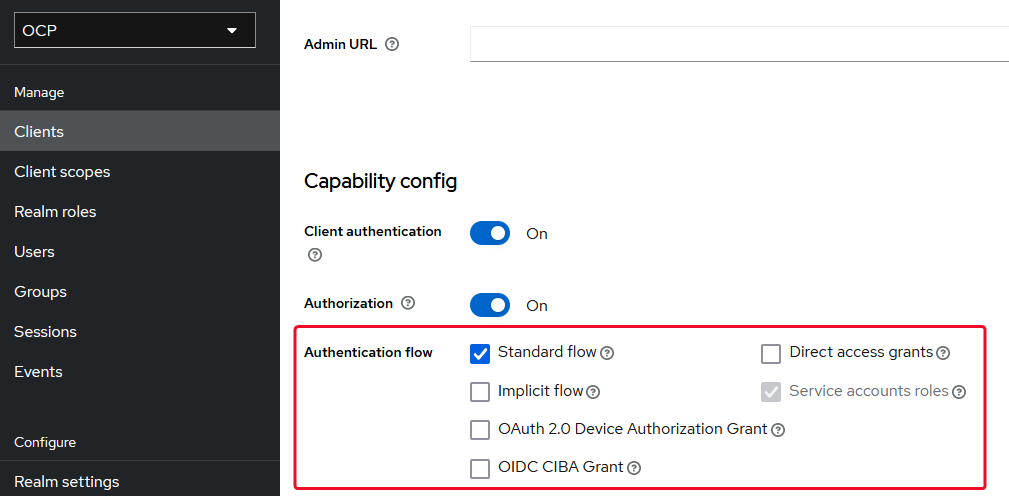
See the Keycloak documentation for other values.
2.2. OAuth 2.0 Resource Server registration
The product will also need the following environment variable to authorized external application to authenticate with a bearer token:
SPRING_SECURITY_OAUTH2_RESOURCESERVER_JWT_ISSUER_URI=http://localhost:8081/realms/YOUR_REALM_NAMEUse the same URL and realm name as the one above.
2.3. Issuer URI (advanced)
To work properly with a OAuth2 provider, the application needs this four environment variables:
SPRING_SECURITY_OAUTH2_CLIENT_PROVIDER_KEYCLOAK_AUTHORIZATION_URI
SPRING_SECURITY_OAUTH2_CLIENT_PROVIDER_KEYCLOAK_TOKEN_URI
SPRING_SECURITY_OAUTH2_CLIENT_PROVIDER_KEYCLOAK_USER_INFO_URI
SPRING_SECURITY_OAUTH2_CLIENT_PROVIDER_KEYCLOAK_JWK_SET_URI
If your OAuth2 provider provides an openid configuration, these four environment variables are not necessary.
The application can retrieve them using only the issuer URI thanks to the environment variable SPRING_SECURITY_OAUTH2_CLIENT_PROVIDER_KEYCLOAK_ISSUER_URI.
For that a Keycloak instance will for example provide the proper metadata at the following URI: http://localhost:8081/realms/YOUR_REALM_NAME/.well-known/openid-configuration
If your OAuth2 provider does not provide the openid configuration, you may need to setup each of those environment variables manually. Look at the documentation of your OAuth2 provider to find these values.
2.4. User name attribute (advanced)
The value provided to the environment variable SPRING_SECURITY_OAUTH2_CLIENT_PROVIDER_KEYCLOAK_USER_NAME_ATTRIBUTE should match a OAuth 2.0 claim which value must be a valid username.
The matching OAuth 2.0 claim value will be used as the username in the application.
The OAuth 2.0 claim can vary between provider, in Keycloak the recommended value for this environment value is preferred_username while with AWS Cognito the recommended value is cognito:username.
You could change this property to force your username to log in with their email for example.
3. Configure the user interface
The application will display each authentication strategy in a separate tab on the login page. By default, tabs are ordered alphabetically by their labels, with the built-in credentials login form placed last.
The tab order, the tab labels as well as their description, and the button label displayed for the strategy can be configured:
OCP_SECURITY_AUTHENTICATION_STRATEGIES_ORDER=strategy1_id, strategy2_id
OCP_SECURITY_AUTHENTICATION_STRATEGIES_STRATEGYID_TAB-LABEL=New tab label
OCP_SECURITY_AUTHENTICATION_STRATEGIES_STRATEGYID_DESCRIPTION=New description
OCP_SECURITY_AUTHENTICATION_STRATEGIES_STRATEGYID_BUTTON-LABEL=New button label
The strategy ID corresponds to the name of the OAuth 2.0 provider (for example, keycloak), or credentials for the default credentials login strategy.
Strategies that are not listed in the order configuration are still displayed after the listed ones and are sorted alphabetically by their tab label.
As an example, you can configure the tab label, button label and description for a keycloak configuration and the default credentials one using this environment variables:
OCP_SECURITY_AUTHENTICATION_STRATEGIES_KEYCLOAK_TAB-LABEL=OAuth2
OCP_SECURITY_AUTHENTICATION_STRATEGIES_KEYCLOAK_DESCRIPTION=Log in thanks to your existing OAuth2 account
OCP_SECURITY_AUTHENTICATION_STRATEGIES_KEYCLOAK_BUTTON-LABEL=Log in with Oauth2
OCP_SECURITY_AUTHENTICATION_STRATEGIES_CREDENTIALS_TAB-LABEL=Other...
OCP_SECURITY_AUTHENTICATION_STRATEGIES_CREDENTIALS_DESCRIPTION=Log in using your Server Admin credentials
OCP_SECURITY_AUTHENTICATION_STRATEGIES_CREDENTIALS_BUTTON-LABEL=Log in as admin