Publication For Capella Installation Guide
Publication For Capella provides three different components:
-
Publication Server: A server application to manage models and provide OSLC API, that depends on PostgreSQL as a database;
-
Web Client: a web UI accessible with a browser to connect and navigate through models contributed to the Publication Server;
-
Contributor Client: an add-on, packaged as an update site, to contribute models to Publication Server capabilities on top of an Eclipse-based bundle (such as Capella or Obeo Designer).
1. Environment
| Contributor Client | Web Client | Server | Comment | |
|---|---|---|---|---|
Operating Systems |
Windows, Linux, MacOS |
Windows, Linux, MacOS |
Windows, Linux |
|
Java Version |
Java 8 to 21 |
N/A |
Java 21 |
The Java version of the Contributor Client is that of the Capella in which the Contributor Client is installed. |
Capella Version |
1.4.0 to 7.0.1 |
N/A |
N/A |
2. Get Publication For Capella
Publication For Capella is distributed as three zip files:
-
perseus-server-application-<version>.zip: a zip file containing the Publication Server and Web Client, and the associated deployment file skeletons; -
fr.obeo.perseus.client.updatesite_<version>.zip: a zip file containing an update site to install the Contributor Client in an Eclipse-based bundle. -
fr.obeo.perseus.client.updatesite61_<version>.zip: a zip file containing an update site to install the Contributor Client in Capella 6.1 or above.
3. Conventions
In this document, we are using a convention to indicate a file path that must be replaced with a value that depends on the reader’s environment.
The convention is to surround the part to replace with < and >.
Some examples:
-
<absolute install folder url>/config: This syntax indicates that the user should replace<absolute install folder url>with its relevant value which could lead tofile:///C:/Obeo/publication-for-capella/config. -
https://<publication.mycompany.com>/oslc/rootservices: This syntax indicates that the user should replace<publication.mycompany.com>with the network name that has been assigned to the Publication For Capella server, such ashttps://localhost, which could lead tohttps://localhost/oslc/rootservices.
|
File URL syntax depends on OS
|
4. Recommended System Requirements
4.1. Server System Requirements
|
Before you Start
The machine where the Publication Server will be installed must have access to internet if you decide to use Docker to install PostgreSQL. |
For a successful installation of the Publication Server, your computer must meet at least the following requirements:
-
64 bits OS,
-
2 GHz processor,
-
RAM: 8 GB,
-
Depending on the size and number of models published, and the number of users, more RAM may be required.
-
-
15 GB of available hard disk space (but depending on the size and number of models published, more disk space may be required),
-
Java Runtime Environment 21 (tested on Eclipse Temurin 21.0.2+13, Amazon Corretto 21),
-
System requirements: Tested on Ubuntu 24.04.1 LTS, Windows 10.
Security policies:
-
Firewall:
-
At least 1 port must be opened, the Publication For Capella Server port (by default 443).
-
The computer should be fully dedicated to Publication Server.
4.2. Web Client System Requirements
The Web Client is browser-based software, which means it can be run on any desktop operating systems (MacOS, Windows, Linux, etc), as well as Chrome OS.
The Web Client has been tested with:
-
Chrome 141
-
Firefox 144
It is very likely to be compatible with additional browsers (especially the most recent browsers) but there is no guarantee.
The minimum operating system (OS) requirements are:
-
Either of:
-
Windows 11 or later
-
Apple MacOS 10.10 (Yosemite) and later
-
Any Linux OS that supports the browsers mentioned above
-
Any Chrome OS that supports the browsers mentioned above
-
| You can find out what browser and operating system version you’re using via What’s my Browser. |
4.3. Contributor Client System Requirements
The Contributor Client is an eclipse plug-in. It is primarily meant to be installed in Capella.
For successful installation of the Contributor Client, your computer must meet the following requirements:
-
System requirements: 64 bits, Windows 7/8/10/11, Windows Server 2016, 2019, 2022, Linux, MacOS
-
2 GHz processor.
-
RAM: at least 3 GB for the Eclipse based application running on the client. More RAM may be required depending on the size of models and other specific requirements.
-
1 GB of available hard disk space.
-
Java Runtime Environment version 8.
-
The specific JRE actually depends on the version of Capella. The Contributor Client is compatible with all the JRE versions use by the compatible versions of Capella.
-
-
Virus scanner should not be activated on models files:
*.aird,*.capella,*.capellafragment,*.melodymodeller,*.airdfragment,*.melodyfragment,*.afm, etc. -
Capella 1.4.0 or above.
5. Deployment Recommendations
5.1. Network
5.1.1. Latency: Publication Server and PostgreSQL server
It is strongly recommended that the Publication Server and the PostgreSQL server are located on the same physical server as latency between the Publication Server and PostgreSQL server will impact greatly the overall performances of the solution. As such the best performing deployment is achieved by using the PostgreSQL database with its .db database file located on the same disk as the Publication Server. If there is a requirement on the database that prevents using PostgreSQL on the same server, make sure that the latency is as low as possible.
5.1.2. Server Isolation
It is strongly discouraged to deploy the server on a public WAN. Publication Server should be the only way to edit the information stored in the database.
5.2. Scalability and Size of Models
Scalability and performances are highly dependent on the design of the domain meta-model, the implementation of this meta-model and the Viewpoint Specification Models. The following figures are given with an Ecore model and the EcoreTools tooling which applies the Sirius best practices. The minimum physical memory dedicated to the Publication Server is 4 GB for a deployment where the expected model size is in the order of 300 000 model elements.
5.3. Disclaimer
Notwithstanding what was stated previously, Publication For Capella is not warranted to run without any error or interruption. Obeo does not make any warranty regarding the statements that are under the chapter "Deployment Recommendations", this chapter is provided for information purposes. You acknowledge and accept the risks involved in using these products which could include without limitation, down time, loss of connectivity or data, system crashes, bad performances or performance degradation.
6. Publication Server Installation Procedure
6.1. All-in-one installation using Docker Compose
| To install Docker report to the official Docker documentation. |
Unzip the server archive delivered by Obeo to a folder on the host machine. This folder will be called the root folder in the following paragraphs.
Then there are two configuration steps to execute before running the server:
1) Configure the following elements in the file docker-compose.yml:
-
In service
perseus-server-application:-
mem_limitcan be used to set the maximum RAM usable by the service. -
mem_reservationcan be used to set the minimum RAM required by the service when memory resources become scarce. -
volumes-
/data/perseus-server-applicationLeave this volume as it is by default. -
You must provide an SSL certificate to the Publication For Capella application. For that, you can map a host folder to a local folder that contains the certificate file.
-
Example:
/Shares/INTERNET/Certificates:/data/certificatesmaps a host folder/Shares/INTERNET/Certificatesto the image folder/data/certificates, which can then be used in the application configuration to reference an SSL certificate.
-
-
You must map a local folder to a folder in the container to store the registered OSLC consumers:
-
Example:
./consumer_store:/data/consumer_store(maps local folderconsumer_store/to/data/consumer_storein the container)
-
-
-
-
In service
perseus-server-postgres:-
mem_limitcan be used to set the maximum RAM usable by the service. -
mem_reservationcan be used to set the minimum RAM required by the service when memory resources become scarce. -
volumes-
Leave the
./init.sqldefault mapping, it ensures proper initialization of the Publication For Capella database. -
You should map the internal
/var/lib/postgresql/datafolder to a folder of the host so that the database content is persisted out of the docker container.-
Example:
/home/publication/pgdata:/var/lib/postgresql/datawill map the host folder/home/publication/pgdatato the image folder/var/lib/postgresql/data, which is where the PostgreSQL database content is stored.
-
-
-
2) Configure the SSL certificate in the file config/application.properties.
Edit this file and set the following properties:
-
server.ssl.key-store-type=<certificate type>, for examplePKCS12if your certificate is in PKCS12 format. -
server.ssl.key-store=<absolute certificate file url>, for examplefile:///C:/data/certificates/publication.p12 -
server.ssl.key-store-password=<your password> -
server.ssl.key-alias=<the alias as defined in the certificate file> -
server.ssl.key-password=<your password> -
ocp.license=<your license>must be set with a dedicated license, that must be requested by sending an email to registration@obeo.fr -
perseus.oslc.host-namemust be set. Its value must be the host name, as it will be used by third-party repositories to connect through OSLC. The format of this property is the following:https://<publication.mycompany.com>(without a trailing slash), i.e. must begin withhttps://followed by the server name (name that will be resolved by a DNS), except in the context of an evaluation, where deployment in plain http is permitted. If a specific port is used then it must be indicated, e.g.https://publication.mycompany.com:9443. -
perseus.metaclass.filter.default- Optional, but recommended: Path to the file that defines the default metaclass filtering policy. Defaults tometaclass-filter.json, that loads this file from the Publication For Capella binary. Use value<absolute install folder url>/config/metaclass-filter.jsonif you use the recommended deployment with docker. -
perseus.oslc.linking.default- Optional, but recommended: Path to the file that defines the default OSLC linking configuration. Defaults tooslc-linking.json, that load this file from the Publication For Capella binary. Use value<absolute install folder url>/config/oslc-linking.jsonif you use the recommended deployment with docker.
The folder used in the path to the certificate file (/data/certificates) must be mapped to a folder of the host machine, for example /Shares/INTERNET/Certificates.
This mapping must be defined in the docker-compose.yml file.
|
| Creating and managing SSL certificates is beyond the scope of this document, but some explanations are provided in section Creating an SSL Certificate |
3) Configure the database access accordingly in the file config/application.properties.
Edit this file and set the following property:
-
spring.datasource.url=jdbc:postgresql://perseus-server-postgres:5432/perseus
In the root folder, run the following command to build the docker images:
docker compose buildFinally, in the root folder, run the following command to startup the server:
docker compose up -dThe following command makes it possible to access the server logs:
docker compose logs --follow perseus-server-application6.2. Installation without Docker Compose
6.2.1. Install PostgreSQL
There are two options:
-
You want to install PostgreSQL, go to the Install PostgreSQL by using Docker section,
-
You want to use an already installed PostgreSQL instance, go to the Existing PostgreSQL section.
Install PostgreSQL by using Docker
| To install Docker report to the official Docker documentation. |
You can install PostgreSQL yourself from Docker thanks to the following command:
docker run -p 5432:5432 --name perseus-server-postgres -e POSTGRES_USER=perseus -e POSTGRES_PASSWORD=password -e POSTGRES_DB=perseus -d postgres:15You can check that the perseus-server-postgres container is running thanks to:
docker ps-
Result example:
CONTAINER ID  IMAGE          COMMAND                 CREATED        STATUS        PORTS                   NAMES
b80207cd1b86  postgres:15  "docker-entrypoint.s…"  3 seconds ago  Up 2 seconds  0.0.0.0:5432->5432/tcp  perseus-server-postgres
Go directly to section Initialize the database by using Docker.
Existing PostgreSQL
It is possible that PostgreSQL is already installed (recommended version 15) at your site because the system administrator already installed it.
If that is the case, you should obtain information from your system administrator about how to access PostgreSQL and check that it is running configured with the default TCP port 5432.
Then go to section Initialize the database on an existing PostgreSQL.
6.2.2. Initialize the database
Initialize the database by using Docker
Before going on the installation, take time to check that the PostgreSQL database is finished to install and is running correctly. If you use the Docker command, you need to open a bash running on the Docker container:
docker exec -it perseus-server-postgres /bin/bashYou are now in a shell running in the Docker container where the PostgreSQL is installed.
Go directly to section Initialize the schema.
Initialize the database on an existing PostgreSQL
If you use an existing PostgreSQL installation, you need to:
-
Define the
POSTGRES_USERandPOSTGRES_DB,
export POSTGRES_USER=perseus
export POSTGRES_DB=perseus
-
Change the user to
postgres:
su - postgres
-
Create a user
perseus:
createuser $POSTGRES_USER
-
Create a database
perseus:
createdb $POSTGRES_DB
Initialize the schema
Then you have to initialize the database with a new schema liquibase:
If you are using Docker installation, exit the container bash (Ctrl-D) to come back to the server shell.
|
psql -v ON_ERROR_STOP=1 --username "perseus" --dbname "perseus" -c "CREATE SCHEMA IF NOT EXISTS liquibase AUTHORIZATION perseus;"6.2.3. Install Java application
Pre-requisites
| The server must be run with Java 17. |
The file <absolute install folder url>/config/application.properties must be filled in with correct information regarding a number of configuration points, including the database access (URL and user/password), the license key and the SSL certificate.
The relevant properties are the following:
-
server.port- Optional: The server port, defaults to 443 (the default for https). -
spring.datasource.url- Mandatory: The JDBC URL of the PostgreSQL database to use, e.g.jdbc:postgresql://localhost:5432/perseus. -
ocp.license- Mandatory: Value is the license key (to be obtained from Obeo). -
perseus.oslc.host-name- Mandatory: To set the server base URL. -
server.sslentries, to describe the SSL certificate to be used by the server:-
server.ssl.key-store- Mandatory: Path to the certificate file. -
server.ssl.key-store-type- Optional: Type of the key store, defaults toPKCS12. -
server.ssl.key-store-password- Mandatory: The store password. -
server.ssl.key-alias- Mandatory: The alias of the key to use in the key store. -
server.ssl.key-password- Mandatory: The key password (should be identical to the store password).
-
-
perseus.metaclass.filter.default- Optional, but recommended: Path to the file that defines the default meta-class filtering policy (=<absolute install folder url>/config/metaclass-filter.json). -
perseus.oslc.linking.default- Optional, but recommended: Path to the file that defines the default OSLC linking configuration (=<absolute install folder url>/config/oslc-linking.json). -
perseus.csp.whitelist- Optional, but recommended: Path to the file that defines a white list of third-party servers that are allowed to embed Publication For Capella pages within iframes (=<absolute install folder url>/config/csp-whitelist.json). -
perseus.properties.mappings- Optional, but recommended: Path to the file that defines the model object property mappings (=<absolute install folder url>/config/prop-mappings.json).
To start the server, run the following command in the folder where perseus-server.jar is located:
java -jar perseus-server.jarTo check that the server is properly running, connect from your browser to: https://<publication.mycompany.com>/.
By default, one user is created with the SERVER_ADMINISTRATOR role.
Set the property obeocloudplatform.admin.password in config/application.properties to specify the password of the administrator account BEFORE launching Publication For Capella for the first time.
By default, this password will be odweb.
This property is used only on the first time the server is started. It should then be removed from the file config/application.properties to avoid a security risk of password leak.
|
-
login =
admin -
password =
odweb(or whatever has been set in the propertyobeocloudplatform.admin.password)
6.2.4. OpenID Connect Authentication
To activate the OpenID Connect (OIDC) Authentication, an OIDC authentication server must be available.
The following informations are needed:
-
Authorization URL
-
Token URL
-
Client ID, as it is registered in the OIDC server
-
Client Secret, as it is registered in th OIDC server
In the OIDC server, 2 clients must be configured:
-
The Publication For Capella server, with a Client ID and a client secret;
-
The Publication For Capella contributor client, with a client ID and no secret. The contributor client uses
authorization_codewithPKCE, as recommended for native applications by the OpenID Connect and OAuth-2.0 best practices.
6.2.5. Under Windows Only - Install Jenkins
Under Windows, a Jenkins server must be installed. It will be used to run the server as a service.
6.3. Installing an SSL Certificate for https
Publication For Capella requires to be accessed by secure http (https protocol). Any access with plain http is rejected in production.
Consequently, to run Publication For Capella you must deploy an SSL certificate. It is beyond the scope of this document to explain what SSL certificates are and why they are important.
6.3.1. Creating an SSL Certificate
The most simple way to create a certificate is to use the 'keytool' utility that is provided with each version of the java runtime environment.
| Refer to your JVM’s official keytool documentation for more details. |
As an example, the following command will create a key pair (a public key and associated private key) for the server publication.mycompany.com as denoted by argument -dname.
It will wrap the public key into an X.509 v3 self-signed certificate, which will be stored in a single-element certificate chain.
This certificate chain and private key will be stored in a keystore (file publication.p12 indicated by -keystore) with PKCS12 type (argument -storetype), as a new entry identified by 'publication' (argument -alias).
The key pair will be valid for 365 days (-validity).
$JAVA_HOME/bin/keytool -v -genkeypair -dname "cn=publication.mycompany.com, ou=My Company System Dept, o=My Company, c=US" -alias publication -keypass <key_password> -keyalg RSA -keysize 2048 -keystore publication.p12 -storetype pkcs12 -storepass <store_password> -validity 365
& 'C:\Program Files\Java\jdk1.8.0_231\bin\keytool.exe' -v -genkeypair -dname "cn=publication.mycompany.com, ou=My Company System Dept, o=My Company, c=US" -alias publication -keypass <key_password> -keyalg RSA -keysize 2048 -keystore publication.p12 -storetype pkcs12 -storepass <store_password> -validity 365
The & at the beginning of the command line is important in PowerShell.
|
The publication.p12 key is generated into the folder from where you are running the command.
|
Specify the path of Keytool is not mandatory so could replace 'C:\Program Files\Java\jdk1.8.0_231\bin\keytool.exe' by keytool.exe.
|
This command produces a file publication.p12 that must be deployed on the Publication Server, which will use this certificate to encrypt and decrypt the https traffic.
See Deploying a Certificate on the Publication Server for more details.
The distinguished name (-dname) argument is important to indicate for which server the certificate is valid.
The server name should match the common name (cn) subpart of the distinguished name.
|
| A limitation of JKS stores (those used by Java virtual machines) makes it necessary to use the same password for the store and for the key (alias) within the store. |
When generating a self-signed certificate for local machine testing, use localhost instead of publication.mycompany.com for the common name 'cn'.
|
|
In production, it is recommended to use a certificate that is signed by a recognized certification authority. For testing purposes or any other reason it is possible to use a self-signed certificate, but in that case this certificate must be installed in the trust store of all the client JVMs (that is, the JVM used to run Capella on each user machine) to make it possible to publish models with the Publication For Capella contributor client. See Trusting the Publication Server Certificate for more details. |
6.3.2. Deploying a Certificate on the Publication Server
Assuming the certificate is stored as entry with alias publication in a keystore file publication.p12 (see Creating an SSL Certificate for details on how to create such a certificate), the deployment of a SSL certificate on the Publication Server is achieved using the following parameters in server’s command line, or better by setting them in the file <absolute install folder url>/config/application.properties:
-
server.ssl.key-store=<absolute SSL key folder url>/publication.p12(mandatory) -
server.ssl.key-store-password=<keystore password, e.g. m%g66bDgvT4>(mandatory) -
server.ssl.key-store-type=PKCS12(optional, default isPKCS12) -
server.ssl.key-alias=<alias, e.g. publication>(mandatory, the value must match the certificate alias in the key store) -
server.ssl.key-password=<alias password, e.g. m%g66bDgvT4>(mandatory, must be identical to the key store password above)
6.4. Publication Server and Proxies
To support OSLC communication with third-party repositories, the server needs to have access to these servers over internet. If this access has to go through proxies, then the server must be properly configured to handle the proxies to use.
Two mechanisms are supported: The use of environment variables, and the use of system variables.
6.4.1. Configuring proxies with environment variables
The Publication server will automatically take into account the following host’s environment variables:
-
HTTP_PROXY: Hostname and port of the proxy to use for HTTP, e.g.<proxy.example.com:8080>(should generally be avoided since communication between the Publication server and third-party servers should use HTTPS to be secure). If the port is omitted, defaults to 80. -
HTTPS_PROXY: Hostname and port of the proxy to use for HTTPS, e.g.<proxy.example.com:7443>. If the port is omitted, defaults to 443. -
NO_PROXY: A list of hosts that should be reached directly, bypassing the proxy. This is a list of patterns separated by|. The patterns may start or end with a*for wildcards. Any host matching one of these patterns will be reached through a direct connection instead of through a proxy.
6.4.2. Configuring proxies with system variables
The Publication server can use the following system variables (set using the usual -D syntax):
-
http.proxyHost: Name or IP address of the proxy host for HTTP (this is normally not what you should use with Publication For Capella, that should be deployed using HTTPS). -
http.proxyPort: Port of the proxy for HTTP, defaults to 80 (this is normally not what you should use with Publication For Capella, that should be deployed using HTTPS). -
https.proxyHost: Name or IP address of the proxy host for HTTPS. -
https.proxyPort: Port of the proxy for HTTPS, defaults to 443. -
http.nonProxyHosts: A list of hosts that should be reached directly, bypassing the proxy. This is a list of patterns separated by|. The patterns may start or end with a*for wildcards. Any host matching one of these patterns will be reached through a direct connection instead of through a proxy.
-Dhttps.proxyHost=proxy.mycompany.com
-Dhttps.proxyPort=7443
-Dhttp.nonProxyHosts="*.example.com|*.google.com"
6.5. OpenID Connect Server Set Up
Publication For Capella OpenID Connect support has been tested with Keycloak[1]. However, it must be compatible with any authentication provider that conforms to the OpenID Connect standard[2].
The following properties must be set in the application.properties file, with the prefix 'spring.security.oauth2.client.'.
In this section and the following, {oidc-provider-name} refers to the name of the OpenID Connect provider as it will be displayed in the Login page, if configured.
|
-
provider.{oidc-provider-name}.authorization-uri-
The Authorization URI of your OpenID Connect application.
-
For example:
https://keycloak.mycompany.com/realms/P4C/protocol/openid-connect/auth.
-
-
provider.{oidc-provider-name}.token-uri-
The Token URI of you OpenID Connect application.
-
For example:
https://keycloak.mycompany.com/realms/P4C/protocol/openid-connect/token.
-
-
provider.{oidc-provider-name}.user-info-uri-
The User Information URI of your OpenID Connect application.
-
For example:
https://keycloak.mycompany.com/realms/P4C/protocol/openid-connect/userinfo
-
-
provider.{oidc-provider-name}.jwk-set-uri-
The JWK[3] Set URI of your OpenID Connect application.
-
For example
https://keycloak.mycompany.com/realms/P4C/protocol/openid-connect/certs.
-
-
provider.{oidc-provider-name}.user-name-attribute-
The name of the attribute to use as login for the user on P4C.
-
This is used to reconnect existing accounts to OIDC authentications.
-
For example,
preferred_username.
-
-
registration.{oidc-provider-name}.authorization-grant-type-
The authorization grant type to use, value must be
authorization_code.
-
-
registration.{oidc-provider-name}.client-id-
The Client ID, as it is declared in your OpenID Connect application for Publication For Capella.
-
For example:
P4C-api.
-
-
registration.{oidc-provider-name}.client-secret-
The Client password, as it is declared in your OpenID Connect application for Publication For Capella.
-
-
registration.{oidc-provider-name}.redirect-uri-
The client redirect URI, as it is declared in your OpenID Connect application for Publication For Capella.
-
For example,
{baseUrl}/login/oauth2/code/{registrationId}
-
-
registration.{oidc-provider-name}.scope-
The scope of the client, value must be
openid.
-
-
perseus.oauth2.registration.id.for.perseus-contributor-client-
Registration ID of the OpenID client provider application, {oidc-provider-name}
-
Finally, depending on the configuration of the ID provider, either 1 or 3 additional properties must be set.
If the ID provider generates JWT access tokens, then one property must be set to secure access to the API from the Contributor Client:
-
spring.security.oauth2.resourceserver.jwt.issuer-uri-
The Issuer URI for the JWT[4] used by the Publication For Capella Contributor-Client.
-
For example,
https://keycloak.mycompany.com/realms/P4C
-
Otherwise, if the ID provider generates opaque access tokens, then three properties must be set to secure access to the API from the Contributor Client:
-
spring.security.oauth2.resourceserver.opaquetoken.introspection-uri-
The Introspection URI for verifying the opaque access tokens generated by the ID provider.
-
For example,
https://idp.mycompany.com/oauth/introspect
-
-
spring.security.oauth2.resourceserver.opaquetoken.client_id-
The contributor client ID, as declared in the ID provider configuration.
-
For example,
perseus-contributor-client
-
-
spring.security.oauth2.resourceserver.opaquetoken.client_secret-
The contributor client secret, as declared in the ID provider configuration.
-
For example,
f723lPfh6fvfJcghAl9xccD
-
As an example, here is the set of all these properties in an imaginary configuration file, configured for a Keycloak server hosted at http://localhost:8081:
spring.security.oauth2.client.provider.keycloak.authorization-uri = http://localhost:8081/realms/P4C/protocol/openid-connect/auth
spring.security.oauth2.client.provider.keycloak.token-uri = http://localhost:8081/realms/P4C/protocol/openid-connect/token
spring.security.oauth2.client.provider.keycloak.user-info-uri = http://localhost:8081/realms/P4C/protocol/openid-connect/userinfo
spring.security.oauth2.client.provider.keycloak.jwk-set-uri = http://localhost:8081/realms/P4C/protocol/openid-connect/certs
spring.security.oauth2.client.provider.keycloak.user-name-attribute = preferred_username

spring.security.oauth2.client.registration.keycloak.authorization-grant-type = authorization_code
spring.security.oauth2.client.registration.keycloak.client-id = P4C-api
spring.security.oauth2.client.registration.keycloak.client-secret = SomeSecretPassword
spring.security.oauth2.client.registration.keycloak.redirect-uri = \{baseUrl}/login/oauth2/code/\{registrationId}
spring.security.oauth2.client.registration.keycloak.scope = openid

spring.security.oauth2.resourceserver.jwt.issuer-uri = http://localhost:8081/realms/P4C

perseus.oauth2.registration.id.for.perseus-contributor-client = keycloak
6.6. Default Organization Setup
Since version 2026.5.0, Publication For Capella allows to create Organizations.
Organizations allow to structure the repository to separate projects and teams by concerns.
At least one default organization is required, whose name is specified through the mandatory perseus.default.org.name property in application.properties.
When migrating from a previous Publication For Capella version, the Default Organization will automatically be created (see Migrating to 2026.5.0 for more details) using the aforementioned property.
When launching Publication For Capella for the first time, on an empty database, the following procedure must be achieved in order to create the Default Organization:
-
Launch the server
-
Login as server administrator
-
Register a valid license
-
Create an administrator account. Either:
-
Create a basic account and assign it an
Administratorrole -
Login with OIDC with the account destined to be
Administrator, then assign it anAdministratorrole from the server administrator account
-
-
Create the default organization. Either:
-
From the administrator account, create an organization with the same name as the one specified in the perseus.default.org.name property
-
Relaunch the server: the default organization will be created automatically, with the previously created administrator account
-
7. Contributor Client Installation
|
Before you start
In this installation guide, we consider that an existing Eclipse based bundle is already installed (Capella, Obeo Designer…).
|
-
Launch your Eclipse based bundle:
capella.exe,eclipse.exe,SMW.exe, … (Capella, Obeo Designer, SMW…) -
For Capella versions 6.0 or below:
-
Click Menu Help > Install New Software…, add the archive file
fr.obeo.perseus.client.updatesite_<version>.zipin the updateSite folder and select the relevant features in the Publication For Capella category.
-
-
For Capella 6.1 and above:
-
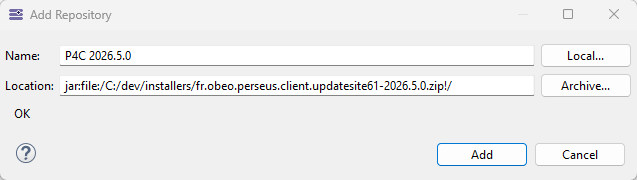
Click Menu Help > Install New Software…, add the archive file
fr.obeo.perseus.client.updatesite61_<version>.zipin the updateSite folder and select the relevant features in the Publication For Capella category.
-
-
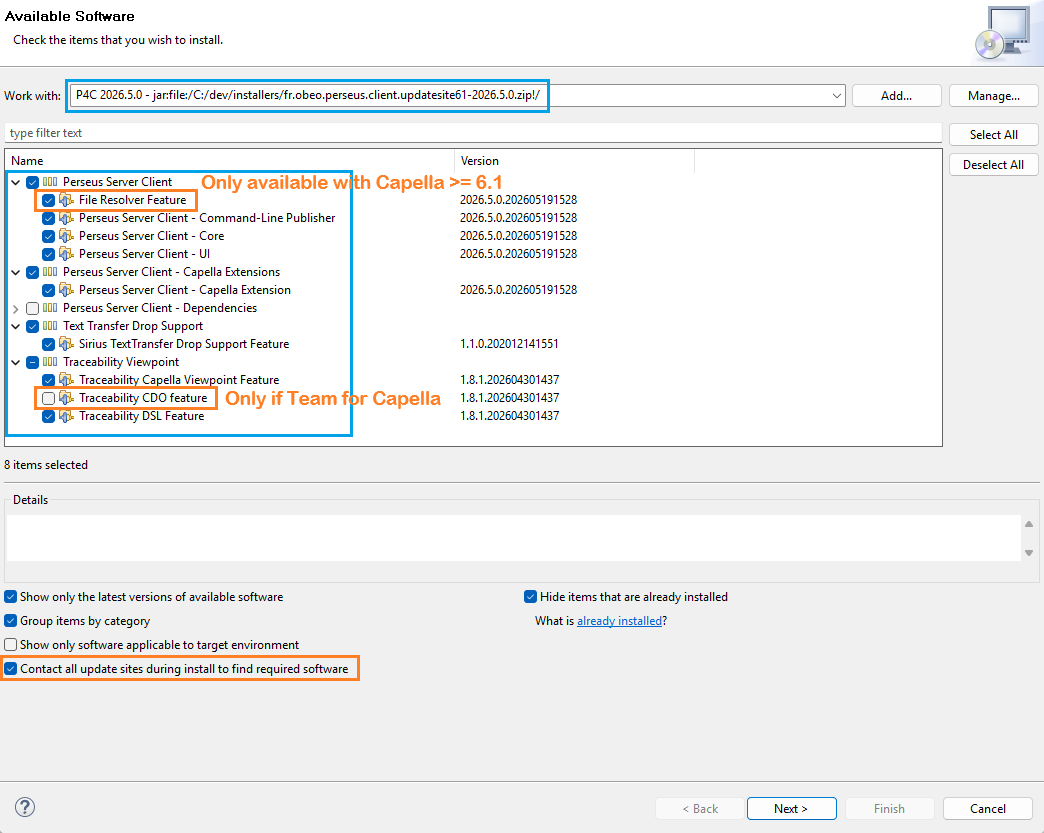
In any case, the installation must include the following features:
-
Perseus Server Client-
☑
File Resolver Feature(Only infr.obeo.perseus.client.updatesite61_<version>.zip) -
☑
Perseus Server Client - Core -
☑
Perseus Server Client - UI -
☑
Perseus Server Client - Command-Line Publisher
-
-
Text Transfer Drop Support-
☑
Text Transfer Drop Support Feature- Technical component required to support drag & drop from third-party repositories.
-
-
Traceability Viewpoint-
☑
Traceability DSL Feature- Technical component required to support drag & drop from third-party repositories.
-
-
-
In Capella, the installation must in addition include:
-
Perseus Server Client - Capella Extensions-
☑
Perseus Server Client - Capella Extension
-
-
Traceability Viewpoint-
☑
Traceability Capella Viewpoint Feature -
☑
Traceability CDO Feature- ONLY if Team for Capella is installed, must not be installed otherwise. -
☑
Traceability DSL Feature
-
-
-
The features within the category
Perseus Server Client - Dependenciesneed not be selected. -
It is also recommended, albeit not mandatory, to deactivate the option
Contact all update sites during install.
| The same procedure is used to upgrade an existing installation. The installation UI will be slightly different because some of the components will be upgraded since they are already installed in a former version. |
7.1. Trusting the Publication Server Certificate
7.1.1. The easy way (not safe for use in production)
-
Option
-Dfr.obeo.perseus.ssl.trust=true(orfalse) can be set in the filecapella.ini.
|
This should only be set to |
7.1.2. The hard way (for use in production)
If a self-signed certificate has been installed on the server (which should only be done for evaluation purposes), then it is necessary to validate the fact that you trust this certificate in the JVM used by the Publication For Capella client that will connect to this server (the 'Publication For Capella client' can be, for instance, the Capella that is used to publish models to the server).
If the certificate deployed on the server is signed by a widely recognized certification authority, then these step will probably not be necessary. You will know that the certificate is not recognized by the Publication For Capella client if you get an error message on publish that mentions 'PKIX' issues.

|
Using self-signed certificates should be avoided in production, but it is nevertheless a valid way of deploying Publication For Capella if needed. If the Publication For Capella certificate is self-signed, it must be added to the client’s JVM keystore (on each machine where the client is used). Otherwise, it may be necessary but it will depend on the way the certificate has been generated. |
As an example, the following command (when run on a client machine) will import a certificate with alias publication stored in file <absolute certificate folder url>/publication.p12 into the trust store of the JRE (Java Runtime Environment) located at <absolute JVM folder url>, truststore that is protected with the default password changeit (which is the default password used by Oracle JVM).
$JAVA_HOME/bin/keytool -v -importkeystore -srckeystore <absolute certificate folder url>/publication.p12 -srcstoretype pkcs12 -srcstorepass publication -srckeypass publication -srcalias publication -destkeystore <absolute JVM folder url>/jvm/lib/security/cacerts -deststoretype JKS -destalias publication -deststorepass changeit
Make sure the environment variable JAVA_HOME is set before running these commands.
Also, be careful that <absolute JVM folder url> should point to the JVM used by your Publication For Capella client instance (i.e. the Capella you use to publish models to the Publication Server).
|
& 'C:\Program Files\Java\jdk-11.0.16\bin\keytool.exe' -v -importkeystore -srckeystore <absolute certificate folder url>/publication.p12 -srcstoretype pkcs12 -srcstorepass publication -srckeypass publication -srcalias publication -destkeystore '\C:\Program Files\Java\jdk-11.0.16\lib\security\cacerts' -deststoretype JKS -destalias publication -deststorepass changeit`
The & at the beginning of the command line is important in PowerShell.
|
| Under Windows, you may have to run PowerShell as an Administrator if you want to store your self-signed certificate in the default truststore of your JVM. It will be the case in the JVM is located within C:\Program Files. |
7.2. Contributor Client and Proxies
The Contributor Client needs to have access to the Publication server over internet.
If internet access requires going through a proxy, then it is necessary to configure this proxy.
This is achieved by setting the relevant values of the following properties in the capella.ini file, after the line -vmargs:
-
http.proxyHost: Name or IP address of the proxy host for http (this is normally not what you should use with Publication For Capella, that should be deployed using https). -
http.proxyPort: Port of the proxy for http, defaults to 80 (this is normally not what you should use with Publication For Capella, that should be deployed using https). -
https.proxyHost: Name or IP address of the proxy host for https. -
https.proxyPort: Port of the proxy for https, defaults to 443. -
http.nonProxyHosts: A list of hosts that should be reached directly, bypassing the proxy. This is a list of patterns separated by|. The patterns may start or end with a*for wildcards. Any host matching one of these patterns will be reached through a direct connection instead of through a proxy.
(general configuration)

-vmargs
-Dhttps.proxyHost=proxy.mycompany.com
-Dhttps.proxyPort=7443
-Dhttp.nonProxyHosts="*.example.com|*.google.com"

(additional system properties)
8. Installation in a Team for Capella Context
This paragraph provides additional details that are relevant when Publication For Capella needs to be installed and used together with Team for Capella.
8.1. Conventions
Publication For Capella is distributed as a set of 3 files:
-
A zip archive
perseus-server-application-<version>.zipof the server binaries, documentation, and helper scripts. -
An update site
fr.obeo.perseus.client.updatesite-<version>.zipof the Contributor Client that can be installed in Capella (any version 6.0 or below). -
An update site
fr.obeo.perseus.client.updatesite61-<version>.zipof the Contributor Client that can be installed in Capella (6.1 and above).
8.2. Installing or Upgrading Publication For Capella
The zip archive of the server should be extracted in a folder that will be designated as <Publication For Capella>/.
It contains a folder TeamForCapella/ with the following structure:
-
<Publication For Capella>/-
(…)
-
TeamForCapella/-
tools/-
install_p4c.bash- To install the Publication For Capella client under Linux, in Capella versions 6.0 or below. -
install_p4c.bat- To install the Publication For Capella client under Windows, in Capella versions 6.0 or below. -
install_p4c_capella61.bash- To install the Publication For Capella client under Linux, in Capella 6.1 and above. -
install_p4c_capella61.bat- To install the Publication For Capella client under Windows, in Capella 6.1 and above.
-
-
-
When Publication For Capella is used in a Team for Capella environment, the Contributor Client must be installed not only in each end user’s Capella instance, but also in the Capella instance that is deployed on the Team for Capella server.
Assuming Team For Capella is installed in a folder <TeamForCapella>/, here are the steps to install the Contributor Client on the Team For Capella server:
-
Copy the script from folder
<Publication For Capella>/TeamForCapella/tools/to folder<TeamForCapella>/tools/. -
Copy the Publication For Capella zipped update site
fr.obeo.perseus.client.updatesite-<version>.zip(orfr.obeo.perseus.client.updatesite61-<version>.zip) to folder<TeamForCapella>/updateSite/. -
Run the script
install_p4c.batorinstall_p4c.bashdepending on the OS being used (batunder Windows,bashotherwise) and the target Capella version (install_p4c_capella61.bash/install_p4c_capella61.batfor Capella 6.1 and above).
The script output should look like this (the version numbers and other details will differ though):
 (...)
 +-------------------------------------------------------+
 + Uninstall previous Publication for Capella if present +
 +-------------------------------------------------------+
 (...)
 Operation completed in 4329 ms.
 ---------------------
 Uninstall successful. (or 'Uninstall returned code 13, this is expected in many cases so proceeding anyway.')
 ---------------------
 +-------------------------------------+
 + Install new Publication for Capella +
 +-------------------------------------+
 (...)
 Operation completed in 3918 ms.
 -------------------
 Install successful.
 -------------------
The script is able to upgrade the version of Publication For Capella if it was already installed.
8.3. Migrating Team for Capella Repositories
In most cases, it is necessary to migrate the Team for Capella repositories.
The reason for that is that each Team for Capella repository is tied to a specific set of meta-models being used for the Capella models authored within this repository. Consequently, whenever the upgrade of Publication For Capella requires a meta-model change, then the Team for Capella repositories must be migrated.
The following steps are required:
-
Import locally all the Capella project shared in Team for Capella, within a Capella with the Publication For Capella Contributor Client installed, in the most recent version.
-
Open each Capella project in this Capella instance, which will automatically migrate the Publication For Capella data, then save and close each of them.
-
Stop the Team for Capella server.
-
Make a back-up of the internal databases of each Team for Capella repository (folder server/db-auditing for static repositories, folder server/dynamic/xxx/_database for dynamic repositories).
-
Delete the internal databases of each Team for Capella repository.
-
Restart the Team for Capella server.
-
Re-export each project to T4C (but only after it has been opened locally at least once).
9. Migration Process
The migration of a version of Publication For Capella to the next generally consists in the following steps:
-
Server upgrade:
-
Turn off the existing server.
-
By security, back up the existing database and server environment.
-
Replace the jar file
perseus-application.jarby the new version. -
Add or update any JSON file in the
config/folder if necessary. -
Edit the
config/application.propertiesfile if necessary. -
Start the server using the same command as previously.
-
-
Contributor Client upgrade:
-
Install the new update site in all the Capella instances that need it.
-
If Team for Capella is involved, make sure to follow the dedicated procedure described in Installation in a Team for Capella Context
-
9.1. Migrating to 2026.5.0
A default organization will be created the first time the server is launched with an available administrator account. All existing administrators accounts will be automatically invited in the default organization as administrators of the organization, and all projects and teams owned by administrator accounts are transferred to this default organization.
A mandatory change is required to perform the migration:
The default organization name must be specified in the application.properties through the perseus.default.org.name property.
9.2. Migrating to 2025.10.0
Migrating from a previous version to 2025.10.0 implies the following deviations from the standard process described in Migration Process:
-
On the server side:
-
Optionally, upgrade the database to PostgreSQL 15.x, and reimport the former data into the migrated database.
-
This guide provides more detailed explanation for the scenario where Publication For Capella is deployed using docker and docker compose.
9.2.1. Migration Process with Docker
Migration Preparation
-
Turn off the Publication For Capella server to migrate (but not the PostgreSQL database it uses).
-
Create a back-up of the PostgreSQL database.
-
For example, run the following command (replacing
POSTGRESQL_CONTAINER_NAME,PATH_TO_BACKUP_FOLDER, and optionallyperseusif you have a different user):
-
docker exec -it POSTGRESQL_CONTAINER_NAME pg_dumpall -U perseus -E UTF8 > PATH_TO_BACKUP_FOLDER/dump.sql-
Check the backup file to make sure the backup ran correctly.
-
Copy this backup file somewhere safe to retrieve it easily in the next steps.
-
Stop the postgreSQL database (unless it was shared with other applications)
-
Upgrade PostgreSQL to 15.x (OPTIONAL)
Starting with version 2025.10.0, it is recommended to use the latest 15.x PostgreSQL version (15.14 at the time this documentation is written).
| This upgrade is not mandatory but it is recommended. |
If your installation was based on the docker-compose.yml and Dockerfile files provided within the Publication For Capella binaries, the you should edit your version of these files according to the new versions delivered in the Publication For Capella binaries.
Otherwise, you are expected to have the knowledge required to upgrade you PostgreSQL image and edit your own docker-compose files.
Once the new version of the postgreSQL database is installed, reimport the backup created above in PATH_TO_BACKUP_FOLDER/dump.sql.
docker exec -i POSTGRESQL_CONTAINER_NAME psql -U perseus < PATH_TO_BACKUP_FOLDER/dump.sqlVerify the restoration went well, and cleanup the backup files when they’re no longer required.
Migration of Publication For Capella
The process to run Publication For Capella with docker is still the same as with previous versions: build an image of Publication For Capella from the binaries delivered, and then run it in a docker container thanks to a docker-compose script.
Due to the deprecation of the openjdk docker image, the docker image of Publication For Capella is now based on Amazon Corretto, a no-cost, production-ready distribution of the Open Java Development Kit (OpenJDK).
The Dockerfile provided within the Publication For Capella binaries has been modified accordingly.
Make sure you update your Dockerfile, either by replacing it if you were using the one provided out-of-the-box, or by making the corresponding changes if you used a custom version of Dockerfile to build your Publication For Capella image.
Prepare the installation folder:
-
Upgrade the following files from the Publication For Capella 2025.10.0 binaries:
-
perseus-server.jar -
config/metaclass-filter.json -
config/oslc-linking.json -
config/prop-mappings.json
-
Eventually, the structure of the installation folder should be similar to the following:
- certificates/
    + perseus.p12 (1)
- config/
    + application.properties (2)
    + csp-whitelist.json (3)
    + metaclass-filter.json (4)
    + oslc-linking.json (5)
    + prop-mappings.json (6)
- docker-compose.yml (7)
- Dockerfile (8)
- init.sql (9)
- perseus-server.jar (10)| 1 | Your own certificate file, for example in PKCS12 format. |
| 2 | The main Publication For Capella configuration file. |
| 3 | Keep the previous version of this csp-whitelist.json file if you had one, otherwise use the latest one provided in the binaries. |
| 4 | Configuration of the default metaclass filter, it is recommended to use the latest one provided in the binaries. |
| 5 | Configuration of the default OSLC Linking settings, it is recommended to use the latest one provided in the binaries. |
| 6 | Configuration of the default propery mappings, it is recommended to use the latest one provided in the binaries. |
| 7 | Description of the containers to run together to have a working Publication For Capella installation. |
| 8 | Description of the steps required to build a Publication For Capella image. |
| 9 | File used to initialize the database when doing a new installation, not relevant for migration scenarios |
| 10 | The java archive of the Publication For Capella server application, always use the latest one provided in the binaries. |
9.3. Migrating to 2025.1.0
9.3.1. Impact of the New Licensing Enforcement System
-
Former Licenses are not Compatible with version 2025.1.0. Please contact the Obeo support to request a compatible license when you upgrade to version 2025.1.0. Obeo will then provide 2 license keys:
-
One for the server itself, to set int the file
config/application.propertiesas before; -
One for user accounts, to provide tokens that can be assigned to users to grant them permissions.
-
9.3.2. Impact of enforcing the use of OpenID Connect
-
Former user accounts can be kept, as long as the OpenID Connect authentication provider uses the login of the former account as the preferred username of the provided user. Make sure to set the property
spring.security.oauth2.client.provider.keycloak.user-name-attributeto the attribute that will contain the same name as was used previously.
9.3.3. Impact of the introduction of Teams
Publication For Capella previously had 3 automatically-created teams for each project. That is no longer the case.
However, existing teams are migrated and their name is prefixed with the name of the project they were attached to for readability purposes.
9.3.4. Additional Properties to Set
Some properties have been introduced in Publication For Capella and may need to be set to relevant values.
If you don’t plan to use OpenID Connect, use the following values in config/application.properties:
spring.security.oauth2.client.provider.keycloak.authorization-uri = http://keycloak.example.com/realms/P4C/protocol/openid-connect/auth
spring.security.oauth2.client.provider.keycloak.token-uri = http://keycloak.example.com/realms/P4C/protocol/openid-connect/token
spring.security.oauth2.client.provider.keycloak.user-info-uri = http://keycloak.example.com/realms/P4C/protocol/openid-connect/userinfo
spring.security.oauth2.client.provider.keycloak.jwk-set-uri = http://keycloak.example.com/realms/P4C/protocol/openid-connect/certs
spring.security.oauth2.client.provider.keycloak.user-name-attribute = preferred_username
spring.security.oauth2.client.registration.keycloak.authorization-grant-type = authorization_code
spring.security.oauth2.client.registration.keycloak.client-id = <Client ID as declare in OIDC server, e.g P4C>
spring.security.oauth2.client.registration.keycloak.client-secret = <OIDC Provider Client secret>
spring.security.oauth2.client.registration.keycloak.redirect-uri = {baseUrl}/login/oauth2/code/{registrationId}
spring.security.oauth2.client.registration.keycloak.scope = openid
spring.security.oauth2.resourceserver.jwt.issuer-uri = http://keycloak.example.com/realms/<P4C>
9.4. Migrating to 2024.5.0
-
A new file
csp-whitelist.jsonmust be added and referenced in the file<absolute install folder url>/config/application.propertiesfor the keyperseus.csp.whitelist.-
This file is distributed as part of the server package, in the
config/folder. -
For example:
perseus.csp.whitelist=file:///d:/apps/P4C/config/csp-whitelist.json. -
Refer to Content Security Policy White List for more details.
-
-
The meta-models used by the Publication For Capella Contributor Client have evolved. These changes are transparent for the end-user in plain Capella. In Team for Capella, the migration requires all shared sessions to be retrieved locally, migrated, then re-shared after the Team for Capella server environment has been upgraded.