Administration of Publication For Capella
1. Account Management
Server administrators can create user accounts and set the account roles. If OpenID Connect is not used for authentication, Server administrators can create user accounts and set the account roles. If OpenID Connect is used for authentication, then Server administrators can set the account roles.
To create an account or manage existing accounts, the server administrator must login and then select the menu entry 'Accounts' in the User Menu.
1.1. Accounts Page
The Accounts page lists the existing accounts.
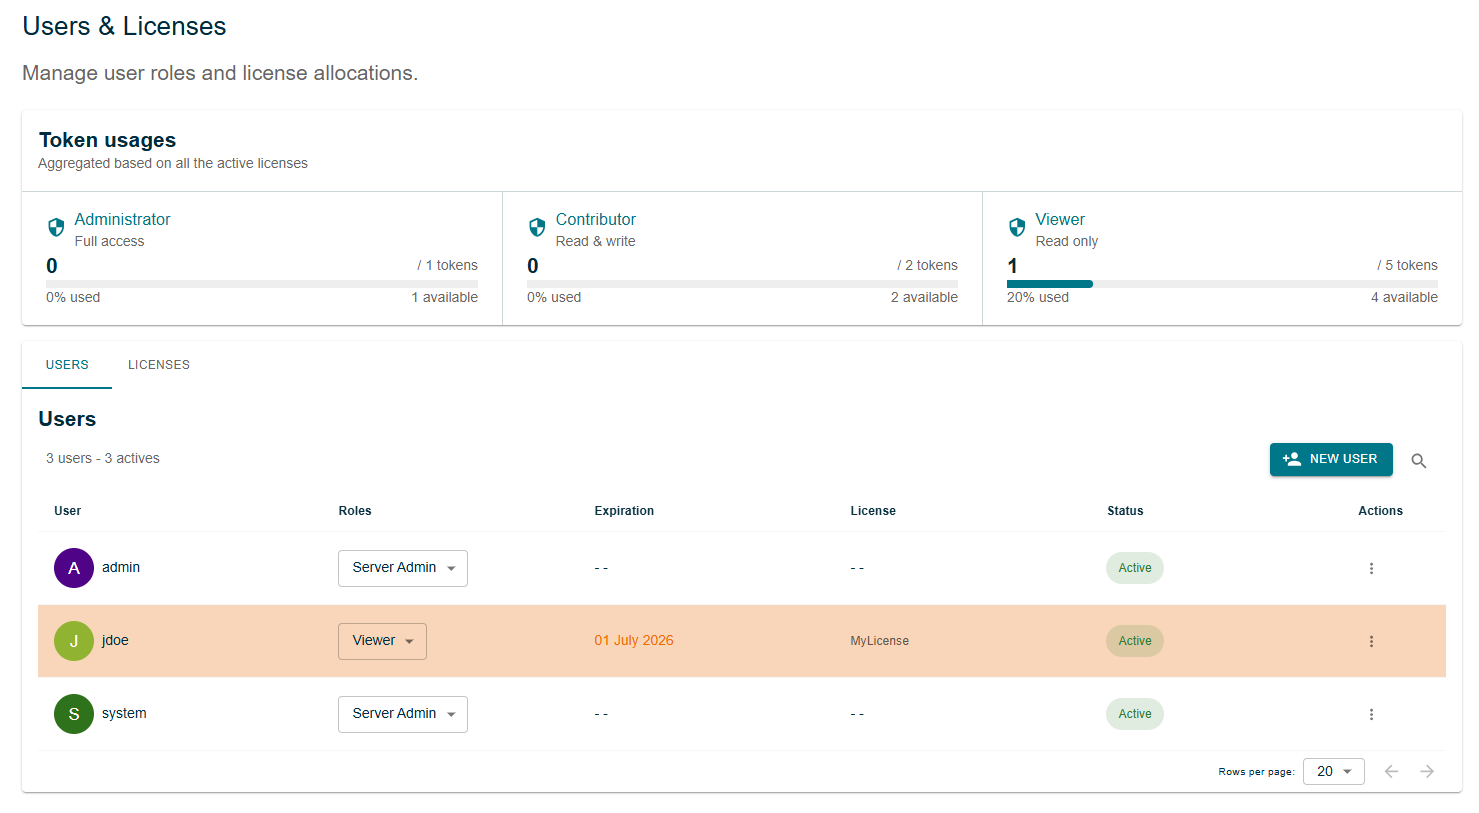
For each account the page lists:
-
User: the unique user name used to log in.
-
Roles: several roles can be assigned to the user.
-
Expiration: the closest expiration date among the licenses used to enable one of the user’s roles.
-
License: names of the licenses used to enable the user’s roles.
-
Status: the activation status of the account (Active/Inactive).
-
Actions:
-
View Details: opens the details page of the account.
-
Enable/Disable account: change the activation status of the account.
-
Click on 'New User' to create a new Account with basic credentials. See Account Creation for more details.
1.1.1. Account Creation
| Creating accounts only makes sense when not using OpenID Connect for authentication. If OpenID Connect is used for authentication, then accounts need not and must not be created manually. They will be created dynamically the first time a user logs in and authenticates successfully with the OpenID Connect authentication server. |
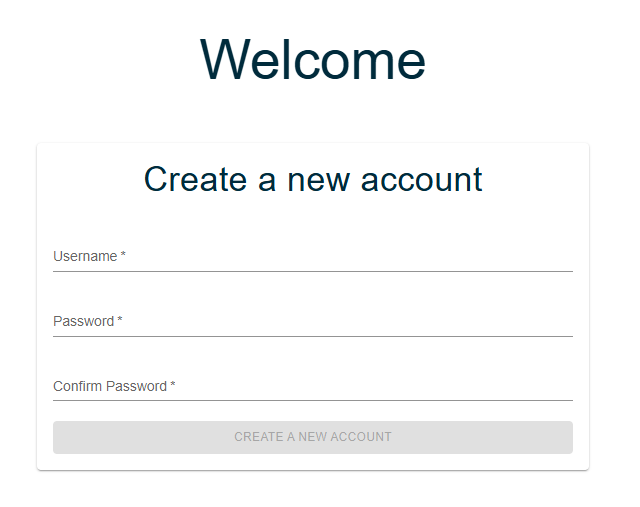

The password must contain at least 5 characters.

The confirmed password must be identical to the first password.
Once the form is ready, the 'Create account' button is enabled unless some fields are incorrect. Click on the 'Create account' button to create the new account.
| once created, an account cannot be deleted. This is on purpose to keep track of the user’s contributions. However, an account that is no longer relevant can be disabled by the server administrator. |
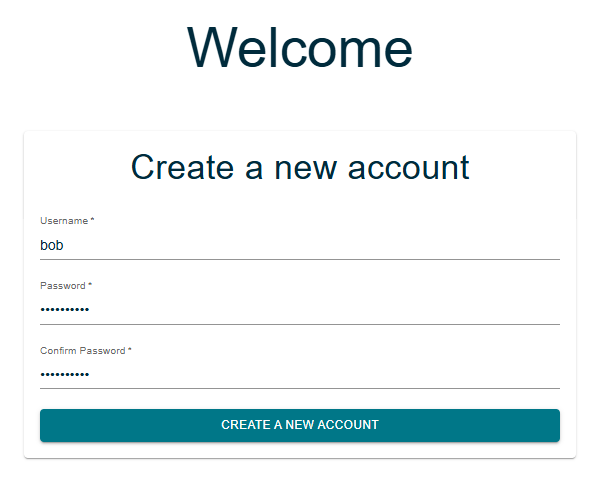
On successful creation user is redirected to the accounts list page. Newly created accounts are automatically enabled and assigned a Viewer role (see Account Roles for more details about roles).
1.1.2. Account Roles
Several roles can be assigned to a user, each one giving access to a set of permissions:
-
Viewer allows to:
-
consult the accessible projects
-
-
Contributor includes Viewer permissions and allows to:
-
publish Capella models to the Publication For Capella server and update models from the server
-
create OSLC links
-
create Baselines
-
-
Administrator includes Contributor permissions and allows to:
-
manage Organizations
-
manage Projects
-
manage Teams
-
delete Baselines
-
-
Server Administrator allows to:
-
manage Accounts
-
manage Licenses
-
manage Consumers and Friends
-
reload default configurations: OSLC linking, Explorer filters
-
These roles will restrict the access levels users can be granted on projects using teams (See [teams-mngt]).
To assign a role to an account, click on the dropdown menu in the role column and select the roles to assign.
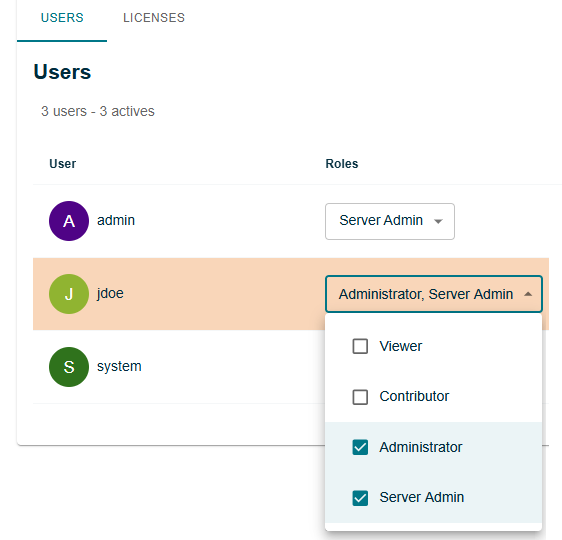
| An account cannot change its own role. It must be achieved by another Server Administrator. |
When setting a new role for an account, a license token of the same roles is automatically assigned to the account, as long as valid license tokens of that role are available. See Licenses Management for more details.
| If an account has a role that does not match a valid license token, the role will not be effective. |
1.1.3. Account Enablement
Each account can be enabled or disabled thanks to the enable/disable action in the accounts list.
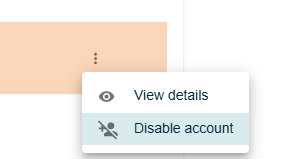
Newly created accounts are enabled by default. When a user account is disabled, the corresponding user will not be able to login anymore but the account is still present and can be re-enabled by an administrator at a later date.
| Disabling a user account will only have an effect the next time the user tries to login, but it will not immediately invalidate the user’s session if the user is connected. |
| If OpenID Connect is used, the user account should also be disabled in the OpenID Connect authentication server. |
1.2. Account Details Page
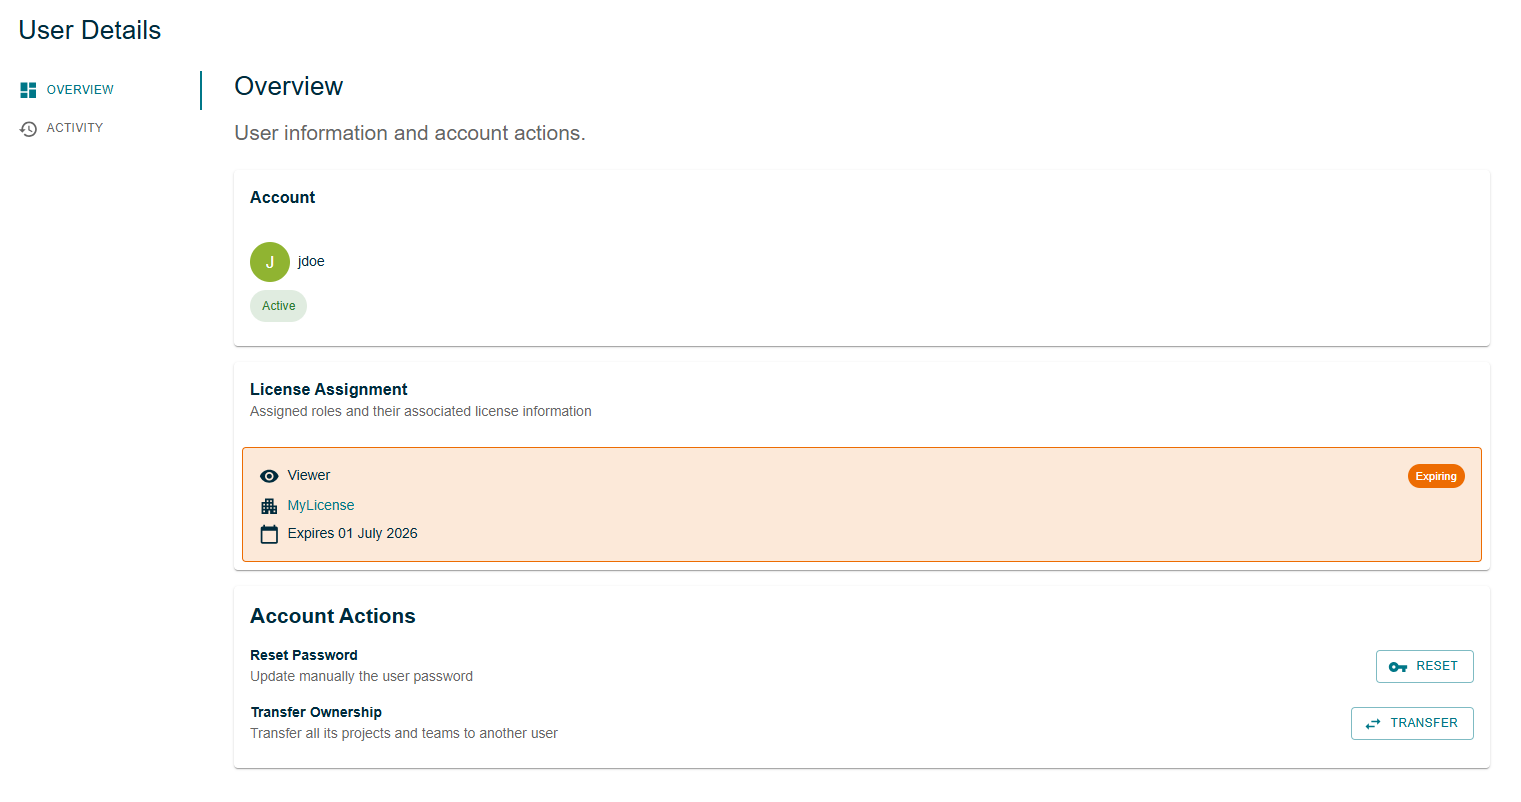
The 'Account Details' page displays the roles granted to the account, if any.
It also proposes the following actions:
-
Reset Password;
-
Transfer Ownership.
1.2.1. Resetting Account Password
The admin user can reset the password of any user account (including his own) that is configured to use username/password credentials.
| Resetting the password of accounts configured to login with OpenID Connect is an operation that must be performed in the OpenID Connect Authentication Tool, not in Publication For Capella. Attempting to reset the password of such an account in Publication For Capella will raise an error message and have no effect. |
Click on the 'Reset Password' button.
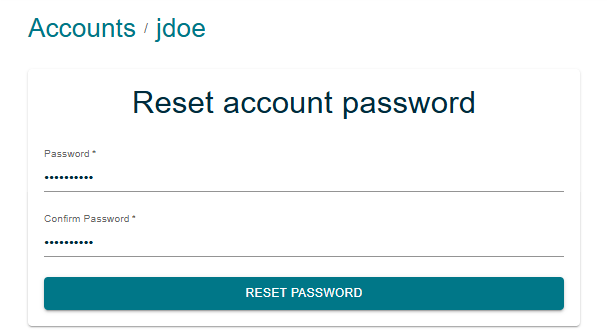
Enter the desired password, confirm it in the second text box, and click on 'Reset Password' to confirm.
The 'Reset Password' button is only active if the two password match.
The new password is active immediately and will be checked on the next login attempts of the user. However, if the user is currently logged in, they will not be required to verify their password until their session expires or they logout.
1.2.2. Transferring Ownership
Users can own projects or teams.
The recommendation is to handle projects and teams through organizations but users can own projects or teams outside an organization. This chapter is only applicable in this particular case where a user owns projects and teams.
This ownership can be transferred to another user or an organization, if needed.
| Transferring ownership transfer all teams and projects. It is not possible to transfer only a specific project. |
|
Who’s the Owner of this Project?
The owner of a project is displayed on the welcome page, as a little round icon that can be hovered with the mouse to get the owner’s username. 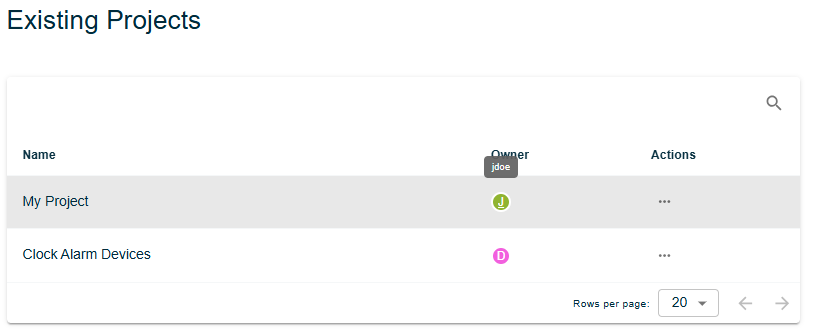
Figure 10. Owner of a Project
|
When a user creates a project or a team, he or she becomes its owner. The owner of a project can define a team that will grant administration rights to another user. Only the owner of a team can manage it.
The admin user can transfer the ownership of teams and projects of a user, to another user.
Transferring ownership form user1 to user2:
-
Makes
user2the owner of all the Projectsuser1owned. -
Makes
user2the owner of all the Teamsuser1owned. -
Removes
user2from all these Teams, since as new owner they don’t need to be explicitly in any of these Teams.
It is possible to disable the account of user1 after transferring their ownership if user1 must no longer access Publication For Capella.
|
Click on the 'Transfer Ownership' button.
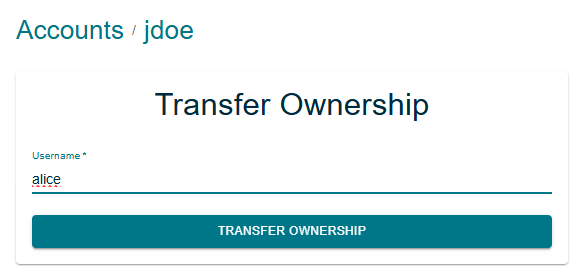
Enter the username or the organization name of the account that will become the new owner, and click on 'Transfer Ownership' to confirm.
2. Licenses Management
Server administrators can register licenses and grant roles to their users. A license contains a set of tokens for each role. Those tokens can be assigned to the server accounts.
Here are the defined roles:
-
Viewer; -
Contributor; -
Administrator.
The effective rights granted to the user are computed according to the following table, taking into account both the Teams in which the user is, and the license assigned to the user.
For a given project:
Assigned License |
|
|
|
in no team |
do nothing |
do nothing |
do nothing |
in team(s) with no access to this project |
do nothing |
do nothing |
do nothing |
in a team with access |
read |
read |
read |
in a team with access |
read |
read, edit |
read, edit |
in a team with access |
read |
read, edit |
read, edit, administer |
In other words, the access right to a specific project is computed from the Teams the user belongs to, within the limit granted by the license permissions assigned to this user.
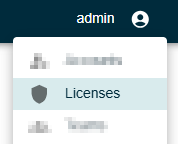
To access the licenses management page, click on the user icon, then in the user menu, click on 'Licenses':
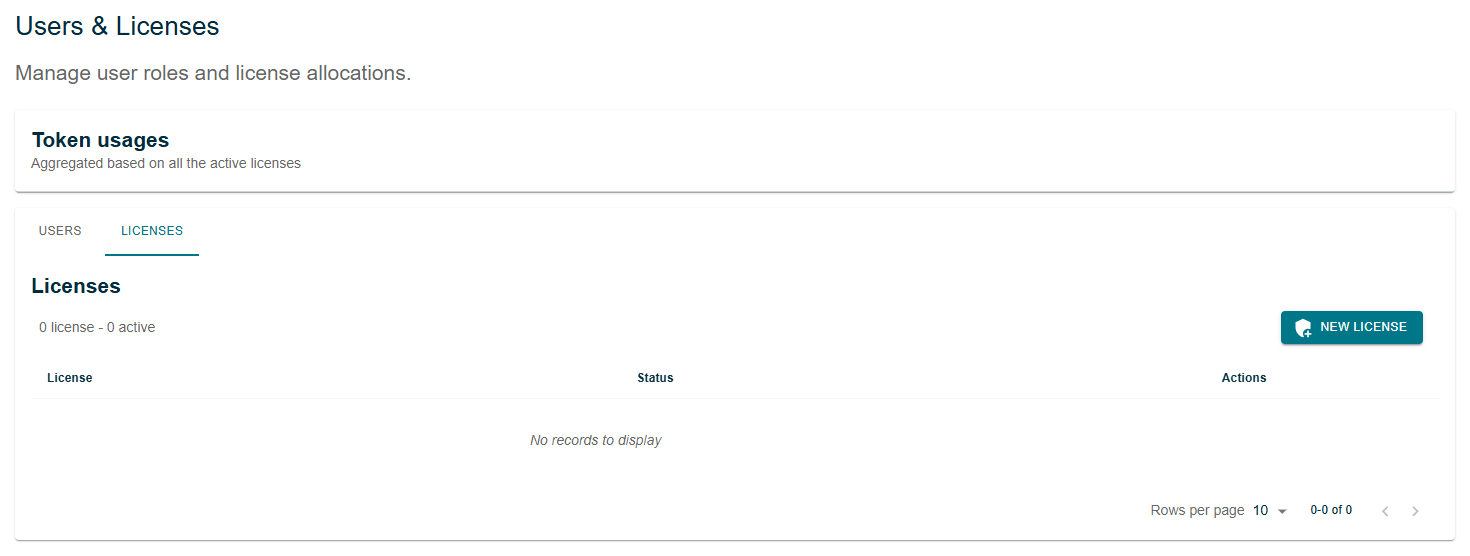
The Licenses page is then displayed:
2.1. License Registration
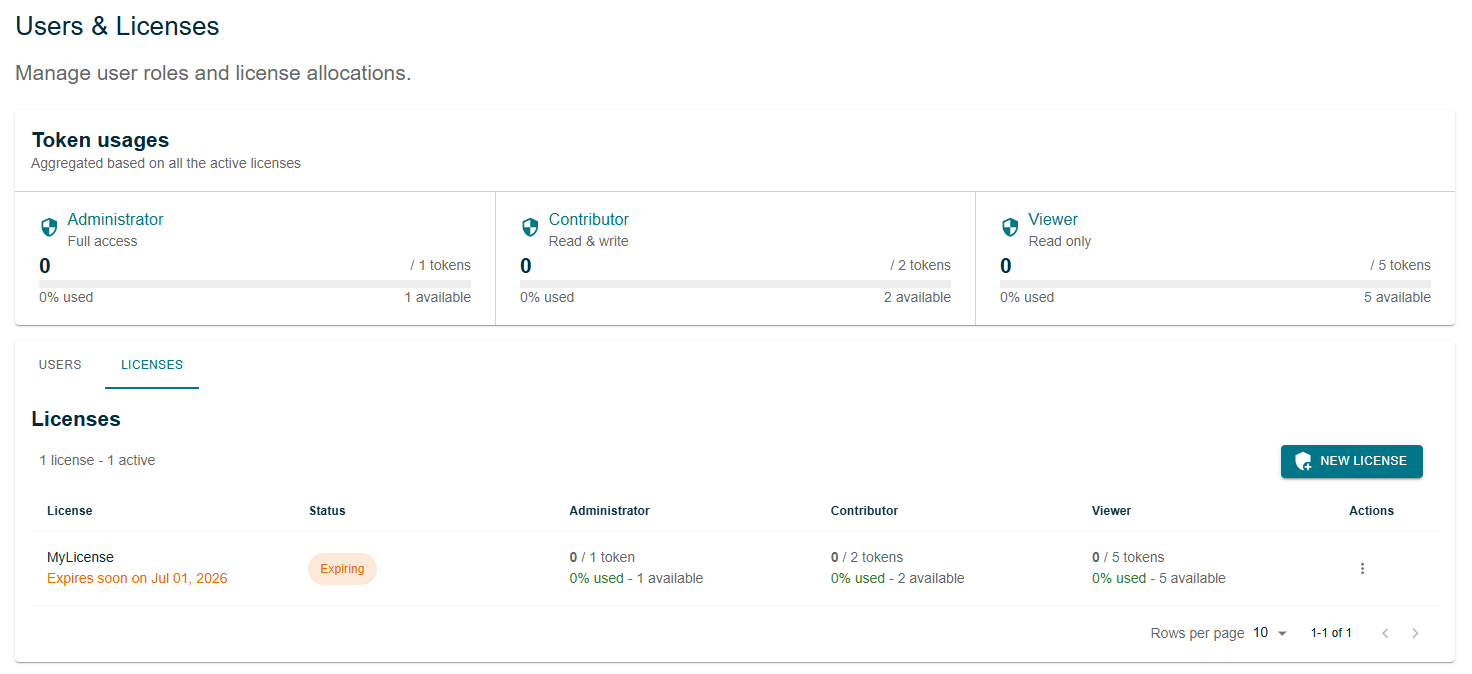
To register a license, click on the 'Register New License' button.
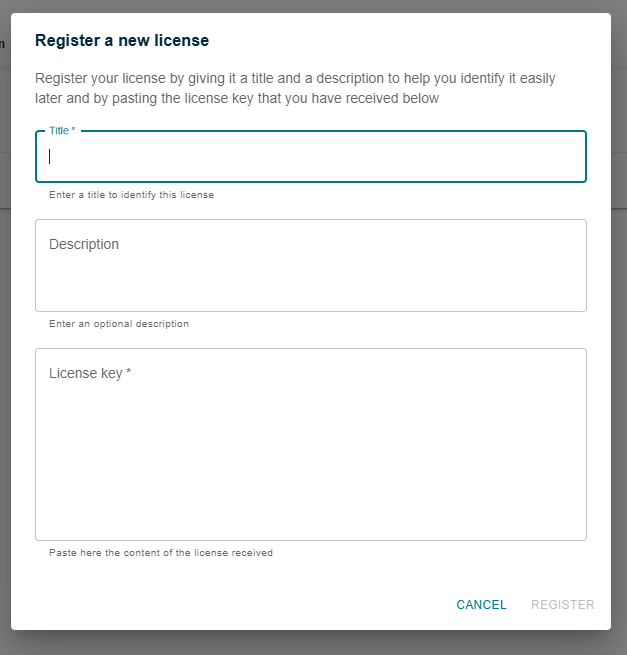
Once registered, the license displays its available tokens:
| Once registered, the license name and description cannot be updated. The license has to be deleted then registered again to set the desired name and description. |
2.2. License Details
The license summarizes all of the information about a given license. It can be accessed through the 'Details' action on the licenses page or by clicking on the license name.
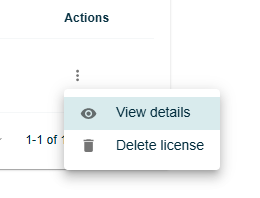
The details page displays the current usage of the license tokens and the users currently consuming tokens.
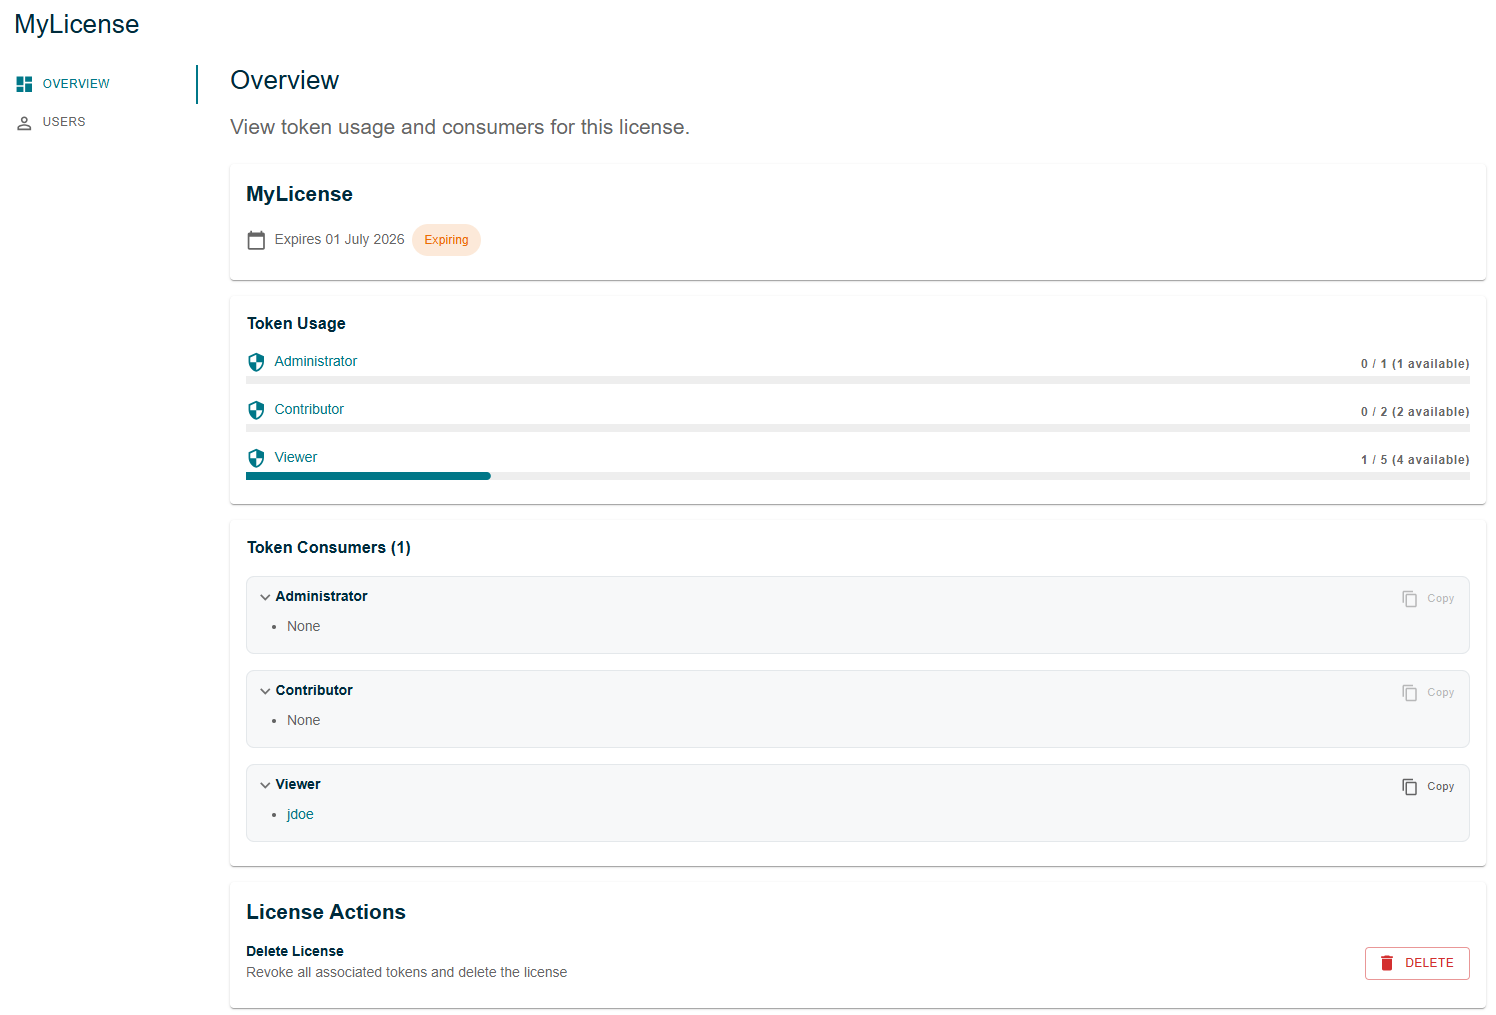
The 'Copy' actions in the 'Token Consumers' sections allow to copy to the clipboard a list of the current token consumption, in a textual format, e.g.:
Viewer token consumers:
user name
jdoe
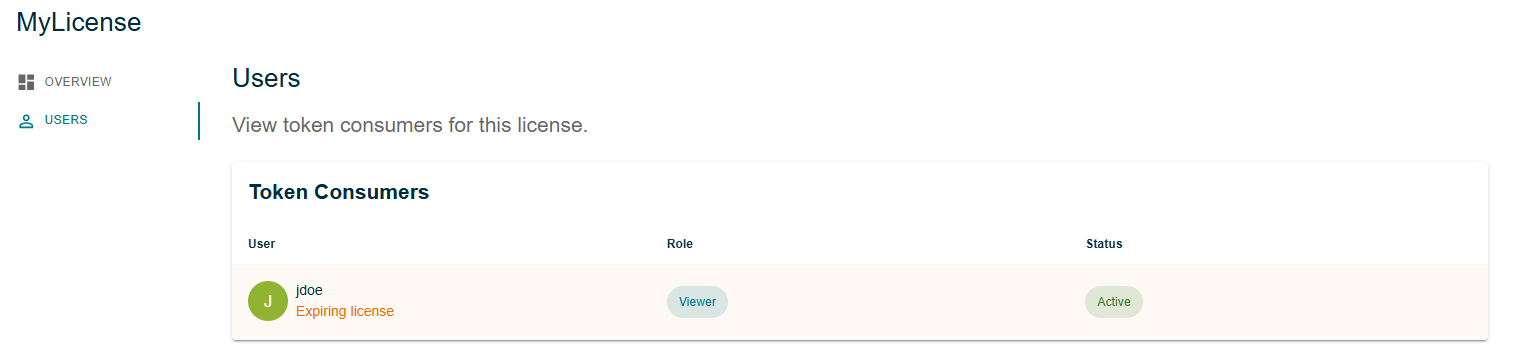
The 'Users' tab displays the token usage per user.
2.3. Token Assignment
Assigning a role to a user (see Account Roles) will automatically consume a token of the given role, if available.
| To pass a token from a user to another, first remove the role from the first user then assign the role to the second user. |
3. Authentication
Publication For Capella support two end-user authentication mechanisms:
-
Plain username/password authentication.
-
The account
admincan only use this authentication mechanism. -
Other user accounts can be created by
admin.
-
-
OpenID Connect authentication.
-
Setting up OpenID Connect is optional, but recommended.
-
A user account is created automatically on the Publication For Capella server when a new user successfully logs in via the OpenID Connect process.
-
4. OIDC Automatic Team Mapping
The application can automatically map users to Teams based on OIDC claims. This feature is optional and can be enabled by providing mapping properties.
4.1. Configuration
To enable the feature, the following properties must be added in the file config/application.properties:
-
ocp.oidc.organisation.claimKey: This property should be set todisabledto let the system use the default organization. -
ocp.oidc.organisation.defaultValue: The organization name where the missing teams will be created. This should be set to the default organization name, as defined by the propertyperseus.default.org.name. -
ocp.oidc.team.claimKey: The claim key for user teams, e.g.team. -
ocp.oidc.team.arrayDelimiter: Delimiter used to split multiple team names from the claim, e.g.,. -
ocp.oidc.team.createIfAbsent: (true|false) Whether to automatically create a team if it does not exist. -
ocp.oidc.team.defaultValue: (Optional) Default team assigned when the claim is empty or mapping is missing. -
ocp.oidc.team.filter: (Optional) A regular expression filter indicating whether the team name in the claim should be considered or not, e.g.Team.*(all team names in the claim which do not start by the prefix 'Team' will be ignored).
4.2. Behavior
-
On first login:
-
If the team claim exists, the user is assigned to the corresponding team(s) within the assigned organization; otherwise, the default team is created and assigned.
-
-
On subsequent logins:
-
The user is attached to their organization and teams according to the latest claims.
-
Memberships in teams not present in the claims are removed automatically.
-
-
Predefined organizations and teams:
-
Administrators can create organizations and teams in advance. Users logging in will join existing entities if their claims match.
-
4.3. Example
Assume the following claims in the OIDC token:
{
  "preferred_username": "alice",
  "team": "Team1,Team2"
}-
Alice will be assigned to
Team1andTeam2. -
If
Team1orTeam2do not exist andocp.oidc.team.createIfAbsent=true, they will be created automatically. -
If Alice belongs to a team not in the claim, she will be removed from that team on login.
5. Custom Information Extension
It is possible for the server administrator to customize the front-end to include specific information as a hoverable label in the header. This label will appear in the header on all the application pages. Hovering it will display the contents of a configurable HTML file.
The intended use-case for this extension is to display customer-specific information, such as where to get help and internal support, on every page of the application, so that end-users can easily find it.
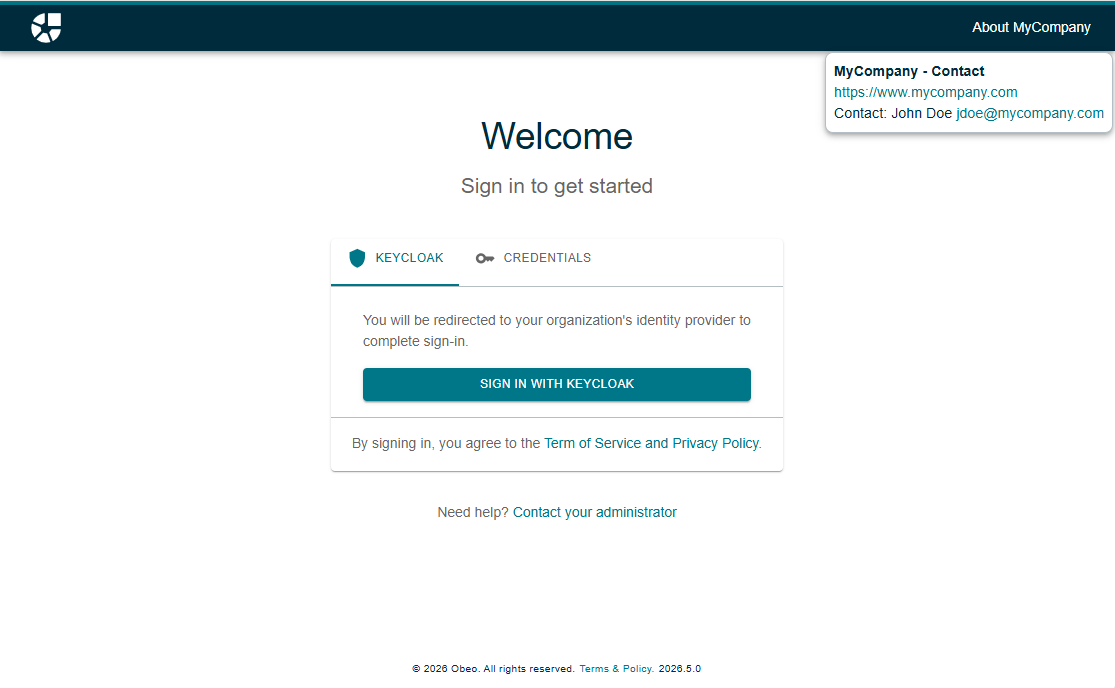
To configure such an extension, the server administrator must enter the relevant information in the file config/application.properties, and deploy a custom HTML file on disk on the server.
| The contents of this file can then be updated at will, changes will be taken into account immediately without restarting the server. |
Adapt the following example:
perseus.ui.extensions[0].id=sample (1)
perseus.ui.extensions[0].location=HEADER-RIGHT (2)
perseus.ui.extensions[0].label=About MyCompany (3)
perseus.ui.extensions[0].content=file:///path/to/sample-information.html (4)| 1 | Set a technical identifier, different for each extension. |
| 2 | Desired location in the application UI.
Currently, the only value supported is HEADER-RIGHT. |
| 3 | Human-readable label, this text will be displayed in the location indicated above (the header). |
| 4 | URL that points to a local HTML file that contains the page to display when hovering the label. This URL must not be a HTTP/HTTPS URL, it must point to a local file deployed on the server. Links can be included but images, CSS, JS and other third-party resources are not supported. |
Here is an example of such a file:
<!DOCTYPE html>
<html>
<head>
  <h1>MyCompany - Contact</h1>
</head>
<body>
  <p><a href="https://www.mycompany.com">https://www.mycompany.com</a></p>
  <p>Contact: John Doe <a href="mailto:jdoe@mycompany.com">jdoe@mycompany.com</a></p>
</body>
</html>
6. Custom Panel Visibility
The default visibility of the left-hand and right-hand panels of the web workbench UI can be customized using the following properties:
perseus.workbench.panels.left.visible = true (1)
perseus.workbench.panels.left.views[0].name = explorer (2)
perseus.workbench.panels.left.views[0].visible = true (3)
perseus.workbench.panels.left.views[1].name = search (4)
perseus.workbench.panels.left.views[1].visible = false (5)
perseus.workbench.panels.right.visible = true (6)
perseus.workbench.panels.right.views[0].name = details
perseus.workbench.panels.right.views[0].visible = true
perseus.workbench.panels.right.views[1].name = history
perseus.workbench.panels.right.views[1].visible = false| 1 | Setting the left-hand panel as visible by default |
| 2 | Defining the explorer as the view identified by index 0 |
| 3 | Setting the explorer as visible by default |
| 4 | Defining the search as the view identified by index 1 |
| 5 | Setting the search as hidden by default |
| 6 | And same thing for the right-hand panel, with the details and history views, details being visible and history hidden by default. |
| The view index does not indicate the view order in the UI. |
7. Content Security Policy White List
When answering HTTP requests, Publication For Capella automatically adds the list of friends in the frame-ancestors, frame-src, style-src and img-src directives of the Content-Security-Policy header of its responses.
The Content-Security-Policy header is useful to prevent certain types of cyber-attacks.
Adding the friend URLs in this header makes it possible to use the OSLC delegated dialogs while maintaining maximum security.
|
Additional white listed URIs can be added to that header in the config/csp-whitelist.json file as a list of string, e.g.: ["http://some_host"] or ["http://some_host","http://some_other_host"].
The file location can be set using the property perseus.csp.whitelist in the file config/application.properties.
It must contain http or https URLs with only a hostname and nothing more. Other values are rejected.
Any web site that should be able to embed Publication For Capella pages in iframe elements and that is not declared as an OSLC friend should be declared in this white list.
7.1. Example use-case
If OpenID Connect is configured for authentication, it may be necessary to explicitly declare the identity provider web site in this config/csp-whitelist.json file to allow the SSO login to take place properly in the context of an OSLC delegated UI.
8. Application Properties Summary
This section lists the properties available for a server administrator to configure Publication For Capella.
These properties need to be set in the file config/application.properties of the server.
They have sensible default values whenever it is possible.
8.1. Properties Inherited from Underlying Frameworks
8.1.1. General Application Server Properties
| Property key | Default value | Description |
|---|---|---|
|
443 |
The port the server must listen to. |
|
|
The session timeout (inactivity delay after which a web session is invalidated). |
|
Certificate type, e.g. |
|
|
Path to the SSL keystore file, e.g. |
|
|
Password of the SSL Keystore file. |
|
|
Alias of the SSL key in the keystore file. |
|
|
Password of the key in the file (generally identical to the file’s password). |
|
|
|
The JDBC URL of the Publication For Capella database. |
8.1.2. OpenID Connect Properties
The following properties need to be set only if authentication with OpenID Connect is desired.
In this section and the following, {oidc-provider-name} refers to the name of the OpenID Connect provider as it will be displayed in the Login page, if configured.
|
| Property Key | Description |
|---|---|
|
The issuer URI of the OpenID Connect server, which can be used to discover other URIs (authorization URI, token URI, User Info URI, and JWK Set URI).
For example, when using keycloak, |
|
The authorization URI of the OpenID Connect server.
For example, when using keycloak, |
|
The token URI of the OpenID Connect server.
For example, when using keycloak, |
|
The user information URI of the OpenID Connect server.
For example, when using keycloak, |
|
The JWK set URI of the OpenID Connect server.
For example, when using keycloak, |
|
The attribute to consider as the username within Publication For Capella, for instance |
|
The authorization grant type to use by Publication For Capella, should be |
|
The Publication For Capella Client-ID, as registered in the OpenID Connect server. |
|
The Publication For Capella Client secret, as registered in the OpenID Connect server. |
|
The OpenID Connect server’s redirect URI, for example |
|
The OpenID Connect scope to use, should be |
|
The JWT issuer URI, for example |
|
The id provider introspection URI to verify opaque access tokens, for example |
|
The ID of the client that uses these access tokens.
This must only be used together with |
|
The secret of the client that uses these access tokens.
This must only be used together with |
8.1.3. Sirius-Web Properties
8.1.4. Obeo Enterprise Framework Properties
| Property key | Description |
|---|---|
|
License key obtained from Obeo. |
|
Default password of the |
|
The claim key for user organization. |
|
The default organization where the missing teams will be created. |
|
The claim key for user teams. |
|
Delimiter used to split multiple team names from the claim. |
|
Whether to automatically create a team if it does not exist. |
|
Default team assigned when the claim is empty or mapping is missing. |
|
A regular expression filter indicating whether the team name in the claim should be considered or not. |
8.2. Publication For Capella Properties
The following properties are specific to Publication For Capella.
| Property key | Default value | Description |
|---|---|---|
|
|
The name of the default organization. |
|
|
Enablement of the polling of Jama Connect servers.
|
|
|
Jama server polling delay, in seconds. |
|
|
Enablement of the synchronization of attachments (with Jama Connect servers).
|
|
Path to the metaclass filter global defaults file. |
|
|
|
Timeout for Branch locks, in milliseconds. |
|
|
Timeout for Model locks, in milliseconds. |
|
|
Number of attempts to lock the model for publications. |
|
|
Delay to reload the UI extension HTML files, in ISO-8601 duration format. Negative durations or non-parsable durations are ignored and fall back to the default. |
|
ID of UI extension number 0 (the 1st extension). |
|
|
Location of UI extension number 0 (the 1st extension), must be |
|
|
Label of UI extension number 0 (the 1st extension), which will be displayed in the desired location. It is recommended to finish this label with a separator and a space, for example: `perseus.ui.extensions[0].label=Get Help - ` with an addition space at the end. |
|
|
URI of the HTML file to load, like |
|
|
Path to the Content Security Policy whitelist file. |
|
|
Path to the file that contains the mappings of properties |
|
|
|
Set the visibility of the left-hand panel. |
|
|
Set the |
|
|
Set the default visibility of the |
|
|
Set the visibility of the right-hand panel. |
|
|
Set the |
|
|
Set the default visibility of the |
|
|
Registration ID of the OAuth-2.0 Client that provides JWT to the Perseus contributor client.
The segment |
|
|
Name of the claim to use to obtain the client ID from the JWT provided by the OIDC server for a contributor client authentication.
By default, the client ID is read in the |
|
|
Signing Algorithm to use to verify JSON Web Tokens issued by the authentication provider corresponding to |
|
|
Timeout for OAuth connection requests, in milliseconds. |
|
|
Timeout for OAuth connections, in milliseconds. |
|
|
Protocol to use to obtain an OAuth-1 access token.
Possible values are: |
|
|
Timeout for OAuth sockets, in milliseconds. |
|
The duration for which an OAuth-1.0 token is valid, in ISO-8601 format.
For example: |
|
|
The public URL of the publication server, as it is accessed by third-party servers and end-users.
For example, |
|
|
|
Duration for which an entry in the rootservices cache is considered valid. |
|
|
Size of the rootservices cache. |
|
|
Timeout to fetch OSLC links, in seconds. |
|
|
Default height of OSLC previews, as a CSS String (including unit). |
|
|
Default width of OSLC previews, as a CSS String (including unit). |
|
|
Number of Threads to use for the OSLC Thread pool. |
|
Path to the OSLC linking default config file. |
|
|
|
The duration for which OSLC credentials are valid, in ISO-8601 format.
For example: |
|
|
This property must be set to make it possible for Publication For Capella to access the Atlassian (Jira or confluence) OSLC API.
This is necessary to be able to connect to recent versions of Jira or Confluence.
Adding this property will cause Publication For Capella to systematically add a header |