Using Publication For Capella Contributor Client
1. Pre-requisites
-
The Publication For Capella Contributor Client must be installed in Capella - Refer to the 'Publication For Capella Installation Guide'.
-
It is compatible with Capella versions between 1.4.0 and 7.0.
2. Contributor Client Settings
2.1. Publication Servers
One or several Publication For Capella Servers must be registered, with specific authentication policies.
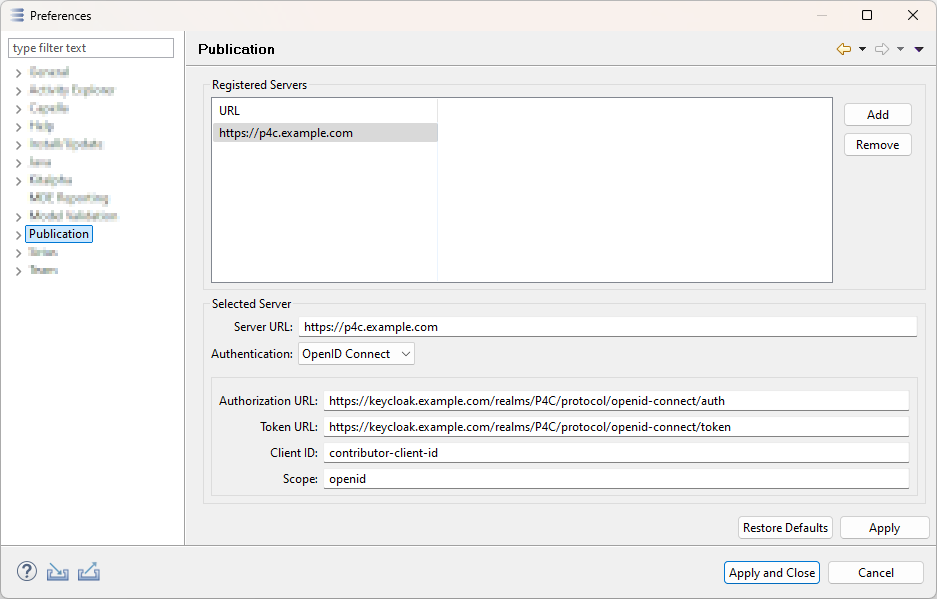
The settings are made in the Publication Preference Page.
-
Go to Window > Preferences and select the 'Publication' entry:
-
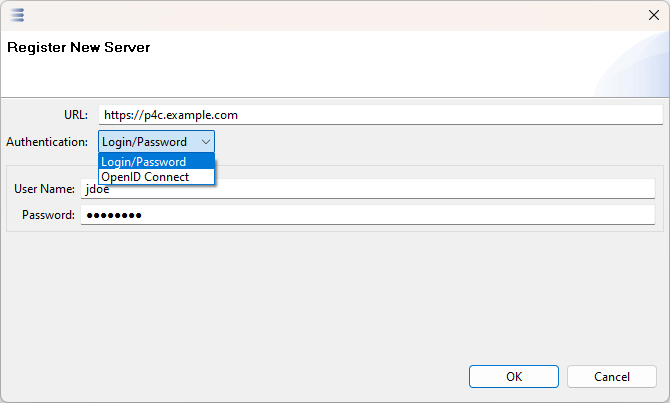
Click on 'Add' to register a new Publication For Capella Server:
-
The
URLfield must be set to the Publication For Capella Server URL (e.g.https://publication.mycompany.com:9443if Publication For Capella is deployed on a server calledpublication.mycompany.comon port9443)
There are two authentication modes available:
-
Login/Password
-
The
User Namefield should be filled in with the user’s login. -
The
Passwordfield should be filled in with the user’s password.
-
-
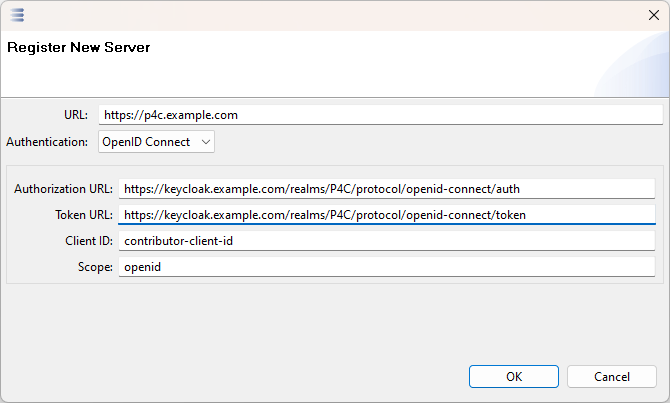
OpenID Connect
-
The
Authorization URLfield should be filled in with the OpenID Connect authentication provider’s authorization URL. -
The
Token URLfield should be filled in with the OpenID Connect authentication provider’s token URL. These two URLs should be requested from knowledgeable IT. The screenshot provides an example based on an imaginary KeyCloak server hosted atkeycloak.mycompany.com.
-
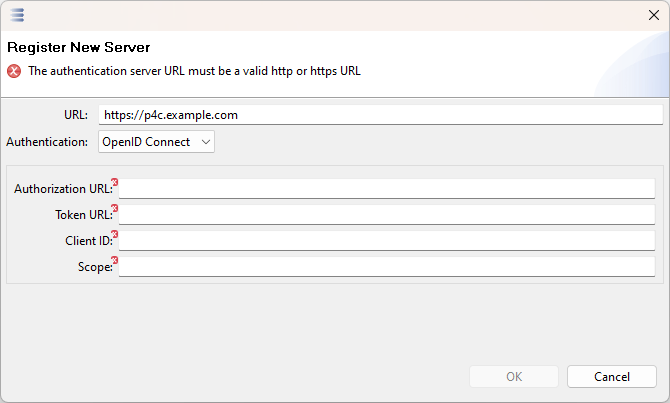
Error messages are displayed if necessary, for instance if the requested URLs are not valid.
2.2. Mapping of URLs for Link Creation
In order to support the creation of Traceability Links (See Managing Traceability) using drag and drop or copy/paste, it is necessary to configure the URLs that should be considered relevant for link creation.
The settings are made in the traceability model, for each artifact repository.
2.2.1. Automatic recognition
When creating a repository using the Initializing Traceability Model action, if its URL is recognized among the Known URL patterns, default URL patterns will automatically be created along with the Artifact Repository.

After that it will still be possible to modify the default pattern and to recreate it using the Add Default URL Patterns action.

2.2.2. Manual addition
It is possible to create custom patterns by manually creating them:
-
On a given Artifact Repository in the model tree, right click and select 'Add Capella Element > Url Pattern'.
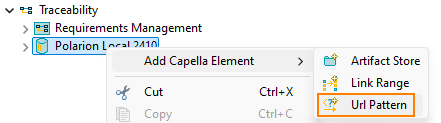
-
Edit the URL Mapping .Edit a given URL Mapping image::perseus-client/artifact-repo-add-url-pattern.png[URL Mapping Properties]
A URL mapping rule has the following properties:
-
ID: Not editable, auto-generated.
-
Name: A human-readable name supposed to describe the URL Mapping.
-
pattern: A regular expression that describes the URL being dropped or pasted. Any URL that matches this pattern will be considered as being a valid candidate to create a link by drag and drop or copy/paste.
-
Replacement: A String that describes what the matched URL should be transformed into. URLs that can be dropped or pasted from Artifact Repository web sites generally differ from the associated OSLC URL. A mapping thus makes it possible to convert a web site URL into an OSLC URL.
2.2.3. Known URL patterns
There are known URL patterns for the different third-party repositories Publication For Capella is compatible with. These patterns are documented hereafter for the sake of completeness but should be initialized automatically thanks to the Automatic recognition of third-party repositories.
Polarion Configuration
To deal with Polarion URLs, use the following values:
-
Pattern:
https://example.com/polarion/#/project/(?<prj>[a-zA-Z0-9_\-]+)/workitem\?id=(?<item>[a-zA-Z0-9_\-]+). -
Replacement:
https://example.com/polarion/oslc/services/projects/${prj}/workitems/${item}.
Where https://example.com should be replaced by a value that matches the Polarion server URL.
DOORS Next Configuration
To deal with DOORS Next URLs, use the following values:
-
Entry 1 (necessary to support link creation by drag & drop):
-
Pattern:
\Qhttps://<jts.mycompany.com>/rm/web#\E(?:[^&]+&(:?amp;)?)*\QartifactURI=https%3A%2F%2F<jts.mycompany.com>%3A9443%2Frm%2Fresources%2F\E(?<item>[a-zA-Z0-9\-\_]+).*. -
Replacement:
https://<jts.mycompany.com>/rm/resources/${item}.
-
-
Entry 2 (necessary to support link creation by copy/paste):
-
Pattern:
https://<jts.mycompany.com>/rm/resources/(?<item>[a-zA-Z0-9\-\_]+).*. -
Replacement:
https://<jts.mycompany.com>/rm/resources/${item}.
-
Where all occurrences of <jts.mycompany.com> should be replaced by the relevant value (the DNS name of the IBM Jazz Team Server).
Note that in the second part of the Pattern, : is replaced by %3A and / is replaced by %2F.
That is due to the way DOORS Next handles its web pages URLs.
Jazz EWM Configuration
To deal with Jazz EWM URLs, use the following values:
-
Pattern:
\Qhttps://<IBM_jts.mycompany.com>/ccm/web/projects/Drive%20Pilot%20(Change%20Management)#\E(?:[^&]+&(:?amp;)?)*id=(?<item>[0-9]+).*. -
Replacement:
https://<IBM_jts.mycompany.com>/ccm/resource/itemName/com.ibm.team.workitem.WorkItem/${item}.
Where https://<IBM_jts.mycompany.com>/ccm should be replaced by a value that matches the Jazz EWM server URL.
Note the use of \Q and \E: These are used to quote what’s between them without escaping special characters.
Note also the use of Drive%20Pilot%20(Change%20Management): This must match a project name from your Jazz EWM server.
Note that the project name is encoded to be valid in a URL, with spaces replace by %20 and so on.
Only artifacts from this project can then be dropped in Capella.
|
Jazz Quality Manager is not supported yet
Drag and drop from Jazz Quality Manager is not yet supported. The reason is that the OSLC URL of Jazz QM artifacts cannot be computed from the corresponding end-user URLs. This limitation should be resolved in a future version of Publication for Capella. |
In the above examples, the syntax (?<item>[a-zA-Z0-9\-\_]+) can be decomposed as follows:
-
(?<item>…): This defines a group of characters to match and gives a name to this group to reuse it easily in the replacement pattern. Here the name is 'item'. This makes it possible to reuse the captured group of characters in the replacement pattern with the syntax${item}. -
[…]+: Will match at least one to any number of characters among those listed between the brackets. -
a-zA-Z0-9\-_: Lower-casea-zor upper-caseA-Zletters, digits0-9, plus dashes-and underscores_. Dashes and underscores need to be escaped with a backslash character\.
Giving more details on regular expressions is out of the scope of this documentation. Refer to any online documentation regarding regular expressions in java to learn more.
Jira Configuration
| The following indications are only valid for use with the Jira add-on OSLC Connect for Jira by Sodius. |
To deal with Jira URLs, use the following values:
-
Pattern:
https://jira.example.com/browse/(?<item>[A-Z\_0-9]+\-[0-9]+) -
Replacement:
https://jira.example.com/rest/oslc/1.0/cm/issue/${item}
Where https://jira.example.com should be replaced by a value that matches the Jira server URL.
|
With recent versions of Jira and confluence, you must set an additional property in the file Without this property, the Atlassian server will reject API calls with a message |
3. Authentication
Every operation that involves data exchange between the Contributor Client and the Publication server is performed on behalf of a user with Write access on the project. Authentication is performed as configured in the preferences, which is driven by how the Publication server is configured.
3.1. Login/Password Authentication Flow
If the server is configured with Login/Password authentication (not recommended), then the Contributor Client will behave as follows:
-
The contributor client will use the credentials registered in the preferences.
-
If there are no credentials registered, the contributor client will display a pop-up requesting the login and password whenever necessary, and make up to 3 attempts to login (if the credentials provided are rejected).
-
In this case, the credentials registered in the preferences will be updated.
-
3.2. OpenID Connect Authentication Flow
If the server is configured with OpenID Connect, then the Contributor Client will behave as follows:
-
The contributor client will open a web browser page on the relevant OpenID Connect authentication provider’s page.
-
If the user logged in recently with the OpenID Connect authentication provider, this step might be skipped.
-
-
Once the authentication is processed by the OpenID Connect authentication provider, the web browser will be redirected to
http://127.0.0.1:<random_port>/login/auth?<openid-connect data>. The page will show a message indicated that the authentication has been successfully processed, in which case the web page can be closed. The page may also indicate that the authentication has failed, in which case the page can also be closed.-
If the authentication has been successful, the operation started in Capella can proceed.
-
|
Antiviruses or other security systems might react to the fact that the Contributor Client will start a (very lightweight) local server process to listen on the local host, what’s called the loopback interface at address 127.0.0.1, on a random port. This behavior is normal and is not a security issue, as it adheres to the current OAuth-2.0 best practices for user authentication from a native application which is to use the Authorization Flow along with the PKCE extension, omitting the client secret from the request, and to use an external user agent to complete the flow. See https://www.oauth.com/oauth2-servers/oauth-native-apps/ for more details. It is possible to force this local server process to use a specific port rather than a random port. This can be useful if any security mechanism in place requires to know the port of such a process. The option to set the port is fr.obeo.perseus.oauth2.local.server.port and must be set in the capella.ini file.Refer to section Contributor Client System Properties for more details. |
4. Managing Traceability
Since version 2023.3.0, the Contributor Client makes it possible to manage traceability within Capella models.
4.1. Configuring a Project to Support Traceability
4.1.1. Traceability Viewpoint Activation
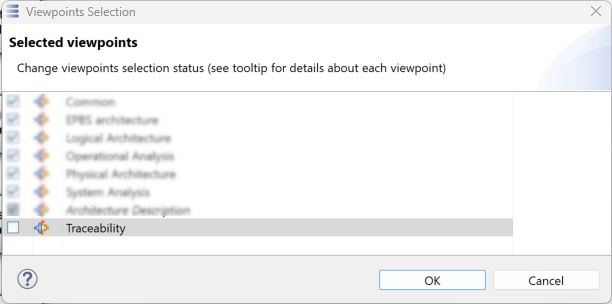
The activation of the Traceability viewpoint can be done with contextual menu 'Viewpoint Selection' available on .aird files.

The Traceability Viewpoint is automatically activated for new projects but it can be manually activated for projects that were created before installing the Contributor Client.
4.1.2. Initializing Traceability Model
Initializers are provided to help create and initialize traceability models.
If the Traceability model is not present, running any initializer will create it and add the traceability resource to the session.
There are currently two kinds of initializers:
-
Domain Initializers, that create Domains with a set of artifact types and link types.
-
Three Domain Initializer are available, for the three relevant OSLC domains: Requirement Management, Change management, and Quality Management.
-
If any of these domains is already configured in the model, the associated initializer will not be displayed in the list of available initializers.
-
A Domain Initializer is just an accelerator, all these initializers do could be done manually by the end users. Also, the domains created by these initializers can be modified as needed.
-
-
Repository Initializers, that create Artifact Repositories.
-
Repository Initializers are only available if the model has been published at least once, i.e. if it is tied to a specific URL on the publication server.
-
One initializer is available for each OSLC Friend configured on the server, if the associated Artifact Repository is not already present in the model.
-
After it is created, an Artifact Repository needs to be configured with relevant Link Range objects to define the types of links that can be created on which model element.
-
To run initializers, right-click on a *.aird file and use the menu Initialize Traceability.

Select the relevant initializers.
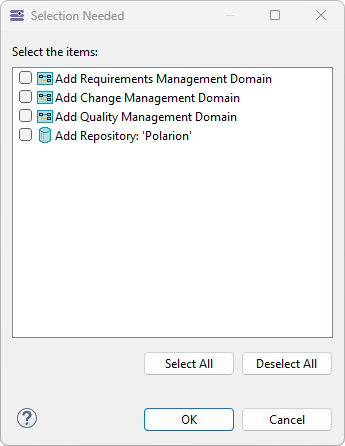
|
Traceability Model Creation
|
Traceability Models
It is possible to edit the Traceability model in the 'Package explorer' and the 'Properties view'.
|
Do not edit Traceability Models outside of a Capella model
Even though an editor exists for |
|
Capella 6.1 and Above Known Issue
There is a known issue with Capella 6.1 and Above: By default, the capability 'Expert Semantic Properties' is off. This capability must be turned on for the Publication For Capella Contributor Client to work properly. To activate it, open the preferences (Window > Preferences) and navigate to the section General > Capabilities. Then make sure that this capability, located in 'Capella Advanced Modeling', is turned on. 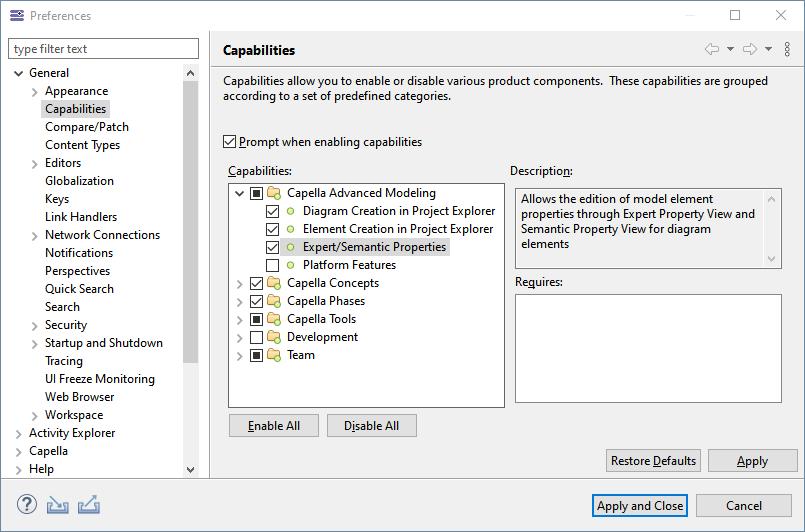
Figure 12. Capability to Turn On in Capella 6.1 and Above
Description of the problem If this capability is turned off, problems will happen whenever a user wants to edit information in the Traceability model, which is required to configure drag&drop from third-party repositories. The properties view will be empty and claim that there is 'no properties available' when the user selects any Traceability model element. This problem can actually happen in any Capella version if this capability has been manually turned off. |
Publication Settings
The traceability models contain some settings related to model publishing.
These settings are captured in an object of type PublicationSettings.
This object can be created manually with a right-click on the Traceability node in the model tree, then 'Add Capella Element > Publication Settings'.
-
Exclude Prefix(defaults to[PRIVATE]): The prefix to use in a diagram name to prevent its publishing. -
Filter Diagrams to Publish(defaults tofalse): Activating this option will prevent the publishing of diagrams prefixed with theExclude Prefixvalue. -
Publish Diagrams(defaults totrue): Activates or deactivates the publishing of diagrams. -
Publish Semantic Browser(defaults totrue): Activates or deactivates the publishing of semantic browser data. -
Refresh Diagrams(defaults totrue): If the optionPublish Diagramsis set, activating this option will refresh each diagram before publishing it.
See [model-nav] for more information about how the diagrams and the semantic browser are displayed by the server.
Domains
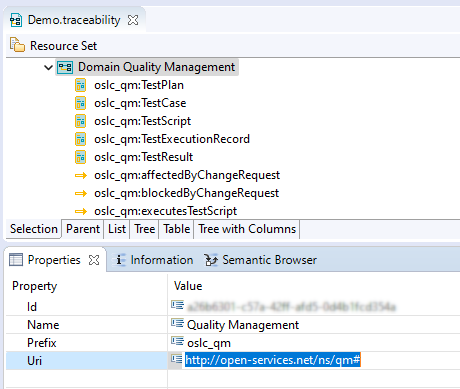
A Domain is a name space that defines a set of artifact types and link types.
-
Domain: Name space for defining artifact types and link types.
-
Name: mandatory, a human-readable name.
-
Prefix: mandatory, a short name of the domain, must be a valid XML namespace prefix.
-
Uri: mandatory, URL of the domain, must end with a slash '/' or a hash sign '#'.
-
| There is currently no way to retrieve traceability settings from the server into a Traceability model, this has to be done manually. |
|
Domain Constraints
Domain attributes All the domains defined in a model must have a distinct URI and Prefix. |
-
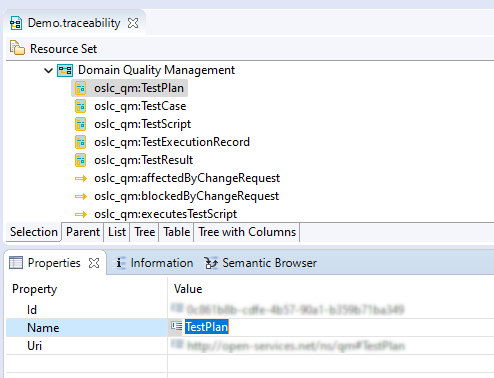
ArtifactType: Specifies the type of artifact
-
Name: mandatory, name of the type, should start with an upper-case letter.
-
Uri: not editable, derived attribute, based on domain URI and name.
-
-
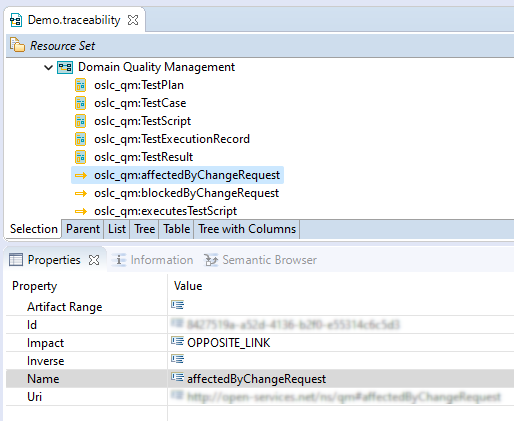
LinkType: Specifies the type of a link between a model element and an Artifact.
-
Name: mandatory, name of the link type, should start with a lower-case letter.
-
Uri: not editable, derived attribute, based on domain URI and name
-
Artifact range: optional, applicable artifact types list - Reserved for future use
-
Impact: optional, No impact / Symmetric impact / follows link / Opposite link - Reserved for future use
-
Inverse: optional, inverse link type - Reserved for future use
-
|
Ignored Properties
The |
Artifact Repositories
-
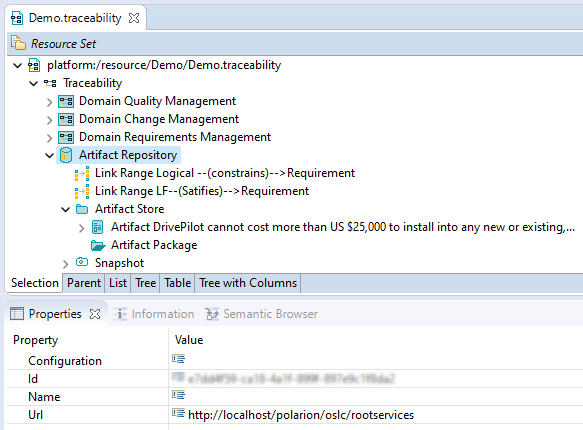
ArtifactRepository: One ArtifactRepository should be present in the model for each third-party OSLC Friend server configured on the Publication server. An ArtifactRepository owns [o..n] Link Ranges, [0..1] Artifact Store, and [0..n] Snaphosts.
-
Name : optional, label of the repository.
-
Url : mandatory, URL of the server, must match the URL of an OSLC Friend configured on the Publication server.
-
Configuration: optional, reserved for future use.
-
|
ArtifactRepository Mandatory attributes
The |
Link Ranges
-
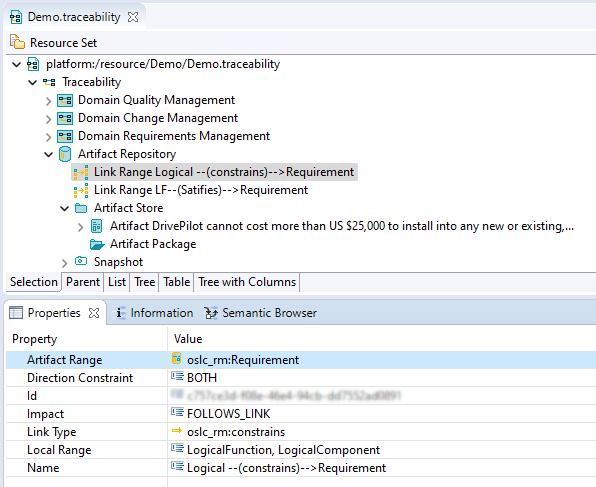
LinkRange: customization specifying for a given link type the possible source and target objects. It is used to constrain the link creation, by drag & drop or by using the palette in diagrams.
-
Name: optional, for readability is is recommended to set an easily readable name -
Local Range: mandatory, list of Strings. Each value should be the name of a type of element in the local model, e.g.LogicalFunction,LogicalComponent. Spaces and case are ignored, so enteringlogical functionis strictly equivalent to enteringLogicalFunction. It is now possible to use the name of super-types, in which case every instance of a sub-class will be accepted. For example, enteringComponentwill make this link range valid for Operational Entities as well as System, Logical, and Physical Components, because all these extend theComponentmeta-class.
-
|
Linking to Diagrams
Since v2025.2.0, to make it possible to create links between diagrams and artifacts, it is necessary to include the value |
-
Link Type: mandatory, link type to constrain. -
Impact: optional, reserved for future use, possible values:-
No impact -
Symmetric impact -
Follows link -
Opposite link
-
-
Direction Constraint: mandatory, possible values:-
Both -
Model element to artifact- This is the default value, and the only one that should be used for the time being. -
Artifact to model element
-
-
Artifact Range: mandatory, list of authorized types of artifact.
|
Link Ranges
It is necessary to configure at least one Link Range for each type of link to be created by drag and drop or copy/paste. During a drag and drop operation, Link Ranges are used to determine the possible link types between the artifact and the model element. If no link type is found according to the link ranges, then no link will be created. |
|
The only Direction constraint supported in this version is |
Artifact Store
-
Artifact Store: Root Package used as the main container for artifacts and packages in a single ArtifactRepository.
-
Name: optional, name of the package
-
-
Artifact Package: Package useful to group artifacts
-
Name: optional, name of the package
-
-
Artifact: Represents an artifact managed by a third party repository (such as a requirement, a change request, or a test case).
-
should be created when dropped or pasted from third-party server web page on an element in the model.
-
Artifacts can be freely moved into other Artifacts or Artifact packages.
-
|
Artifact Creation
Artifacts should never be created manually. Their properties cannot be modified. |
Snaphosts
-
Snapshot: Synchronization point, captures the state of links at the time of a given synchronization with the server. This is a purely technical concept.
|
Snapshot Constraints
Snapshot elements mustn’t be deleted or modified. These elements are mandatory for the publication process but they are not intended to be manipulated by the end user. Modifying or deleting snapshot or snapshot contents is not supported and should absolutely be avoided, otherwise traceability data loss or mismatches may occur. |
4.2. Creating Links by Drag and Drop
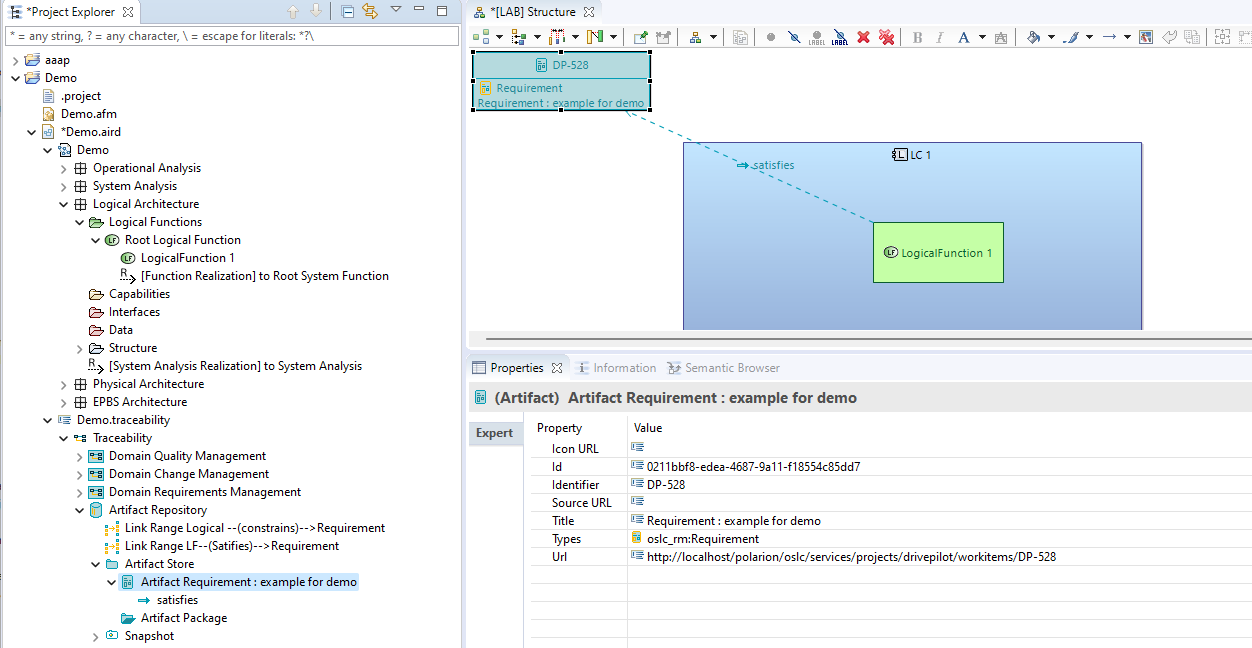
An element configured in the mappings can be dropped on a model element, either in the model tree or in a diagram. If several link ranges can apply to a drop, a selection dialog is open to select the link type to use.
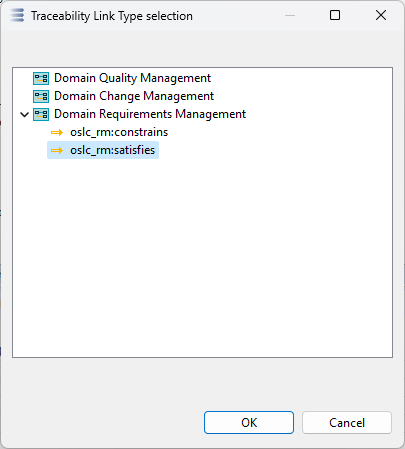
The artifact and the link are created. If the artifact was present before the drop, only the link will be created.
|
Drag and Drop Limitations
|
4.3. Creating Links by Copy Paste
An element configured as described in Mapping of URLs for Link Creation can be pasted on a model element in a diagram.
First, copy the artifact URL from a web browser (This step depends on the web browser used and the third party repository, but it should be as simple as right-click on the artifact’s URL and select 'Copy Link').
Then, select the target model element in a diagram and hit Ctrl+V (or whatever shortcut is defined for the paste operation) to paste the link.
If at least one link type is defined between the target model element and the pasted artifact, the link gets created. If several link types are defined, a selection dialog is opened to select the link type before creating the link.
|
Copy Paste Limitations
|
4.4. Creating links between Diagrams and Third-Party Artifacts
It can be interesting to add links between diagrams and third-party artifact such as Requirements or Test Cases.
Since version 2025.2.0, this is supported using either drag & drop or copy/paste.
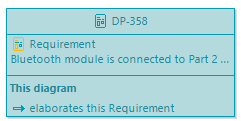
Open the diagram and drop the artifact on the diagram’s background, or copy/paste the artifact’s URL on the diagram’s background.
| Specific settings must be defined to allow links between diagrams and artifacts, as described in section Link Ranges. |
An artifact that is linked to the diagram it is displayed in will have an additional container to make it noticeable that the artifact is really linked to the diagram and not only displayed in it:
4.5. Traceability Tools in Diagrams
Traceability tools are available for all Capella diagrams. The Traceability Layer should be selected to view tools.
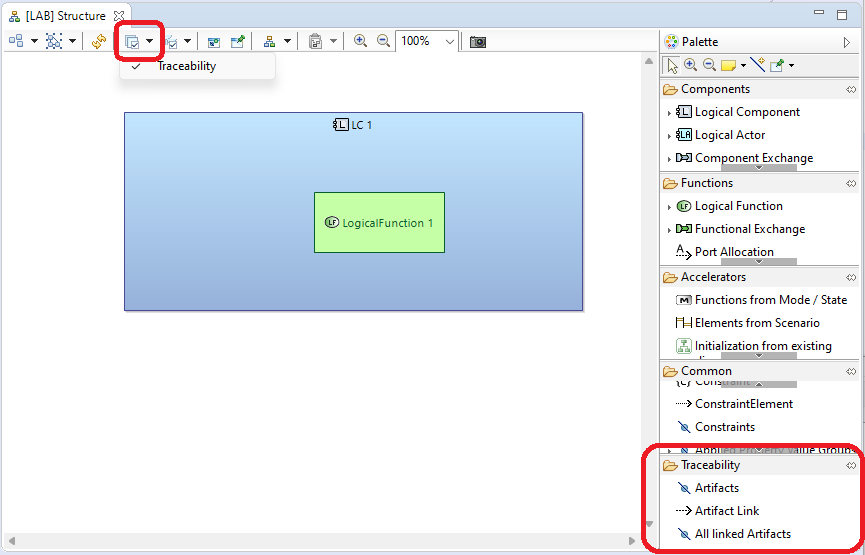
-
Tool "Artifacts" : This tool can be used everywhere in the diagram. It allow to select already created artifact to add them in the diagram. It open a selection dialog with all the artifacts present in the model.
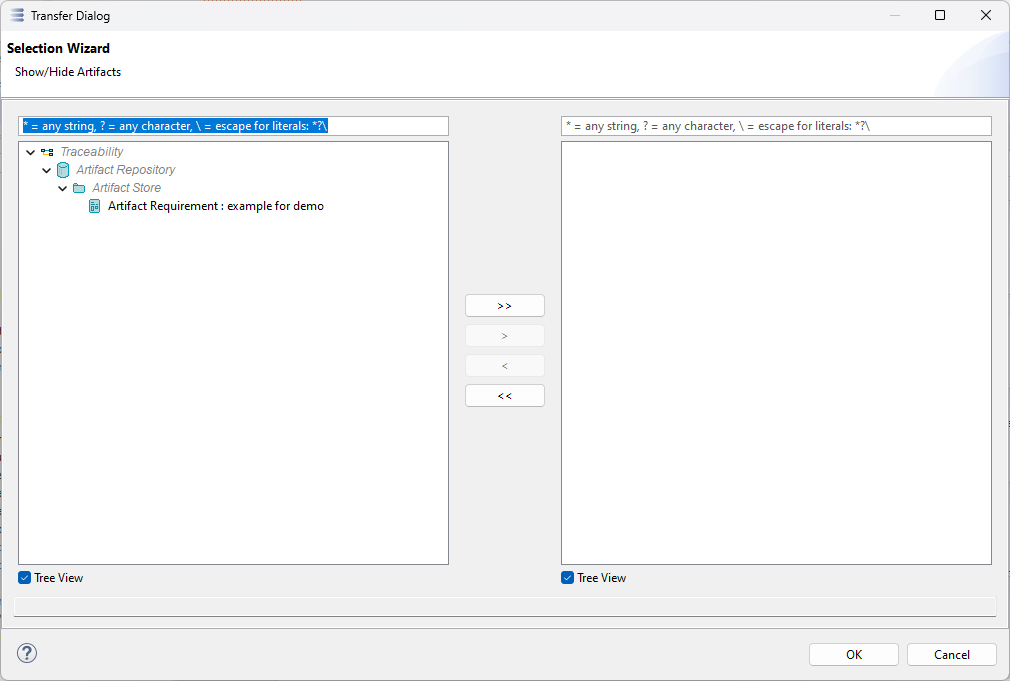
-
Tool "Artifact Link": This allow to create link between Artifact present in diagram and element. If several link types are available, a selection dialog is shown to select the type of the new link. Link creation is limited by the linkRange customization which specifies types and direction.
-
Tool "All Linked Artifacts" : Using this tool for an element present in diagram imports all the artifacts linked to the selected element.
|
Traceability Tools limitations
Traceability Tools are only present in diagrams defined in the core Capella. Additional diagrams defined by Capella extensions (such as the open-source Requirement add-on, or proprietary add-ons with their own viewpoints) will not have these tools in the Palette. Also, links between artifacts and model elements not defined in the core Capella cannot be displayed in diagrams. |
4.6. Getting Changes from the Publication Server
There is no live connection between the Contributor Client and the Publication server. It means that the contributor client is not notified when links are modified on the Publication server. To get link changes made on the server, the Contributor Client user must use the appropriate action 'Update from server':
-
Right-click on the
*.airdfile of the published model.-
The model must have been published to the server at least once before.
-
The session must be open.
-
-
Select 'Update from server'.
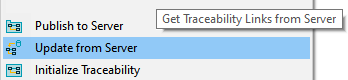
A progress bar will appear while the Contributor client retrieves the link data from the Publication server.
If no modification has been made on the server, then a message will be displayed:
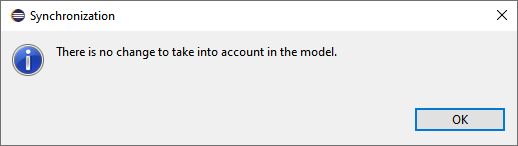
If there are differences, then a dialog will be displayed to show the differences and apply them to the Capella model.
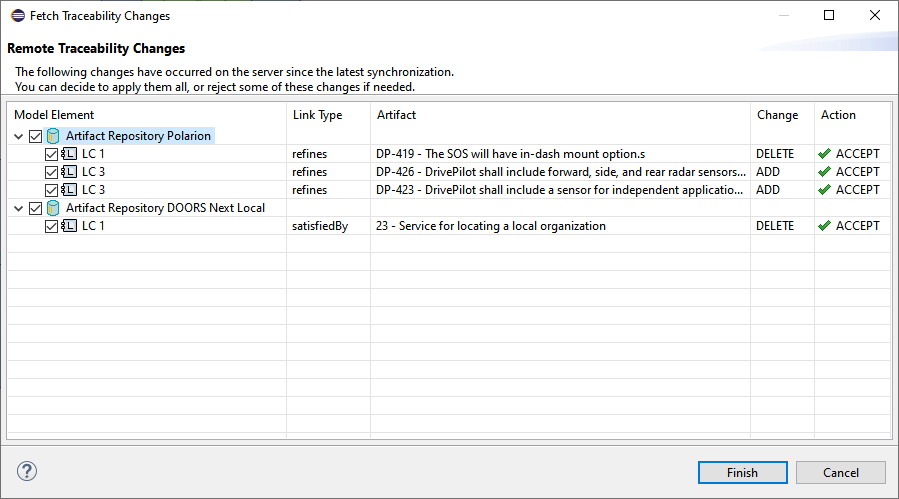
This dialog shows all the changes that have happened on the Publication server since the last synchronization between the Capella environment and the Publication server.
The changes are grouped by repository, in case several remote repositories are involved.
|
Traceability and Repositories
Only the repositories that are configured in the Traceability model are considered for link synchronization. If links are created online to or from a friend server that is not configured as an Artifact Repository in the model, these links won’t be retrieved in the model. If links are missing because their repository is not configured, the missing repository can be added using the Initializing Traceability Model action. The next 'update from server' will then also take added repositories into account, and retrieve all the links involving this repository. |
Within each repository, each line represents a link modification: Addition or deletion.
In this dialog, the user can do the following actions:
-
Cancel: This cancels the update, none of the remote changes received from the server are taken into account in the model.
-
Finish: This applies the selected changes to the model and stores a new synchronization point.
-
Accept or reject a change: Changes can be individually rejected or accepted. All the changes received are accepted by default. The user can uncheck the box in front of a link change to 'reject' this change.
-
Accepting a change means that this change will be taken into account in the Capella model.
-
However, new links will not appear in diagrams. For that, users need to use the relevant palette tool in the diagrams where they want to display the new link (if any).
-
Deleted links will be removed from diagrams the next time the diagram is opened.
-
-
Rejecting a change means that this change will:
-
NOT be taken into account in the Capella model.
-
Be reverted on the server the next time the model is published:
-
If the link has been created on the server, the next publication will delete it.
-
If the link has been deleted on the server, the next publication will recreate it.
-
-
The following screenshot shows an example where the user accepts 2 changes and rejects the 2 others.
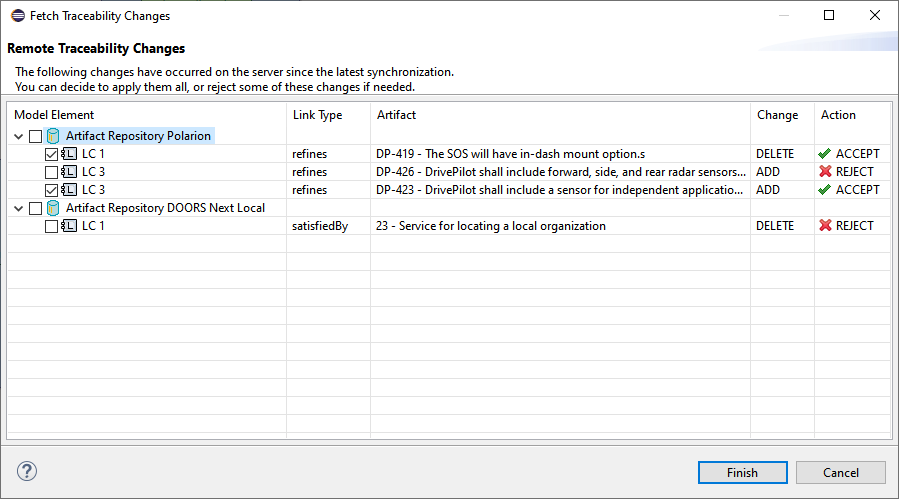
|
Update link
|
4.7. Refreshing Artifacts
The Oslc links displayed and stored in Capella are updated only when requested by the user. For performance reasons, the artifact data (especially their titles) are not updated during these link update operations.
However, it is possible to update a single artifact or all the artifacts of a single repository independently from the links.
In Capella, right-click on an Artifact or Artifact Store in the model tree (in the traceability model), or on an Artifact in a diagram, then select 'Update from server'.

It will trigger the update of the remote resource in both the Publication server and Capella. This should only be useful when the remote artifact’s title has been modified.
4.8. Import / Export Traceability Settings
The traceability settings of a given model can be reused in another. Only the settings aspects of the traceability model will be reused: repositories, domains, link ranges. Snapshots, target model URI, OSLC configuration, are ignored when importing traceability settings.
When initializing the traceability for a model it is possible to import existing settings directly from another model.
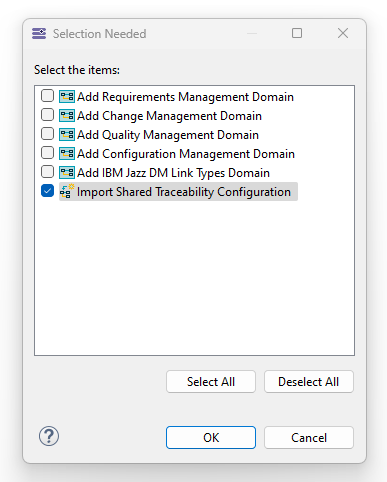
The dialog displays all the traceability files available within the current workspace.
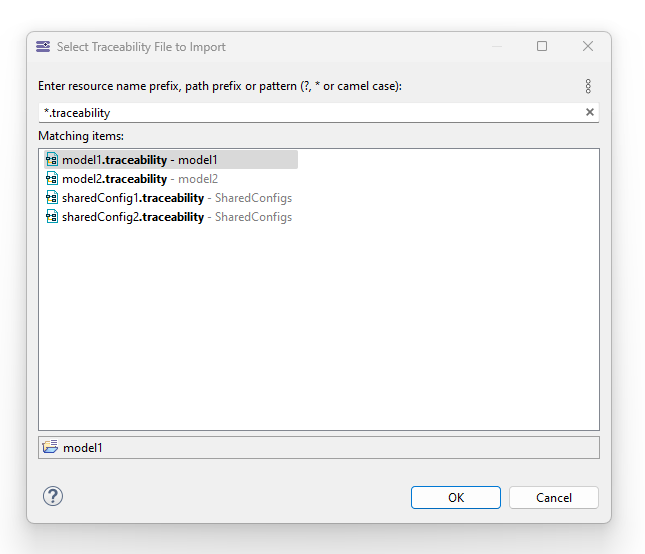
To export traceability settings, right-click on the *.traceability file and click on the 'Export traceability Settings' action.
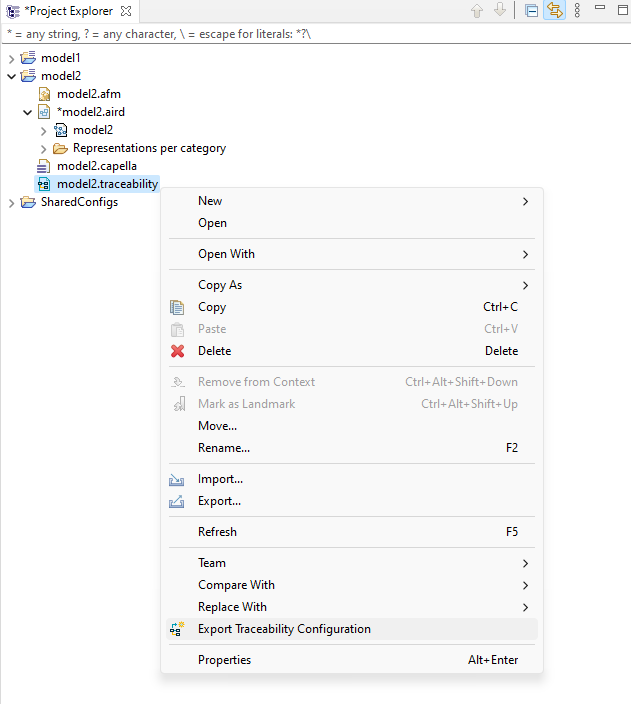
Exported traceability models only contain settings and can safely be shared between users and teams to facilitate the initialization of traceability in Capella models.
5. Publishing a Model
Publishing a Model is the operation of sending the model data to the Publication Server, where it will become available for browsing and linking with third-party artifacts.
| Before publishing, it is necessary to configure at least on Publication server. Refer to section Publication Servers for more details. |
Three distinct cases are supported:
-
Publishing a new Model (the model does not exist yet on the Publication Server). See Publish for the First Time.
-
Publishing an update of Model (the model already exists on the Publication Server). See Publish an Update of a Model.
-
Publishing an update of a Model published with an older version of Publication For Capella (Any version prior to 2022.9.0). See Publish an Update of a Model of a Previous Publication For Capella Version.
5.1. Publish for the First Time
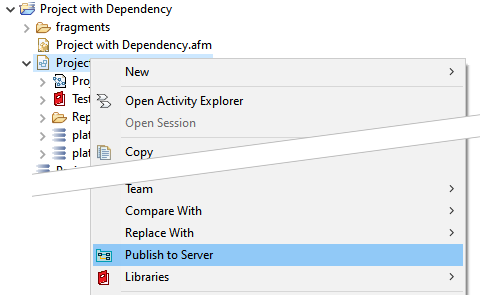
The publication of a model is triggered by right-clicking on the session file *.aird in the project Explorer.
The session must be opened beforehand, by double-clicking on the *.aird file.
The publish menu is not available if the session is not open.
|
The menu is labeled  'Publish to Server'.
-
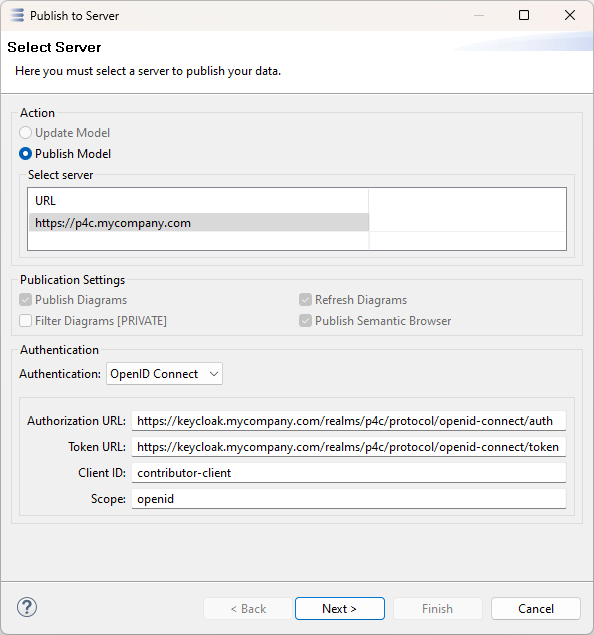
Select the Publication Server to which the model should be published. Enter the credentials if needed:
-
Click on 'Next >'.
-
The next page displays the projects available for publication:
-
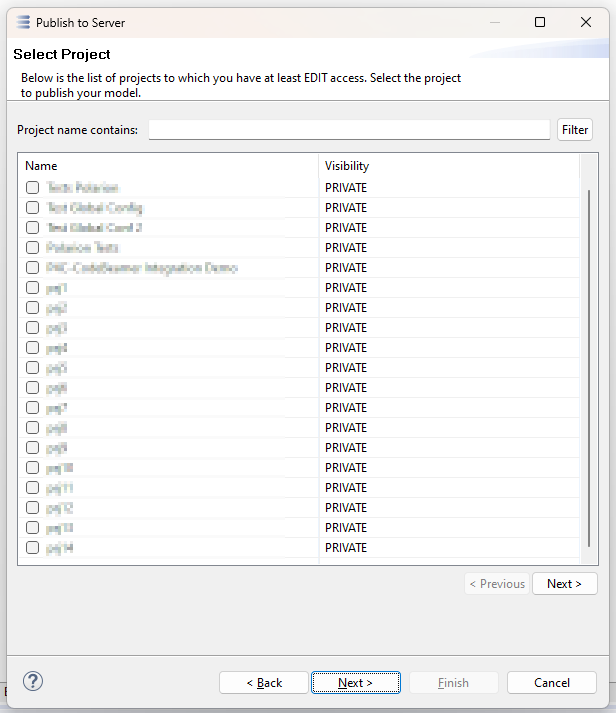
The list of projects is paginated. It can be filtered with the input at the top and the button 'Filter'. The next or previous page of available projects can be obtained by clicking on the buttons at the bottom of the project list.
| Only the projects to which the user has EDIT access are displayed. If no project is displayed, then publication cannot proceed. Contact the manager of the targeted project to obtain EDIT access. |
-
Click on 'Next >'.
-
The user is prompted to publish a new model.
-
It is recommended to enter a proper description for the model to publish. This is the description that will be used in the [model-nav].
-
Enter a commit message, that will appear in the model history (mandatory).
-
-
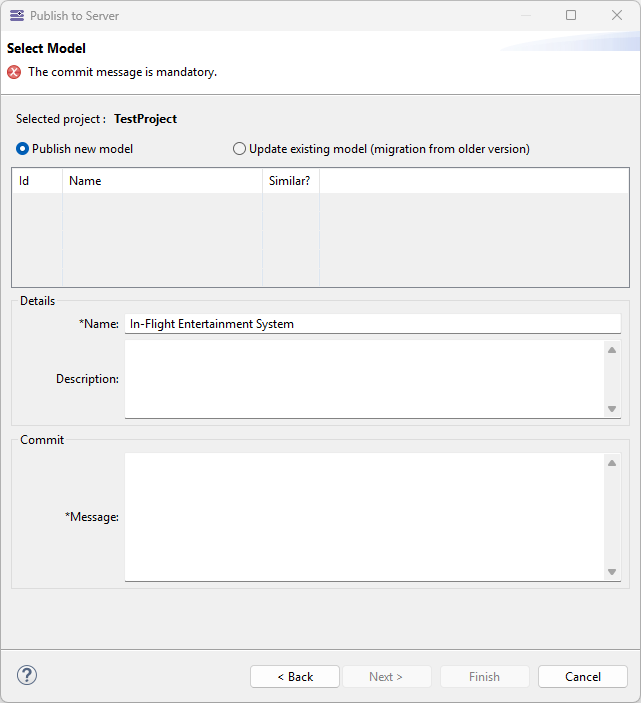
| If at least one similar Capella model already exists on the Publication Server, the user is prompted to update an existing model, by default the latest similar model that was updated on the server. This is supposed to be used only in the case of a migration from a previous version of Publication For Capella. This makes it possible to 'reconnect' a model published with a previous version of Publication For Capella to the local model. See Publish an Update of a Model of a Previous Publication For Capella Version for more details. |
-
Click on 'Finish'. The publication starts.
-
Depending on the size of the model, it may take from a few seconds to several minutes to send all the publication data to the server.
-
After the publication data upload is finished, a background process will wait for the publication result. The server will schedule a publication job.
-
On the server side, the jobs page will show the progress of the publication job.
-
Once the job is complete, its label becomes a clickable hyperlink which leads to the published model. The client is notified of the result (success, warning or error) of the publication through a dialog.
-
-
Save the Sirius session to keep track of the Publication traceability information in the local model.
5.2. Publish an Update of a Model
Models that have been published once to a Publication Server are 'connected' to this server, and keep track of that connection.
This connection information is stored in the Sirius session file (the *.aird file).
This makes it easier to publish updates of this model.
This also makes it possible to navigate easily from any model object, including diagrams, to their Publication counterpart. See Navigating from Capella to the Publication server for more details.
To publish an update of a previously published model, just use the same menu as for any publication. This opens the publication wizard.
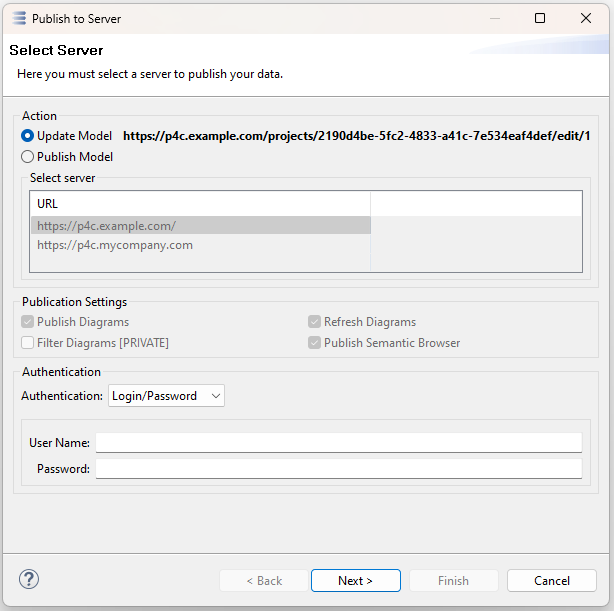
-
On the first page of this wizard:
-
Enter the relevant credentials if needed;
-
Decide whether diagrams must be published;
-
Decide whether semantic browser links must be published.
-
Click on 'Next >'.
-
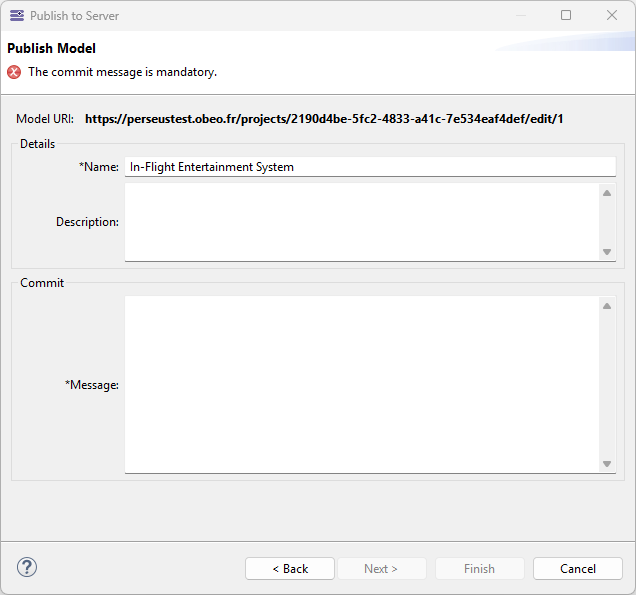
-
On the second page:
-
Modify the name of the model to publish if needed (or leave it as it is)
-
Enter a useful description for that model.
-
Enter a commit message, that will appear in the model history (mandatory). A warning is displayed if the description is blank because a useful description is recommended.
-
Traceability Links are automatically taken into account and published to the server.
Once the publication result has been received a popup indicates if it was successful or if anything went wrong. If an error occured the publication will be dismissed. If the publication resulted in some links being somehow invalid, a warning will indicate that an action must be performed in the server (see [fix-invalid-links] for more details).
5.3. Publish an Update of a Model of a Previous Publication For Capella Version
This section only makes sense if you were previously using Publication For Capella 2022.3.0, and your Publication environment (servers and clients) has been upgraded to the latest version.
In that case, the Capella models contain no information about their Publication counterpart. To 'reconnect' a project to its Publication counterpart, you must publish it again with the latest version of Publication For Capella.
To publish an update of a previous version model, just use the same menu as for any publication. This opens the publication wizard.
The first step and second step are identical to the Publish for the First Time use-case.
On page 3 of the wizard, the tool should detect that there is an existing model that corresponds to the model you are publishing (See the note on model similarity below). If the tool does not detect that automatically, the user can force the update by selecting the second option labeled 'Update existing model (migration from older version)'
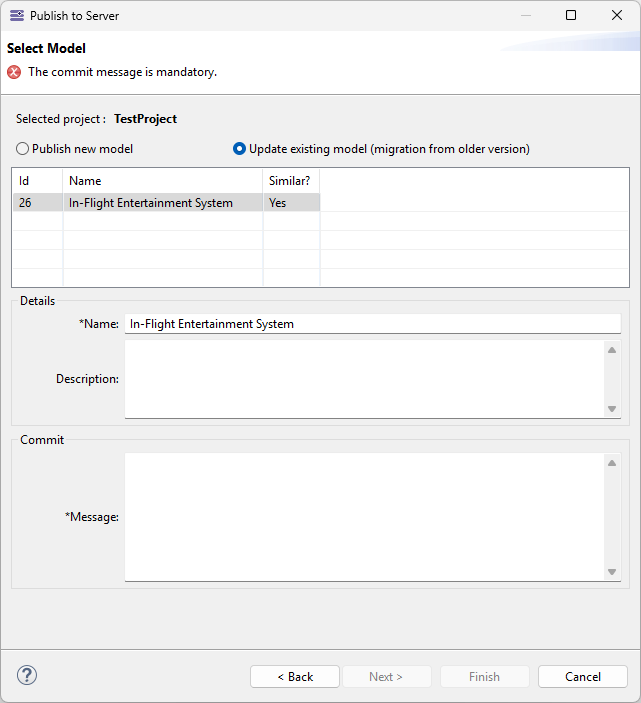
Click on 'Finish' to launch the publication as usual.
Once that is done, the Sirius session is updated with traceability information and the new Contributor Client features are active for that project, especially the navigation feature. As usual, save the Sirius session to keep track of the Publication traceability information.
|
Incompatibility with Traceability
The process described here must NOT be used with a model that has traceability links. A given Model that contains traceability information must always be published to the same URL in order to always update the same data and not break, duplicate, or corrupt traceability information. |
|
Model Similarity
Similarity is determined by comparing the technical identifiers of the root model objects. That way, two distinct Capella models created independently will never be considered similar. Similar models would rather be different versions of the 'same' Capella model. It is possible to publish any number of similar models, but then the only way to distinguish between them will be the creation date, last update date, and description. |
5.4. Latest Synchronization
The traceability model keeps track of ongoing publications and the latest successful publication or update. The latest synchronization point can be visualized inside of the traceability model.
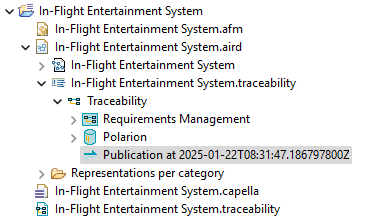
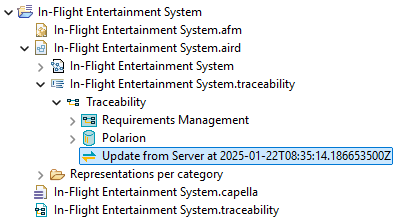
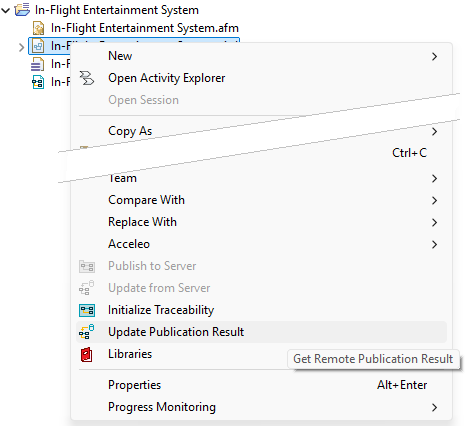
| If for some reason the contributor client was closed before a publication ended, on reopening the traceability model will still be waiting for the publication result. To get out of that state, an 'Update publication result' action will fetch the publication result and set the latest publication accordingly. |
6. Navigating from Capella to the Publication server
Once a model has been published, it is possible to easily navigate from a model element of this model to its online counterpart.
Right-click on any model element, in the Model Tree or in a diagram, and select 'Show in Publication'. That will open the system web browser on the relevant URL on the Publication website.
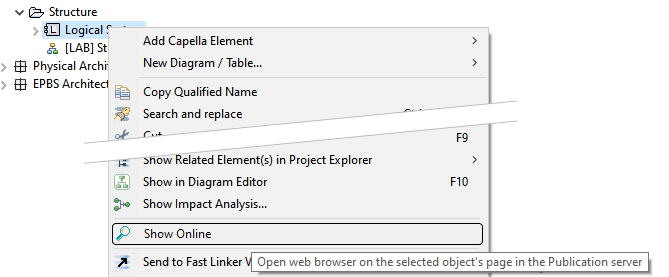
| The user will have to login if they don’t have an active session on the Publication Server on that web browser. |
7. Semantic Browser Additions
7.1. Traceability in the Semantic Browser
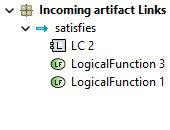
Publication For Capella adds a button on the top right of the semantic browser to activate the display of traceability-related elements.

Once this button is activated, traceability information is displayed in the semantic browser.
7.2. Improved Property Values in the Semantic Browser
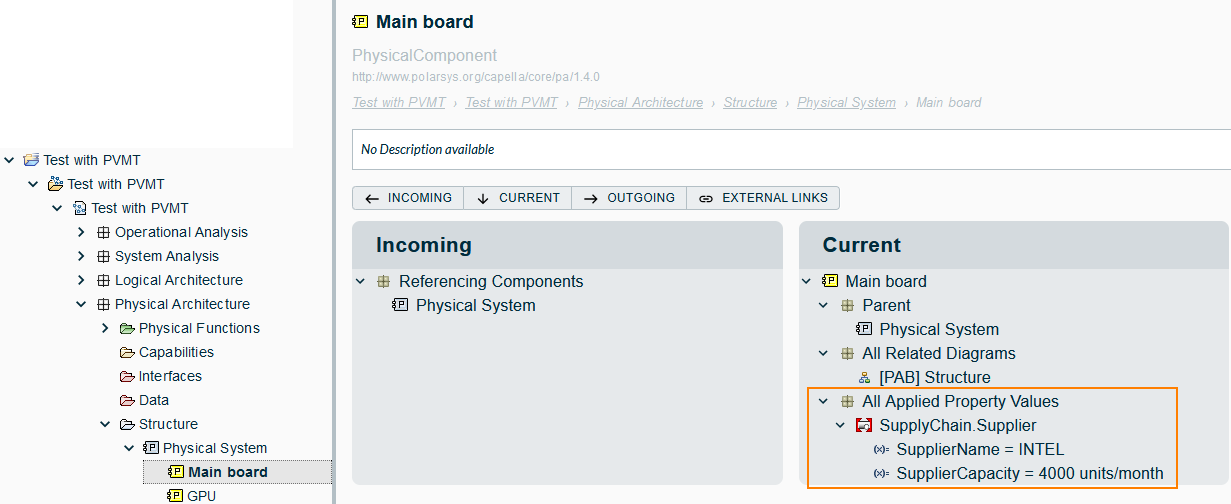
Publication For Capella introduces a specific category in the semantic browser to display all the applied property values of an object in a way that is compatible with the PVMT Capella add-on.
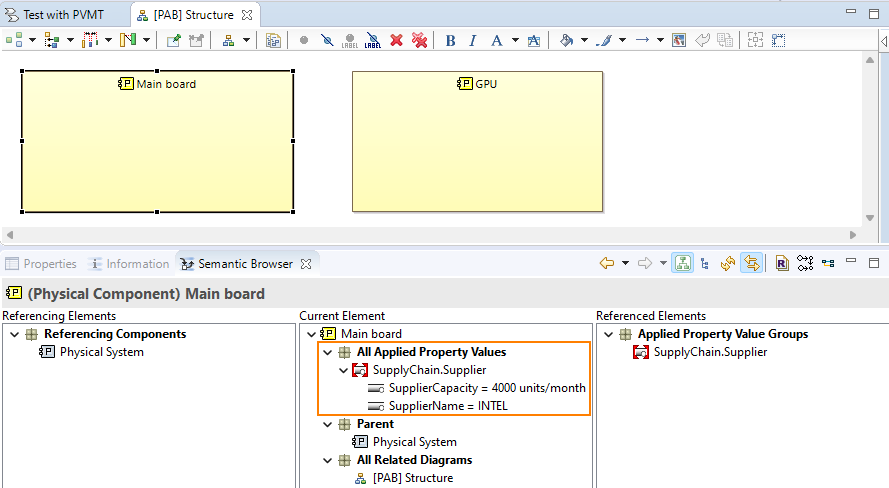
This provides more information than the standard semantic browser support of property values (visible on the right of the picture for instance). This information is also published to the server so that people who access models online can easily see which property values are applied to a model element.
8. Contributor Client System Properties
This section lists the system properties that can be used to configure the Publication For Capella contributor client.
These system properties can be set in the file *.ini of the installation folder of Capella (or other eclipse-based bundle) where the contributor client is installed.
To set a property in the capella.ini file, locate the line -vmargs and below this line, add a line for each desired property with the syntax -Dmy.property.key=desired value.
For instance, to set the property fr.obeo.perseus.oauth2.local.server.port to 55555 ((…) indicates the possible presence of additional lines):
-startup
plugins/org.eclipse.equinox.launcher_1.6.400.v20210924-0641.jar
(...)
-vmargs
(...)
-Dfr.obeo.perseus.oauth2.local.server.port=55555
(...)
They have sensible default values and must only be set if the default values don’t work.
| Property key | Default value | Description |
|---|---|---|
|
5000 (5 seconds) |
The interval in milliseconds to poll the publication server when a publication is in progress to obtain the publication result. |
|
|
Name of the local server that is use locally to retrieve that OAuth-2.0 authentication token. |
|
|
Port to use for the local server launched by the contributor client to handle the OAuth-2.0/OpenID Connect authentication. |
|
|
Timeout in milliseconds of the OAuth-2.0/OpenID Connect login. |
|
|
Set this to |
9. Batch Publishing
The Publication For Capella Contributor Client can be run from a command line to launch the publication of a Capella model.
9.1. Launching the Publication Application
The publication command line tool is a headless Eclipse Application (fr.obeo.perseus.client.publisher) integrated in the Publication For Capella Contributor Client.
It can be launched using the capella executable with the following parameters:
-
-application: fr.obeo.perseus.client.publisher -
-data: The path to the workspace -
-airdPath: The path to the aird file within the workspace -
-commitMessage: The publication commit message -
-p4cLogin: The Publication For Capella contributor user login -
-p4cPassword: The Publication For Capella contributor user password -
-serverURI: (Optional, in case of first publication) The target Publication For Capella server URI -
-projectId: (Optional, in case of first publication) The target Publication For Capella project ID -
-timeoutSeconds: (Optional) Maximum time to wait for a server response (Default: 300 seconds)
| This application requires a login/password account. The account must be created by a server administrator and have a valid contributor license. The account must also be granted contributor access to the target Publication For Capella projects. For now the batch publishing application does not support OIDC accounts. The destination project inside the Publication For Capella server must already exist. |
./capellac --launcher.suppressErrors -nosplash -console -consoleLog \
-application fr.obeo.perseus.client.publisher \
-data workspace_path \
-airdPath capella_project/capella_project.aird \
-commitMessage "commit message" \
-p4cLogin login \
-p4cPassword passwordcapellac.exe --launcher.suppressErrors -nosplash -console -consoleLog ^
-application fr.obeo.perseus.client.publisher ^
-data workspace_path ^
-airdPath capella_project\capella_project.aird ^
-commitMessage "commit message" ^
-p4cLogin login ^
-p4cPassword password9.2. Publishing a Team for Capella model
The batch publication tool can be used in a Team for Capella context, for instance to regularly publish a Capella model shared on a Team for Capella server.
A template script in TeamForCapella/tools provides a way to achieve this: publisher_p4c_from_t4c.bash / publisher_p4c_from_t4c.bat.
The script imports a Team for Capella model then publishes it using an auxiliary publisher_p4c.bash / publisher_p4c.bat script.
To use it, the auxiliary publisher_p4c script needs to be modified to include the Team for Capella server license key:
-DOBEO_LICENSE_SERVER_CONFIGURATION=<To set in T4C context>Then the publisher_p4c_from_t4c can be used to publish Team for Capella models.
As-is, the template script is based on variables that need to be set before calling the script (or be set within the script):
-
MODEL_NAME: The name of the capella project to publish -
ROOT: The path to the capella folder containing the capella executable -
WORKSPACE: The path to the workspace -
T4C_REPO_NAME: The Team for Capella repository name -
T4C_HOST: The Team for Capella server host -
T4C_PORT: The Team for Capella server port -
T4C_USER: The Team for Capella user login -
T4C_PASSWORD: The Team for Capella user password -
P4C_COMMIT_MESSAGE: The publication commit message -
P4C_USER: The Publication For Capella contributor user login -
P4C_PASSWORD: The Publication For Capella contributor user password
export MODEL_NAME=ModelName
export ROOT="C:/Programs/capella"
export WORKSPACE=tmp_workspace
export T4C_REPO_NAME=repoCapella
export T4C_HOST=localhost
export T4C_PORT=2036
export T4C_USER=admin
export T4C_PASSWORD=admin
export P4C_COMMIT_MESSAGE="Automatic commit"
export P4C_USER=batchuser
export P4C_PASSWORD=passwordset MODEL_NAME=ModelName
set ROOT="C:\Programs\capella"
set WORKSPACE=tmp_workspace
set T4C_REPO_NAME=repoCapella
set T4C_HOST=localhost
set T4C_PORT=2036
set T4C_USER=admin
set T4C_PASSWORD=admin
set P4C_COMMIT_MESSAGE="Automatic commit"
set P4C_USER=batchuser
set P4C_PASSWORD=password10. Known Limitations in the Contributor Client
-
The client does not publish tabular representations (such as tables and cross-tables), only diagrams can be published;
-
When opening the web browser after publication, the user will not be automatically logged in;
-
If there is no open session on Publication in the browser, the user will be prompted for credentials.
-
-
Initializing a Traceability model must be done with registered initializers. Traceability models can be edited easily to be adapted to the mapping. Create the model with the menu
File\new\other\Example EMF Model Creation Wizards\Traceability Modelmust not be used. The model will not be fully initialized and will not be connected to the Capella model. In this case all actions will fail. -
Dropping a URL for link creation requires:
-
An initialized Traceability model.
-
That the model was already published to Publication For Capella.
-
Dropping from Jazz Quality Manager is not supported yet.
-
-
Before updating model from server, all the link types and artifact types used in the Publication For Capella server must be created in the Traceability model. If types are missing, the Update might fail.
-
There is no automated way of aligning the OSLC linking settings of the Publication server and the Traceability settings of a Traceability model.
-
Depending on the Capella version where the Contributor Client is installed, diagrams may be improperly displayed and/or exported during publication. In such a case, the currently recommended workaround is to restart Capella with a display resolution set to 100%, and only change the screen resolution once Capella has properly started. See https://forum.mbse-capella.org/t/diagram-graphics-problem/6681 for more details.
-
When used within a Team for Capella bundle, the contributor client may cause errors when closing a Capella model session. The symptom is that in the Project Explorer view, the node
*.airdwill still display children nodes even though the session is actually closed. The Error Log will contain messages likeorg.eclipse.net4j.util.lifecycle.LifecycleException: Not active: CDOTransactionImpl. However, this problem does not imply loss of data or data corruption. The only known workaround is to close and reopen the project explorer view. This issue is fixed from Capella version 7 and the associated Team for Capella release. -
CodeBeamer Integration Limitations:
-
The URLs of CodeBeamer artifacts do not contain any information about the project that contains these artifacts. Consequently the integration is currently limited to being used with only one CodeBeamer project for a given Capella model.
-
CodeBeamer does not provide the correct URL for its artifacts, which prevents the action 'Show online' from working properly on CodeBeamer artifacts.
-